If you’ve ever lain in bed staring at that big blank wall above your headboard and felt a tiny pang of “blah,” you’re in exactly the right place. I’ve been there — more times than I care to admit. The wall over your bed is prime real estate for personality, texture, and a daily dose of happy. But store-bought art can feel impersonal (and expensive!), and filling that space with just anything never quite scratches the itch. That’s why I’m absolutely thrilled to share 15 bed wall decor DIY art ideas that are totally doable, brimming with charm, and packed with your own creative fingerprint.
In this post, I’m going to walk you through each project as if we’re sitting together with a cup of tea, sketching ideas on a napkin. I’ll tell you why each idea works, what you’ll need, a few little secrets to make it shine, and how to make it yours. Whether you’re into soft boho texture, crisp modern lines, or whimsical romance, there’s something here that’ll make your bedroom wall whisper (or sing) your name. Ready to transform that blank space into a soulful sanctuary? Let’s dive into these DIY art adventures.
Table of Contents
- 1 1. Oversized Macramé Dream Catcher Wall Hanging
- 2 2. Botanical Pressed Leaf and Flower Gallery
- 3 3. Textured Abstract Canvas Trio with DIY Spackle Art
- 4 4. Floating Shelf with Mini Art Vignette
- 5 5. Woven Yarn Tapestry on a Driftwood Branch
- 6 6. Giant Crepe Paper Flower Wall Installation
- 7 7. Gold Leaf Accent Minimalist Canvas
- 8 8. Personalized String Art Constellation
- 9 9. Upcycled Vintage Window Frame Photo Display
- 10 10. Removable Watercolor Wash Wall Mural
- 11 11. Fabric-Covered Acoustic Panels as Art
- 12 12. Driftwood and Air Plant Sculpture
- 13 13. Decoupage Quote on Reclaimed Wood
- 14 14. Embroidery Hoop Gallery Wall
- 15 15. LED Neon-Inspired Wire Word Art
- 16 Bringing It All Together: Your Wall, Your Story
1. Oversized Macramé Dream Catcher Wall Hanging
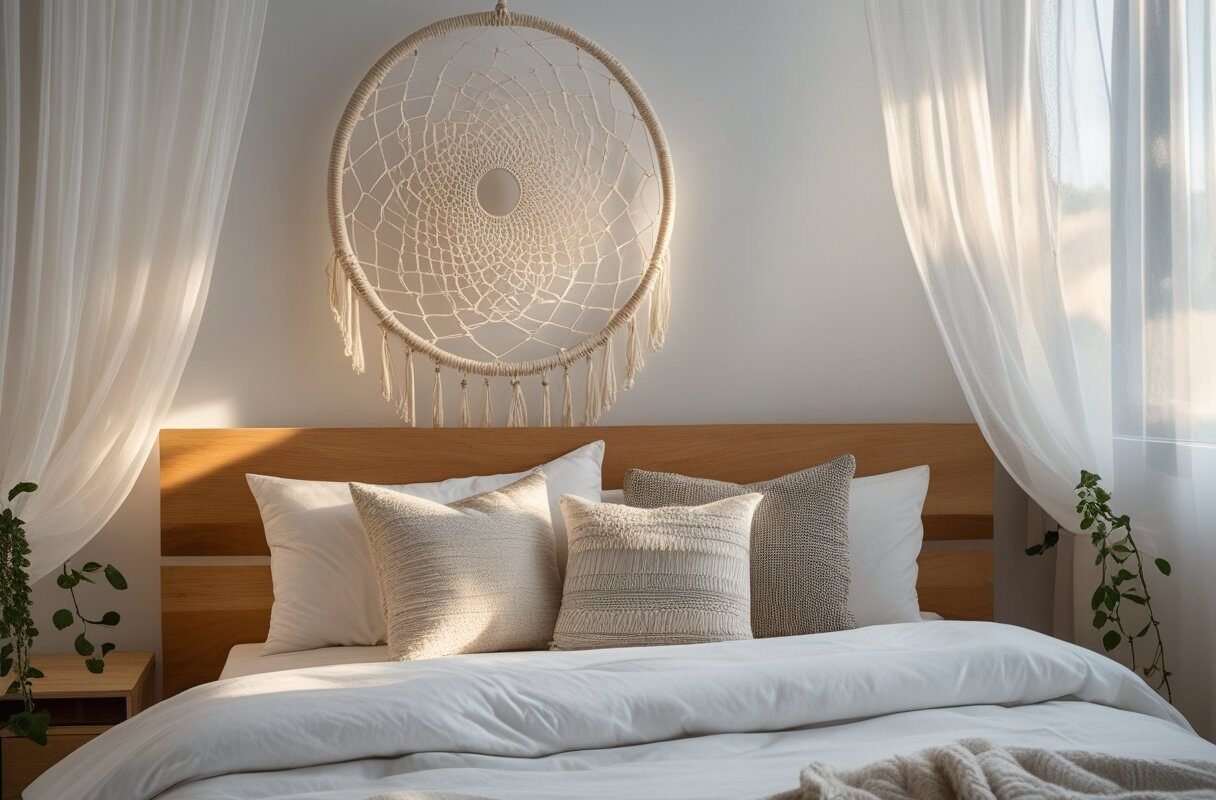
There’s something about macramé that feels like a warm hug from the ’70s, yet it’s totally current in a modern bohemian bedroom. An oversized piece above the bed creates instant softness and vertical drama. And when you shape it like a dream catcher, you add a layer of symbolism — perfect for the place where you rest and dream.
To make this, you’ll need a large metal or wooden hoop (24–36 inches wide), several bundles of cotton macramé cord in a natural cream or soft blush, and some wooden beads for accent. Begin by wrapping the hoop tightly with cord so no metal shows. Then cut lengths of cord about three times the desired hanging length. Attach them to the bottom half of the hoop using a lark’s head knot. Now the meditative part: work simple square knots and spiral knots to create a dense web of fringe. Drop beads onto some strands as you go for a subtle sparkle. Leave the top half of the hoop open, and add a few long feathered fringes dangling from the center and sides. I like to incorporate a tiny macramé leaf or two for an organic touch.
The beauty of this piece is its movement — even the slightest breeze from an open window makes it sway gently. It anchors a bed beautifully, especially with neutral bedding and a chunky knit throw. To hang, use a decorative nail or a clear hook fixed securely in the wall. The texture softens hard walls and introduces a crafty, handmade vibe that says “I curated this space with love.”
2. Botanical Pressed Leaf and Flower Gallery
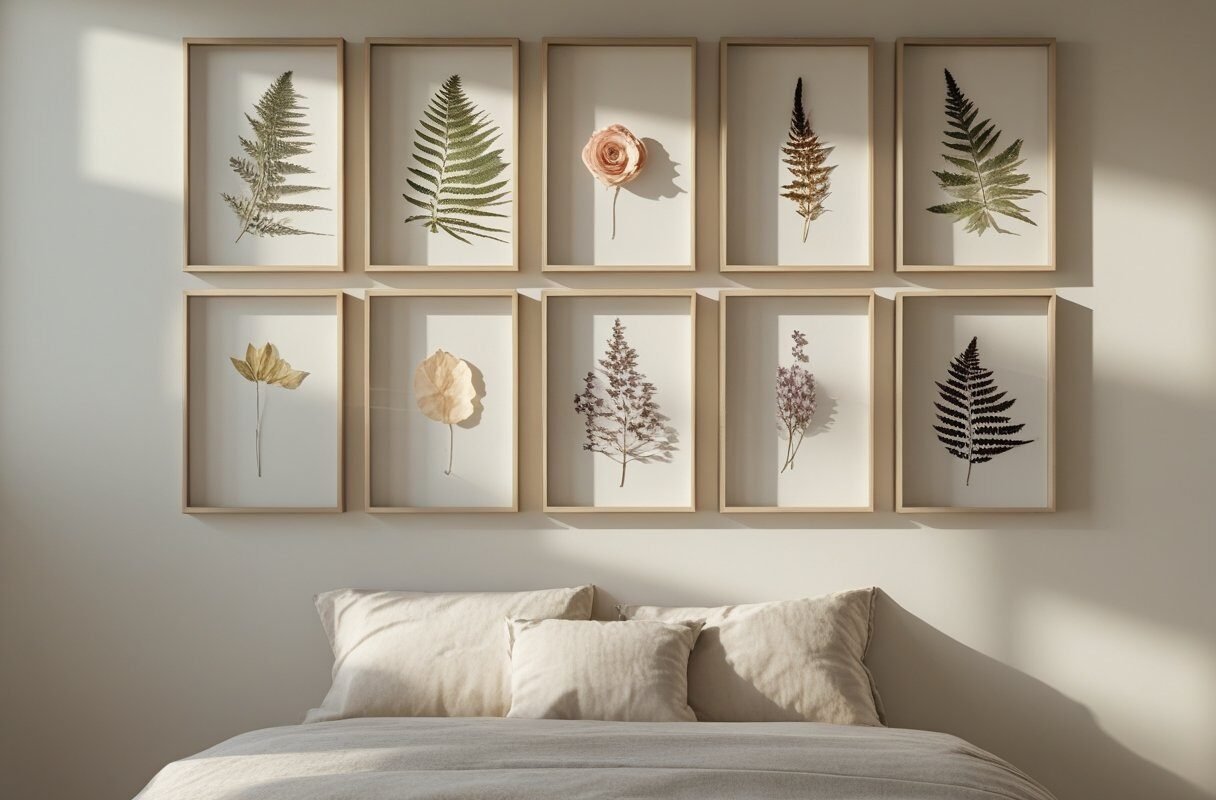
If you’re a nature lover, nothing beats the delicate elegance of real pressed botanicals. A gallery of floating frames filled with fern fronds, dried wildflowers, and eucalyptus leaves turns your wall into a love letter to the outdoors. I started pressing flowers from my own garden years ago, and seeing them framed above my bed feels like preserving a meadow forever.
You’ll need a flower press or heavy books, parchment paper, and patience. Gather leaves and blooms that are relatively flat: ferns, pansies, Queen Anne’s lace, lavender sprigs. Press them for two to three weeks until completely dry. Then arrange them on a plain white or off-white backing paper. For a modern look, use a set of matching frames — black, light wood, or gold — with a double glass or a floating frame style so both sides are visible. Aim for an odd number of frames: three vertical frames lined up, or a grid of nine small squares. Before you close the frame, fix the botanicals with a tiny dab of acid-free glue stick.
What I adore about this idea is how it changes with the light. At different times of day, the shadows of petals and stems play across the wall. It’s a quiet, soulful statement. You can even add tiny handwritten labels with the botanical names for a vintage apothecary feel. Just make sure the frames aren’t too heavy, and use proper wall anchors.
3. Textured Abstract Canvas Trio with DIY Spackle Art
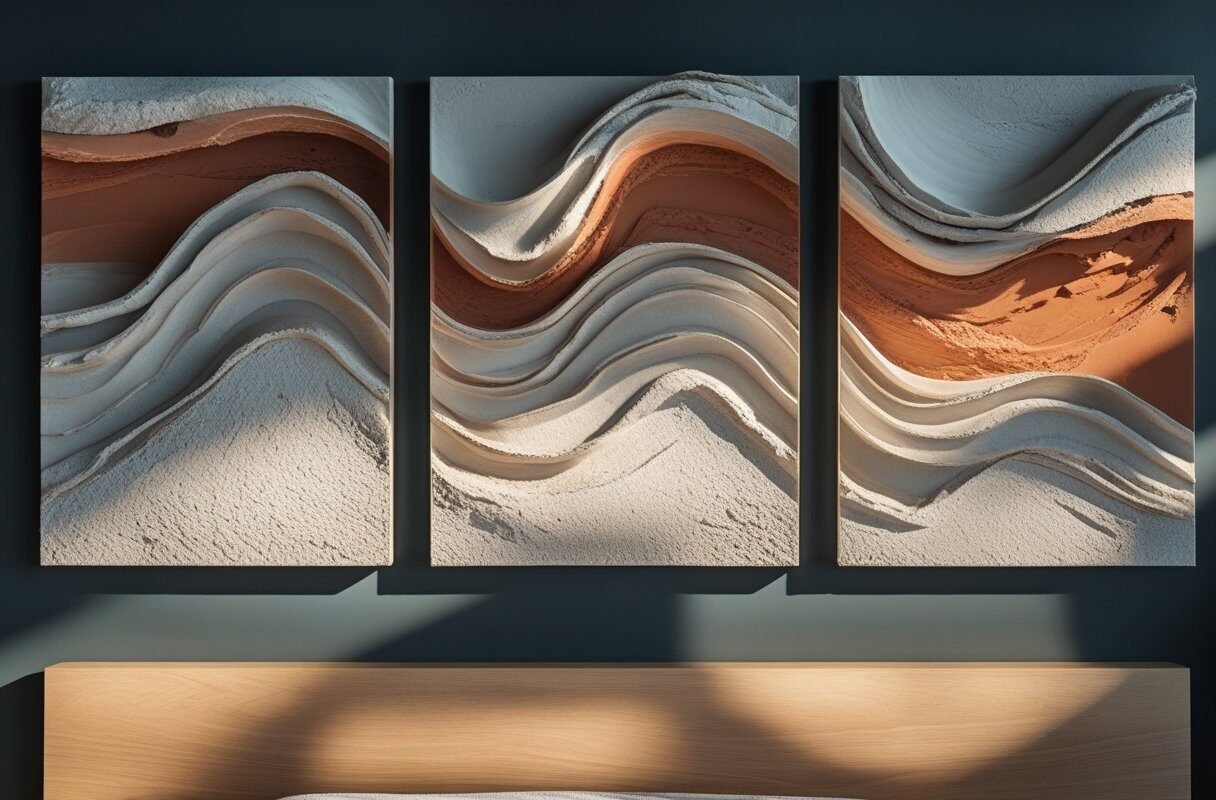
If you crave something utterly unique and sculptural, spackle (yes, the stuff for fixing walls) is your new best friend. Creating a set of three canvases with heavy, impasto-like texture gives you a gallery-worthy abstract that feels expensive but costs pennies. The best part? No painting skills required.
Grab three canvases in a size that fills the width of your bed — for a queen, try 16×20 inches each. You’ll need lightweight spackling paste, a palette knife or old credit card, and acrylic paint in a muted palette: think ivory, blush, terracotta, or sage green. Mix the paint directly into the spackle to tint it, or apply color after the texture dries. With the palette knife, slather the paste onto the canvas in sweeping arcs, starbursts, or organic swirls. Create ridges, peaks, and valleys. Let it dry completely, which might take 24 hours. Then you can dry-brush a contrasting color over the high points to highlight the dimension, or leave it monochromatic and serene.
Hang them in a row with equal spacing, or stack them vertically if you have a tall wall. The light will catch every groove, making the artwork feel alive. I love how forgiving this is — you can scrape off a mistake and rework it. It’s tactile art you’ll want to touch, and it instantly turns a flat white wall into a focal point of interest.
4. Floating Shelf with Mini Art Vignette
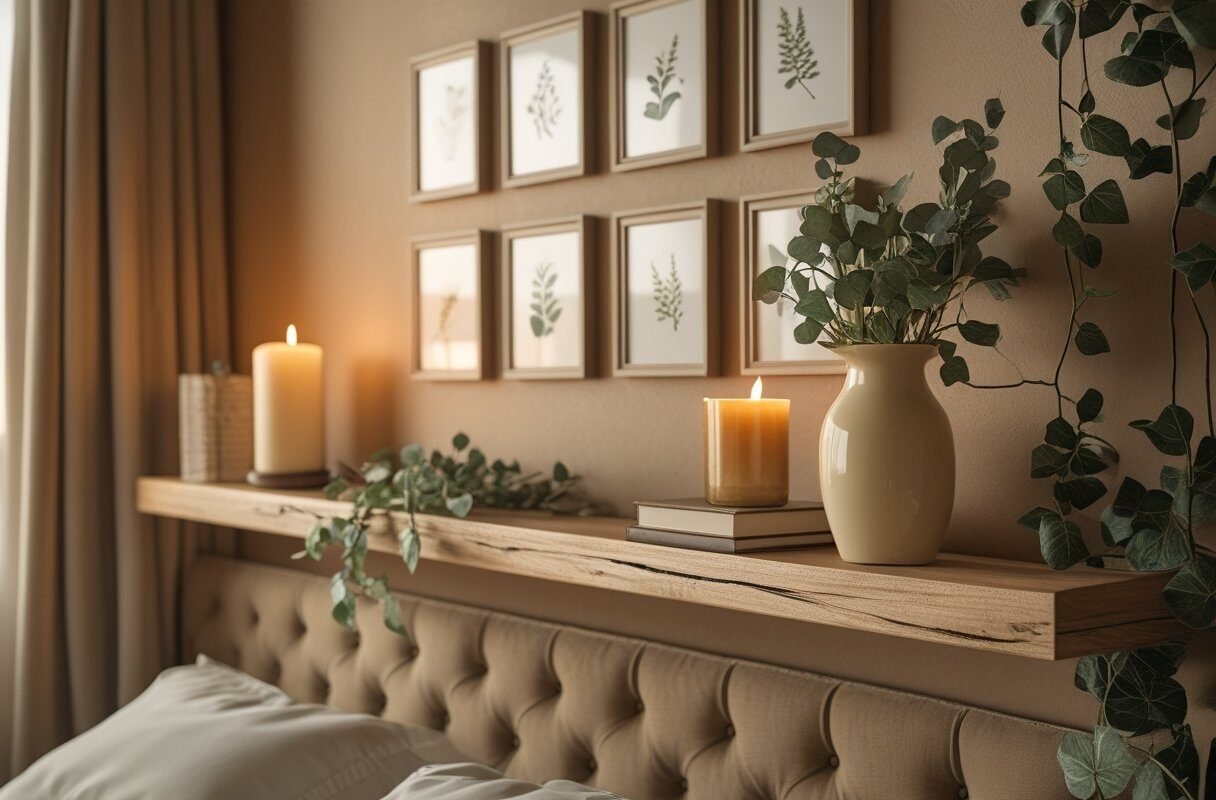
Sometimes the best bed wall decor isn’t a single piece of art but a curated shelf that lets you change things on a whim. A slim floating shelf installed 8–12 inches above your headboard becomes a stage for a rotating gallery of tiny prints, small sculptures, and living greenery.
Pick a shelf that’s at least as wide as your headboard or a bit shorter for asymmetry. Stain or paint it to match your room’s trim. Mount it securely with brackets into studs, because you’ll be leaning precious things on it. Now the fun: gather 5–7 pieces that tell a story. I like to use a mix of small framed prints (4×6 or 5×7), a mini vase with a single stem, a candle, a ceramic bird, and a small stack of beloved books lying flat. Lean the frames against the wall, layering them slightly so they overlap. Add a trailing plant like a string of pearls at one end to cascade down.
This idea works brilliantly because it adds depth and lets you swap out art seasonally. A little Halloween ghost print in October, a pressed flower for spring. The shelf itself becomes part of the art. Just remember to leave breathing space — don’t overcrowd it. The negative space between objects is as important as the objects themselves.
5. Woven Yarn Tapestry on a Driftwood Branch
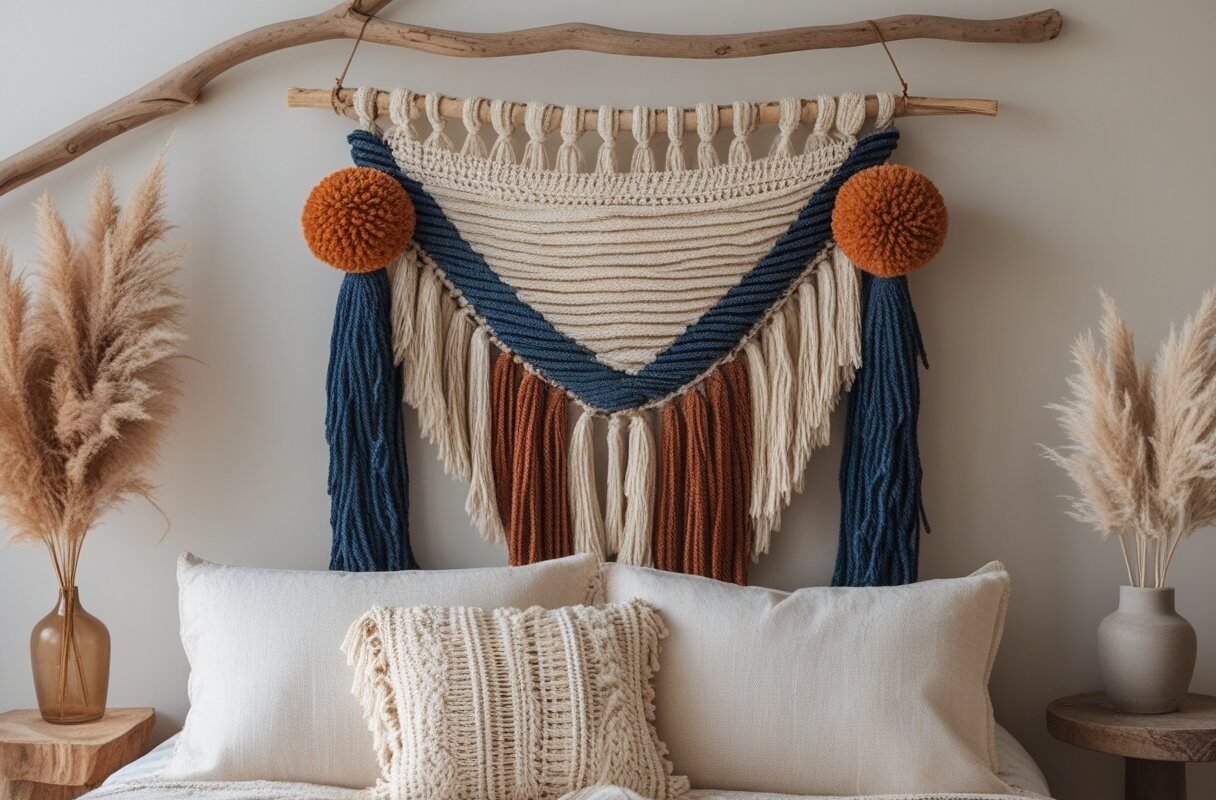
There’s a reason fiber art has taken over our feeds — it’s pure, touchable comfort. Weaving your own wall tapestry using a found branch as a hanger brings nature indoors and gives you total control over color and texture. Even if you’ve never woven before, you can make something striking.
Find a sturdy, smooth branch or a piece of driftwood about 24–30 inches long. Clean it and seal it if needed. You’ll need a variety of yarns: chunky wool, soft cotton, roving, maybe a bit of silky ribbon. Tie the warp threads (the vertical ones) onto the branch using simple loops, and then start weaving horizontally with your fingers or a large tapestry needle. Leave tails hanging, make tassels, add a row of Soumak braids for texture. You can incorporate a pop of mustard yellow or dusty blue among neutrals. Don’t worry about perfect edges; the charm is in the irregularity.
Hang your creation by tying a length of cotton cord to each end of the branch. This piece adds incredible warmth above a bed, especially if you have wooden elements in the room. It also dampens sound a bit, making your bedroom feel cozier. I love pairing this with linen bedding and a chunky knit blanket for an all-out texture feast.
6. Giant Crepe Paper Flower Wall Installation
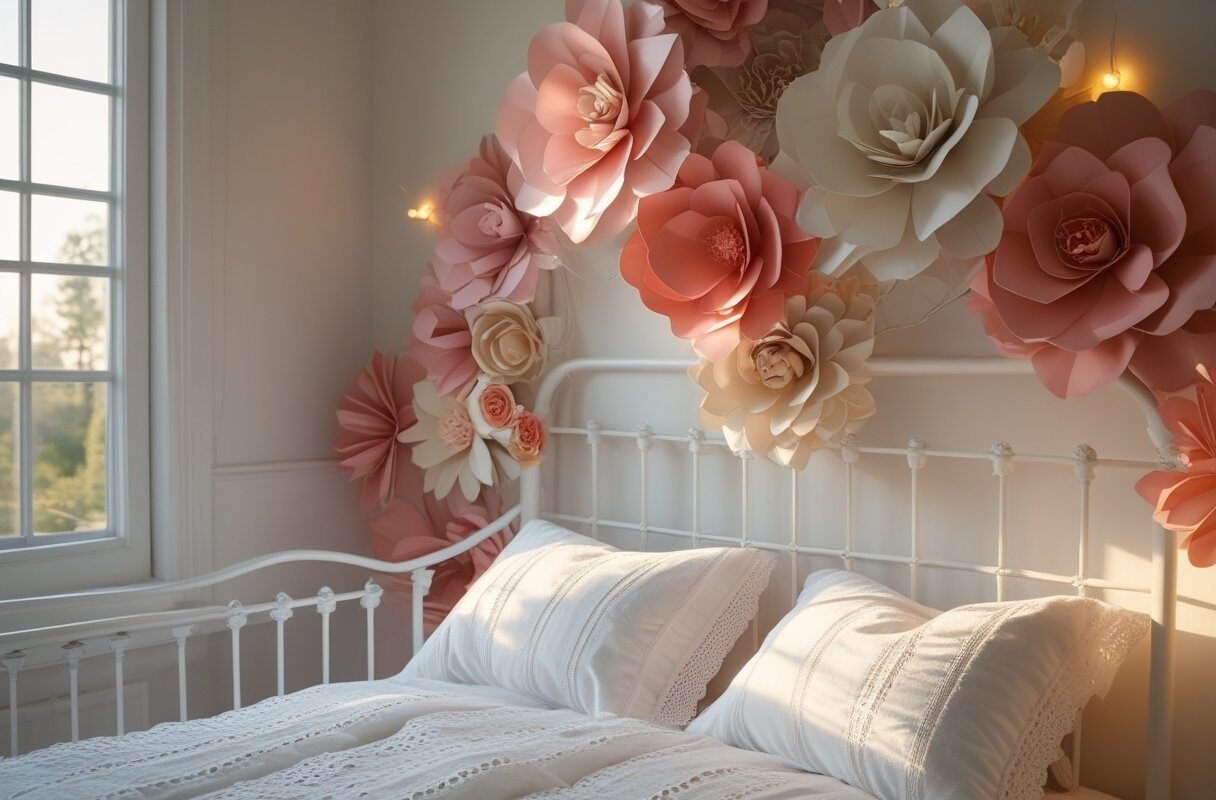
If romance had a DIY form, it would be giant paper flowers cascading over your headboard. They are whimsical, budget-friendly, and pack a huge visual punch. This project is pure joy to make, and you don’t need to be a master crafter.
You’ll need crepe paper in your chosen palette (blush and ivory, bold coral, or even ombre shades), floral wire, hot glue, and a cardboard or foam base to attach the flowers. Start by cutting petal shapes — lots of them — and stretching the crepe paper slightly to give it a natural curve. Layer petals around a center stamen made of fringed paper. Build flowers in varying sizes, from 8 inches to a massive 18-inch bloom. Add leaves cut from green crepe paper.
To create the wall art, mount a lightweight board or a large canvas painted the same color as your wall, then hot glue the flowers directly onto it in a lush cluster. Alternatively, you can attach each flower to a removable Command strip on the wall for an airy look. The arrangement should look organic, like a blooming garden spilling from the center or one upper corner. This makes mornings feel like you’ve woken up in a secret garden. And the best thing? The flowers won’t wilt.
7. Gold Leaf Accent Minimalist Canvas
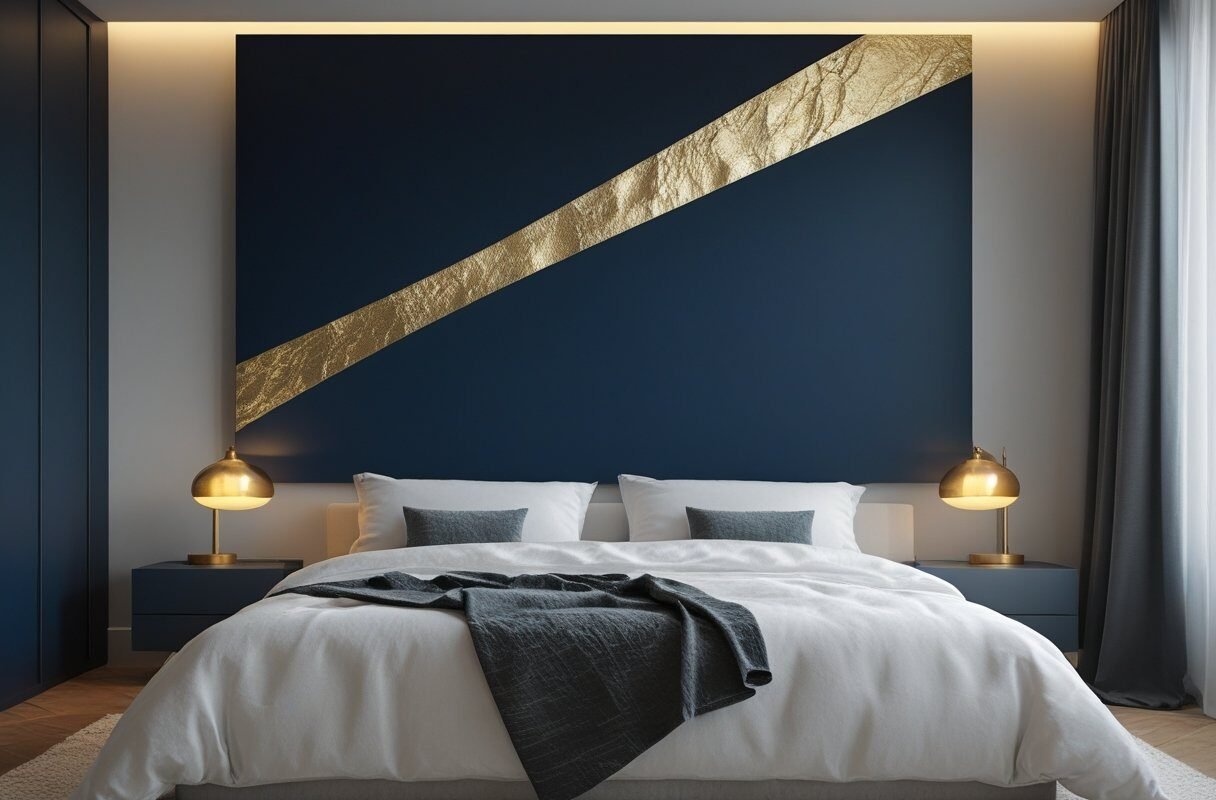
Sometimes less is more, and a single large canvas with a sweep of gold leaf is the epitome of understated luxury. It’s modern, catches the light, and you can customize the shape to suit your taste — a diagonal slash, a crescent moon, or an abstract geometric shape.
Grab a large canvas, at least 24×36 inches. Paint it a solid background color: deep navy, charcoal, or warm blush. Once dry, use gold leaf adhesive (also called size) to paint your design. Let it become tacky, then gently lay delicate sheets of gold leaf onto it, pressing with a soft brush. The leaf will stick only to the adhesive, revealing your pattern. Burnish gently, and seal with a clear spray sealer if desired.
The result is opulent but minimal. When the light hits, that gold glows and adds a touch of glamour without being loud. Pair it with crisp white sheets and a velvet throw for a boutique hotel feel. I’ve done a variation with copper leaf on a black canvas, and it’s absolutely stunning. This idea works especially well above a bed with a simple upholstered headboard.
8. Personalized String Art Constellation
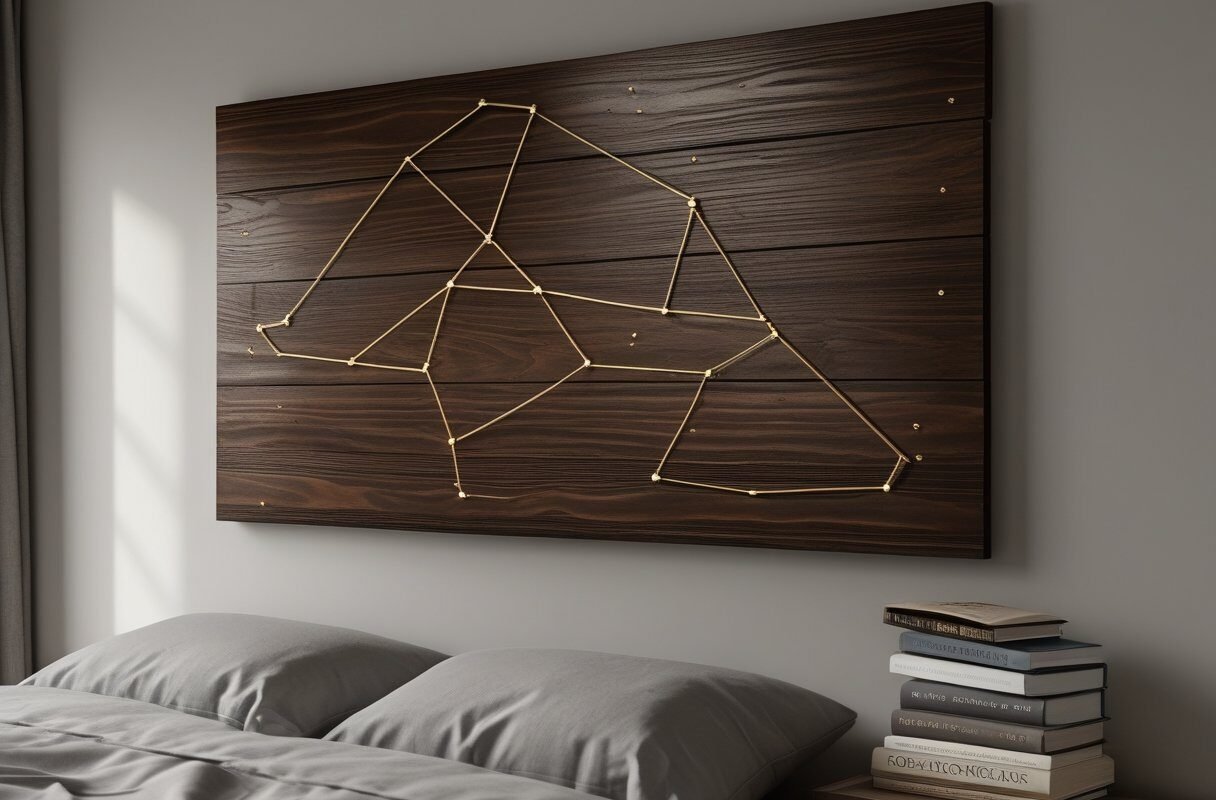
String art isn’t just for kids’ crafts; when done with intention, it becomes a celestial map that’s deeply personal. You can map the actual stars from a meaningful date — your wedding, a birth, or the night you moved into your home — and turn it into a permanent fixture above where you sleep.
You’ll need a wooden board (plywood works well, painted or stained), small nails, and embroidery floss or thin yarn in gold, silver, or white. Use an online star chart to find the constellation arrangement for your specific date and location. Print it out as a template. Tape the template onto the board and hammer small nails into each star point, plus a few outline nails if you want to show the constellation figure. Then remove the paper and start connecting the stars with thread, looping around each nail to create lines. Add a few scattered “stars” with tiny nails placed randomly.
This piece is a secret story above your bed. It’s romantic without being cheesy, and the texture of layered string catches the eye. Frame the board with a simple trim or leave it frameless and mount it with standoffs for a modern look. I love the idea of waking up under the same stars that shone on a special moment.
9. Upcycled Vintage Window Frame Photo Display
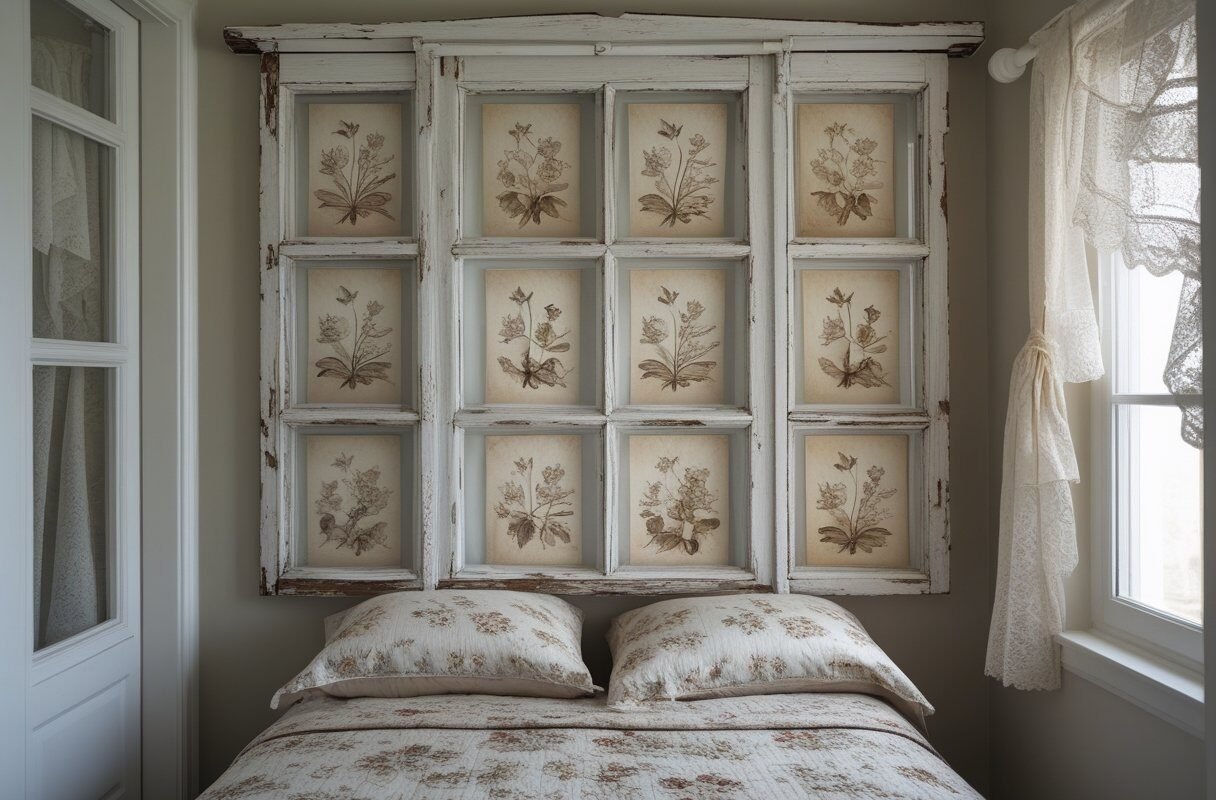
There’s an old story in every salvaged window frame. Replace the glass panes with your favorite photos, postcards, or even pressed flowers, and you’ve got a piece of art that’s full of nostalgia and charm. This project blends farmhouse warmth with personal storytelling.
Hunt for an old window frame at a flea market or salvage yard — one with multiple panes, perhaps four or six. Clean it up, scrape off loose paint (or leave the chippy goodness), and seal it. Measure each pane opening and cut photos or artwork to fit. You can use photo prints, vintage botanical prints, or even fabric swatches. Attach them to the back of the frame with acid-free tape or small clips. If the original glass is intact, you can slide photos in front and secure them with glazing points. To hang, use heavy-duty D-rings and wall anchors because old windows can be weighty.
Lean into the romantic, slightly rustic vibe. A window frame filled with black-and-white family photos becomes a heritage gallery; filled with botanical illustrations, it’s an English cottage dream. I love this above a bed with simple white cotton bedding and a garland of dried eucalyptus draped across the top.
10. Removable Watercolor Wash Wall Mural
What if the art was the wall itself? Painting a soft, dreamy watercolor wash directly onto the wall above your bed creates a backdrop that’s impossible to ignore. And if you’re renting, don’t panic — there are removable wallpaper options or you can paint a large canvas panel to mount.
For a permanent solution, use diluted acrylic paint in layers. Mix your chosen hue with plenty of water to achieve a translucent wash. With a large brush or a sponge, apply sweeping, overlapping strokes in an organic shape, like a soft cloud or a color-field horizon. Let layers dry and add depth with a slightly more saturated tone at the edges. Use painter’s tape to keep the wash within a defined rectangle, or let it fade out at the edges for a watercolor look. If renting, paint on a piece of primed canvas or wallpaper that you can adhere with removable wallpaper paste. Remove carefully when you move.
Imagine a blush-to-dusty-rose gradient that glows in the morning light, or a soft sage green wash that brings the outdoors in. The wall becomes a living painting, and all your bedding and decor just float against it. It’s surprisingly simple and makes the entire room feel custom-designed.
11. Fabric-Covered Acoustic Panels as Art
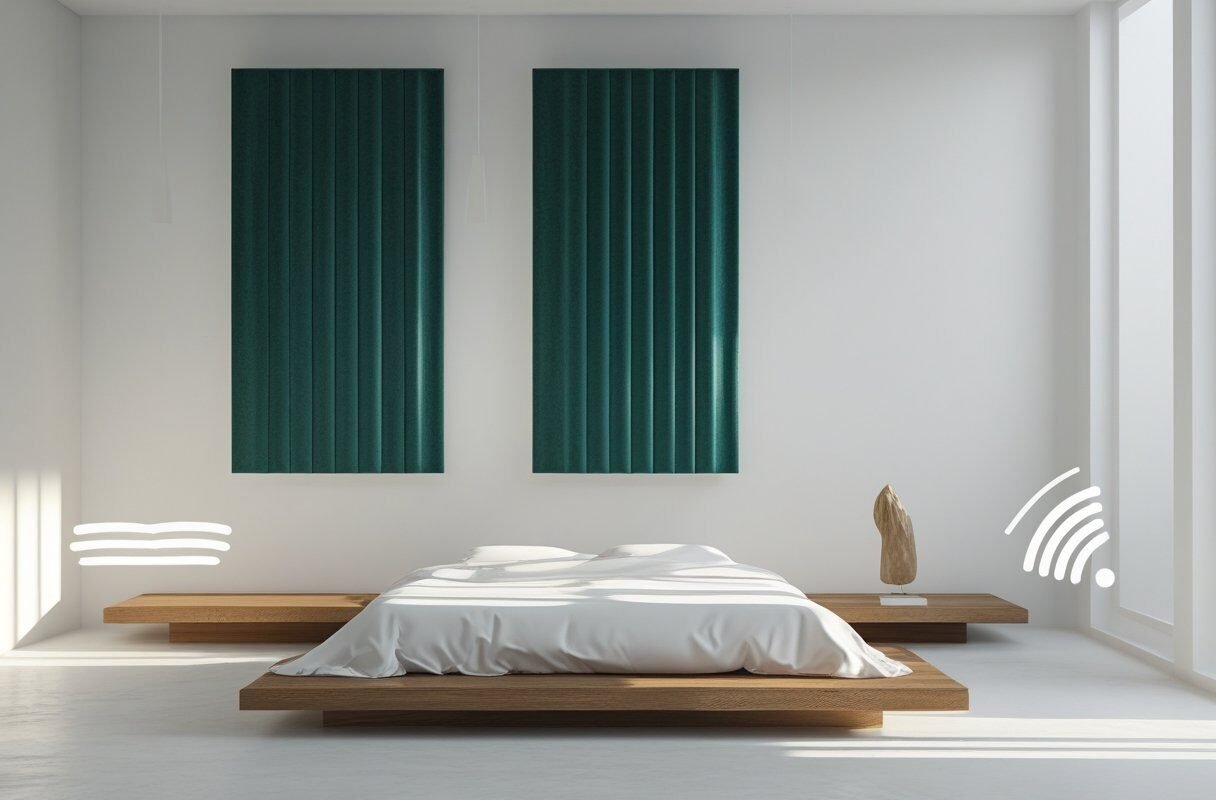
Here’s one for the multifunctional lovers: panels that absorb sound and look like large-scale modern art. If your bedroom echoes or you just love a snug, hushed atmosphere, fabric acoustic panels covered in beautiful textiles are a win.
Cut rigid fiberglass acoustic board or wood frames filled with sound-absorbing material to your desired size — two large vertical rectangles, maybe 2×4 feet each. Wrap them tightly with a stunning fabric: think a block-printed cotton, a subtle tribal pattern, or a soft velvet in a jewel tone. Staple the fabric on the back. Then mount them side by side or with a small gap using French cleats. They sit slightly proud of the wall, giving a plush, upholstered headboard-wall hybrid effect.
Choose fabric that complements your bedding. A deep teal velvet panel set brings drama, while a neutral linen with a thin stripe keeps things airy. The bonus is the cocooning quiet, perfect for deep sleep. These can also double as a soft backdrop for a floating shelf or a small piece of art mounted on top.
12. Driftwood and Air Plant Sculpture
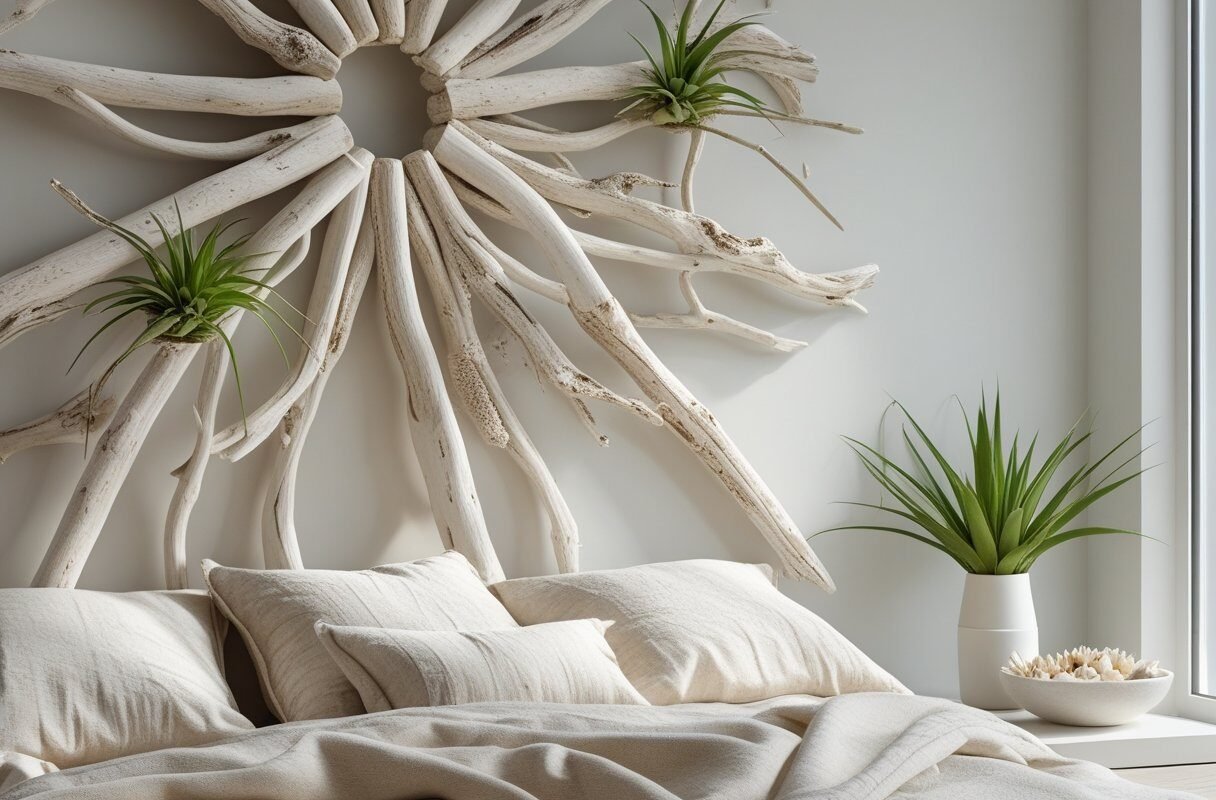
For a coastal or organic modern bedroom, a sculptural arrangement of driftwood and living air plants brings the outside in with minimal upkeep. It’s alive, architectural, and each piece is one-of-a-kind.
Collect interesting pieces of driftwood or purchase cleaned branches. Arrange them in an asymmetrical starburst, a horizontal line, or a cascade. Using fine wire or clear fishing line, attach them together at junctions. Then, tuck small air plants (Tillandsia) into natural crevices, securing them with a dab of clear silicone or floral glue. Air plants need only a weekly misting, and they thrive in indirect light. You can also add touches of dried sea fan or moss.
Hang the entire sculpture on a single nail using a wire loop on the back. The organic shapes contrast beautifully with crisp white walls and bedding. It feels like a piece of the shore washed up exactly where you need it. Because the plants are alive, they bring a subtle energy shift, reminding you to breathe.
13. Decoupage Quote on Reclaimed Wood
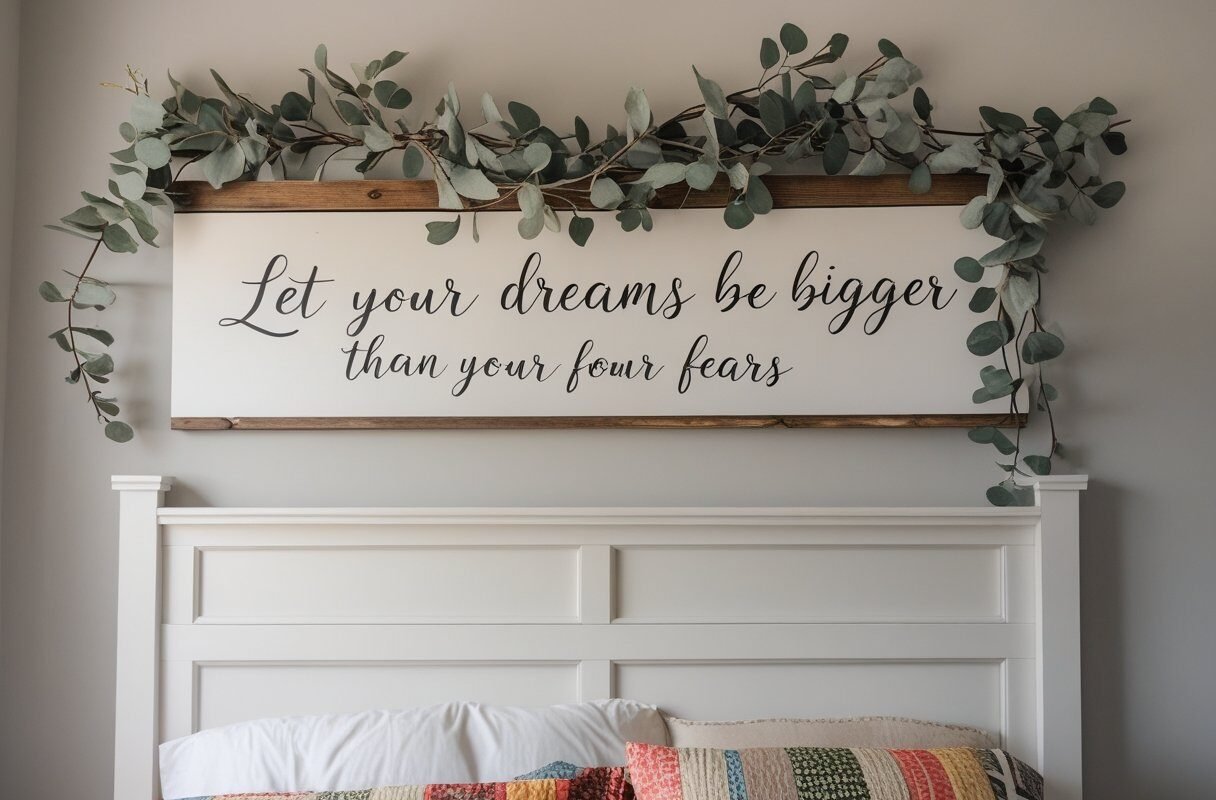
Words hold power, and having a favorite quote, lyric, or mantra above your bed can set the tone for every morning. Decoupaging it onto a reclaimed wood plank marries rustic charm with personal inspiration.
Find a piece of barn wood or a smooth wood board that fits the width of your bed. Sand it lightly but keep character marks. Paint the background a muted color or leave it raw. Print your chosen text in a beautiful font, reversed (mirror image) if you’re using an inkjet transfer method, or simply use letter stencils. For the decoupage method, print on thin paper, cut out the letters or the entire text block, and adhere to the wood with Mod Podge, smoothing out bubbles. Once dry, seal with several coats of matte Mod Podge, lightly sanding between for a distressed look.
Add delicate hand-painted vines or tiny stars around the words if you wish. The wood’s grain shows through, giving an heirloom feel. I love something like “and so she decided to live a beautiful life” or a simple “rest” in elegant script. Hang it with D-rings and lean into the handmade patina. It’s a daily affirmation that feels crafted, not bought.
14. Embroidery Hoop Gallery Wall
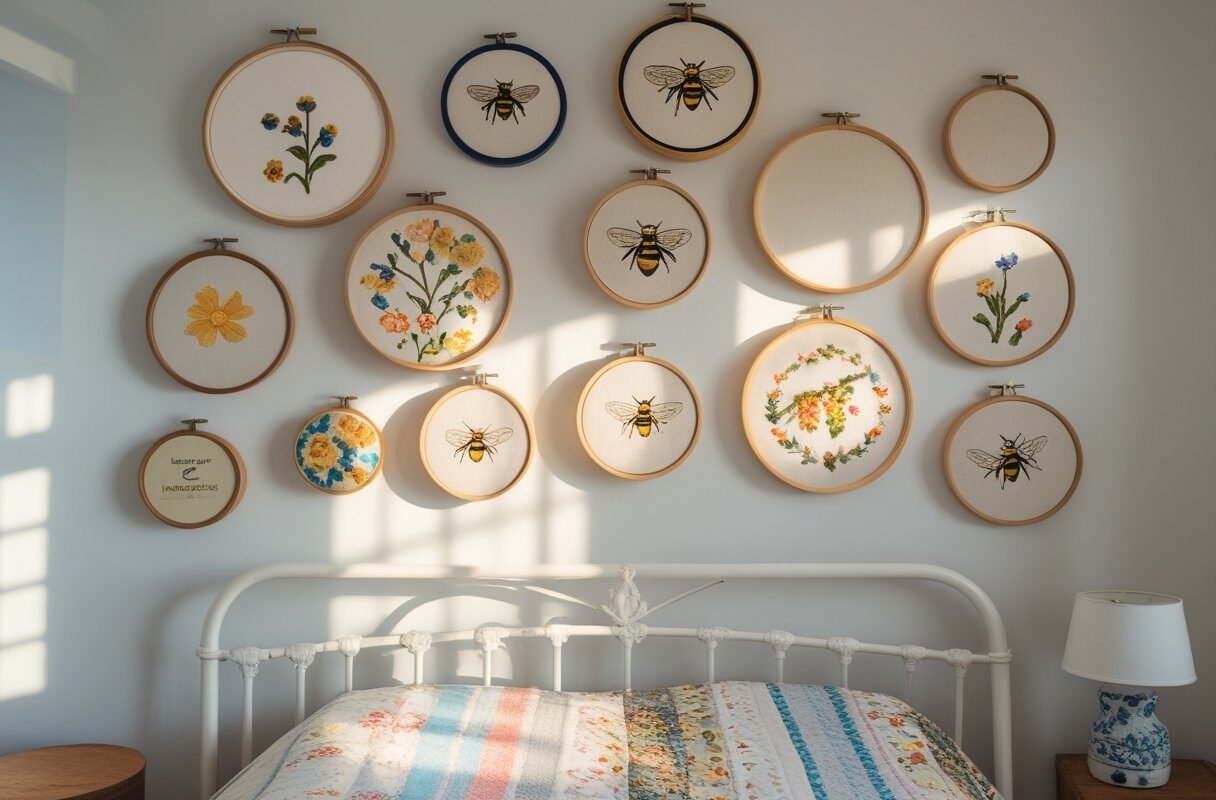
Embroidery hoops aren’t just for stitching — they’re perfect little frames for fabric art, and when grouped in a cluster, they create a playful, textured gallery. This is a wonderful way to use fabric scraps, lace, or even small woven pieces.
Gather wooden embroidery hoops in various sizes, from 4 inches up to 12 inches. For each hoop, select a fabric that speaks to you: a floral cotton, a piece of linen with a stamped pattern, a snippet of vintage handkerchief, or a tiny cross-stitch you made. Stretch the fabric taut in the hoop and secure the back. You can keep the raw edges or trim neatly. Arrange them on the wall above your bed in an organic cluster, mixing sizes and patterns. Use small nails or removable hooks. You can also hang some hoops overlapping slightly by using a second nail.
The result is a boho-meets-cottage collection that’s so easy to swap out. Change fabrics with the seasons — cozy plaids in winter, bright florals in spring. For added charm, leave a few hoops empty except for a sprig of dried lavender tucked under the screw. This idea fills a big wall without the weight of heavy frames.
15. LED Neon-Inspired Wire Word Art
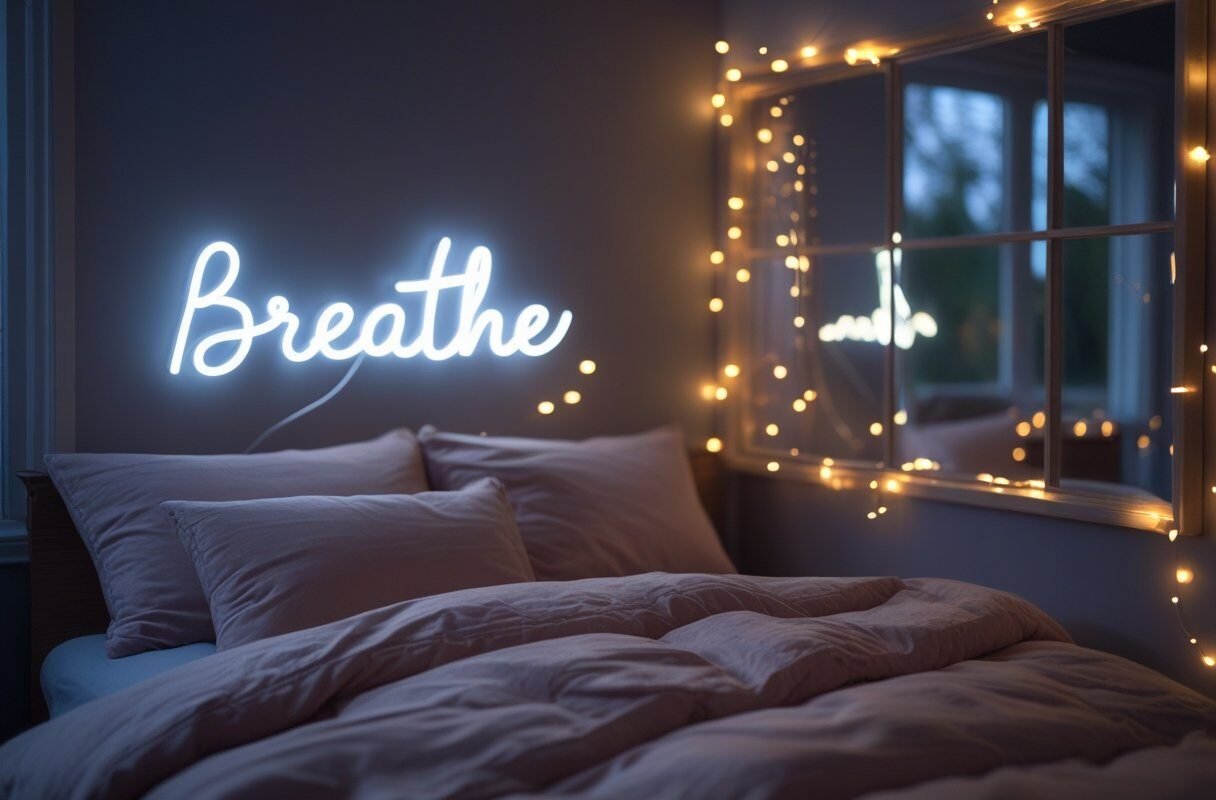
Want a statement that literally glows? A neon-style sign crafted from EL (electroluminescent) wire gives you that trendy, electric pop without the high cost or glass fragility. Bend it into a word, a heart, or a lightning bolt and watch your bedroom wall come alive at night.
EL wire is a thin, flexible tube that lights up when powered by a small battery pack (often USB rechargeable). Choose a color that harmonizes with your room — warm white, soft pink, or cool blue. Sketch your word or shape on a piece of thin plywood or foam board painted to blend with your wall. Drill small holes along the design path and thread the wire through, or use clear adhesive clips to hold it in place. Alternatively, you can shape it freestanding on the wall using small clear Command hooks. The wire needs to be supported every few inches to hold its shape.
Plug it in, and watch the magic. The soft glow is perfect for unwinding before sleep, acting as a gentle night light. “Dream,” “Love,” or even your name — it’s a personalized marquee that feels like a piece of modern pop art. Just hide the battery pack behind the headboard or on a nearby shelf.
Bringing It All Together: Your Wall, Your Story
As I look back on these 15 bed wall decor DIY art ideas, I’m reminded that the wall above where we rest should be a reflection of what makes us feel safe, inspired, and utterly ourselves. Whether you’re weaving a tapestry, pressing petals from your garden, or painting a watercolor dream, each project is a little love note to your home. Don’t be afraid to mix ideas — a macramé hanging next to a floating shelf, a driftwood sculpture paired with a glowing wire word. The beauty of DIY is that there are no rules.
I’d love to know which idea sparks something in you. Will you gather driftwood on your next beach walk, or finally try gold leaf on a rainy Saturday? Tag me in your creations, because there’s nothing better than seeing that bare wall transformed into a soulful sanctuary. Until next time, happy making — and may your bed wall become your favorite piece of art in the whole house.