Last year, I spent $150 on a plastic Christmas tree that my cat immediately declared war on. This year? I’m building my own wooden masterpieces that look way better, cost less, and won’t shed fake pine needles until Valentine’s Day.
If you’re tired of wrestling with tangled lights on traditional trees or just want something uniquely yours, you’re about to fall in love with these DIY wooden Christmas tree projects.
Here’s the thing – wooden Christmas trees aren’t just trendy, they’re practically genius. They store flat, look incredible, and give you that handmade charm that makes guests go “Where did you get that?” Trust me, nothing beats the satisfaction of saying “I made it myself.”
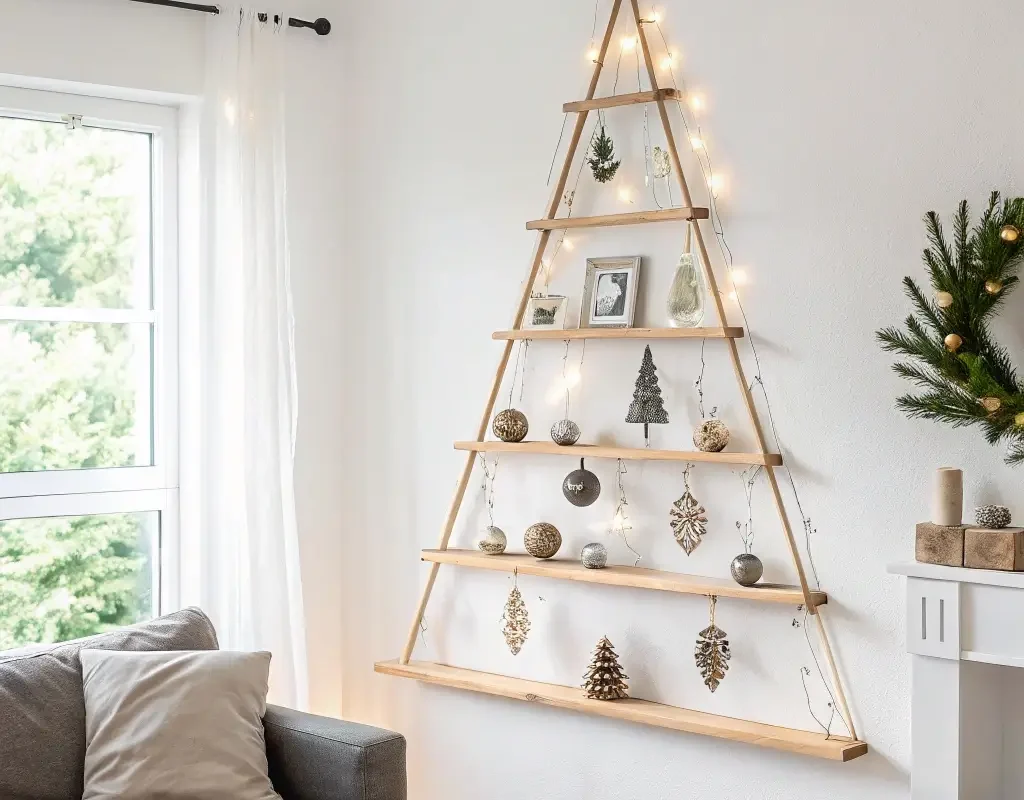
Minimalist Floating Shelf Tree

This design absolutely blew my mind when I first saw it. You’re essentially creating a Christmas tree silhouette using floating shelves of decreasing lengths. The negative space becomes part of the design, and honestly, it’s pure modern magic.
I built mine using five pine boards cut to lengths from 48 inches down to 12 inches. The trick is spacing them evenly on your wall, starting with the longest at the bottom. Mark your studs first – nobody wants their tree crashing down during Christmas dinner.
Materials You’ll Need:
- 5-7 wooden boards (various lengths)
- Floating shelf brackets
- Level (seriously, don’t eyeball this)
- Wall anchors if not hitting studs
- Wood stain or paint
- Sandpaper
Mount each shelf about 10-12 inches apart, creating that classic triangle shape. The beauty here is functionality – you can actually display ornaments, small gifts, or holiday decorations on each shelf. Mine holds my collection of vintage glass ornaments that usually stay boxed because the cat situation I mentioned earlier.
Rustic Pallet Wall Tree
Ever wonder what to do with those pallets everyone’s always giving away? This project turns trash into holiday treasure. Pallet wood has character you can’t buy – weathered, worn, and perfectly imperfect.
Start by breaking down your pallet (wear gloves, those splinters are vicious). Cut boards into graduated lengths, anywhere from 6 to 36 inches. Sand them down but not too much – we want rustic, not refined.
The Assembly Process:
Arrange your boards horizontally on the floor first, creating your tree shape. I like leaving small gaps between boards for a more airy feel. Once you’re happy with the layout, attach them to a vertical support board running up the back.
Mount the whole thing on your wall using heavy-duty picture hangers. String some warm white lights through the gaps, and boom – instant cozy vibes. The first time I lit mine up, my partner literally gasped. That’s the reaction we’re going for.
Driftwood Tabletop Tree

This one speaks to my beachy soul. If you live near water or just love that coastal aesthetic, collecting driftwood for this project becomes part of the fun. No two pieces are alike, making your tree completely unique.
Sort your driftwood pieces by length – you’ll need everything from tiny 2-inch pieces to longer 12-inch branches. Drill a hole through the center of each piece (patience is key here, driftwood can be stubborn).
Thread them onto a wooden dowel, largest pieces at the bottom, creating that tree shape. Secure with hot glue between layers if things get wobbly. The organic shapes create this beautiful, sculptural piece that looks like modern art met Christmas spirit and had a beautiful baby.
Top it with a starfish or sand dollar if you really want to commit to the coastal theme. Mine sits on my entryway table, and people always touch it – there’s something irresistible about that smooth, weathered wood.
Also Read: 15 Lovely Rustic Christmas Decor Ideas: Woodsy Festive Details
Geometric Triangle Wood Tree
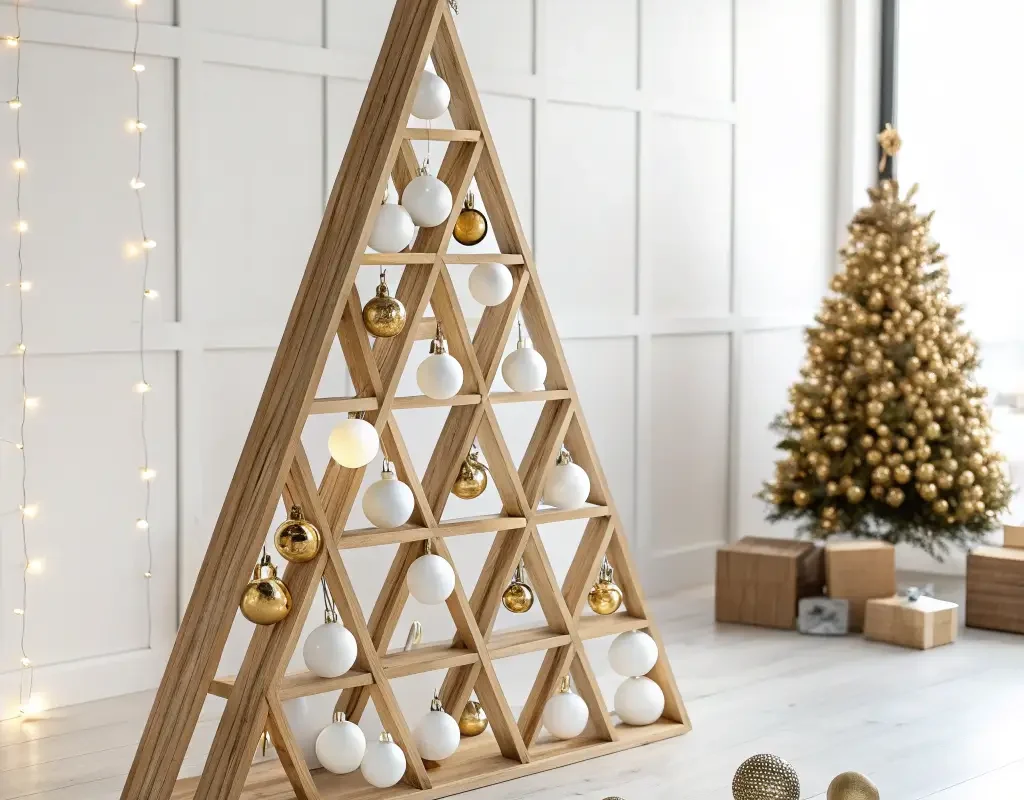
For all my fellow perfectionists out there, this geometric design will satisfy your need for clean lines and mathematical precision. This isn’t your grandma’s Christmas tree – unless your grandma is really into contemporary design.
Building Your Geometric Masterpiece:
- Cut 1×2 inch wood strips into specific lengths
- Create triangular frames of increasing size
- Stack and attach them with wood glue and small nails
- Paint in monochrome or leave natural
I made five triangular frames, each 3 inches larger than the last. Stack them with small spacer blocks between each triangle to create depth. The shadows this creates on the wall are almost as beautiful as the tree itself.
Paint them all white for a minimalist look, or go bold with metallic gold. When friends see mine, they always ask if I bought it at some fancy design store. Nope, just $20 worth of wood and an afternoon of measuring twice, cutting once.
Branch Tiered Hanging Tree
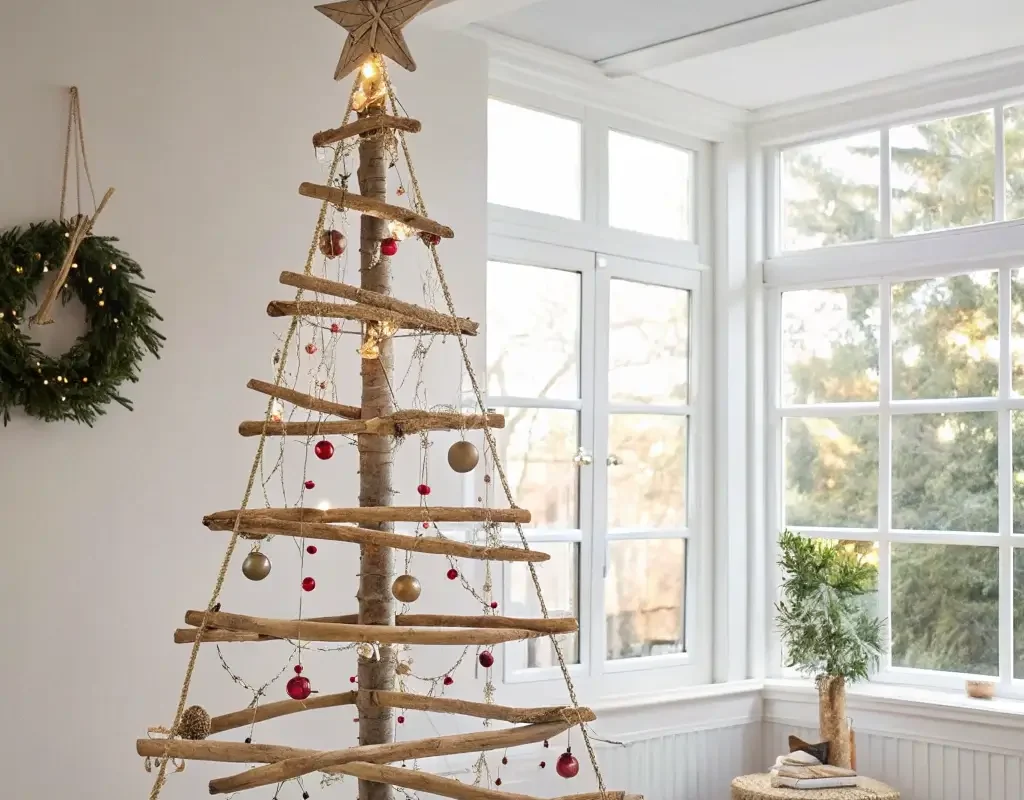
This design makes me feel like I brought the forest inside, minus the bugs and sap. You’ll need branches of varying lengths – I collected mine during a hiking trip, but your backyard works too.
Find a strong ceiling hook (test it with your body weight – safety first). Attach fishing line or thin rope to each branch, creating tiers from largest at bottom to smallest at top. Space them about 6-8 inches apart vertically.
The key is balance – literally. Each branch needs to hang level, which requires some patience and possibly a glass of wine. Wrap the branches with battery-powered fairy lights, and you’ve got this ethereal, floating tree that moves gently with air currents.
My cat hasn’t figured out how to destroy this one yet, which I consider a major win 🙂
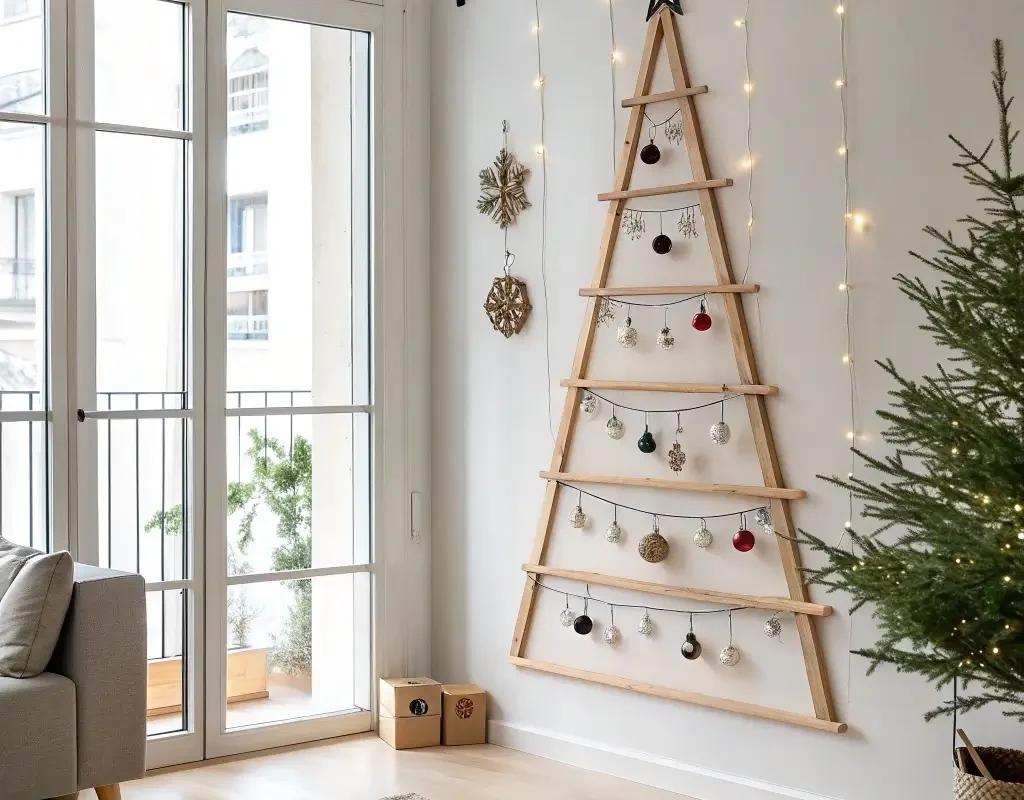
Ladder-Style Wooden Tree

Got an old ladder lying around? Perfect. This might be the easiest project on the list, and it looks ridiculously expensive when done right. Sometimes the simplest ideas are the most brilliant.
If you’re building from scratch, create an A-frame with 2×2 lumber. Make it about 5-6 feet tall with rungs every 10 inches. The rungs get progressively shorter as you go up, creating that tree silhouette.
Decorating Your Ladder Tree:
- Wrap with garland or lights
- Hang ornaments from the rungs
- Place presents underneath
- Add a star or angel topper to the peak
I painted mine white and distressed it slightly for that farmhouse look. During the off-season, it becomes a blanket ladder in my living room. Two functions, one piece of furniture – efficiency at its finest.
Also Read: 10 Magical Earth Tone Christmas Tree Ideas for Holiday Cheer
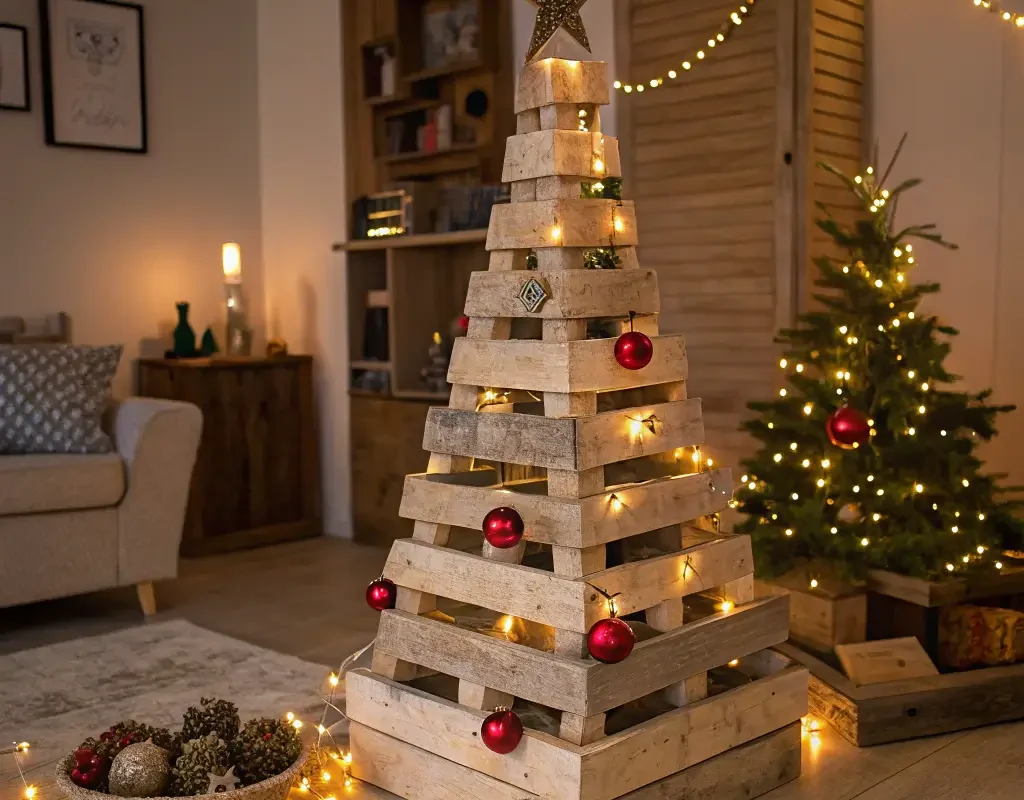
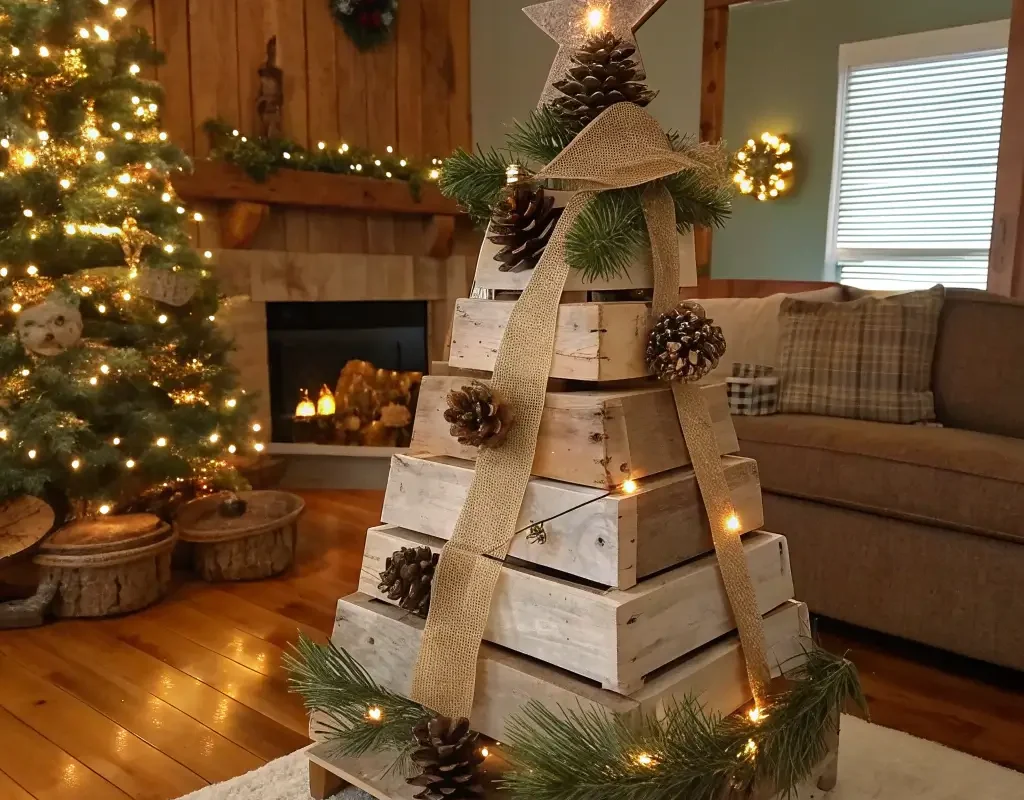
Reclaimed Crate Tree with Lights
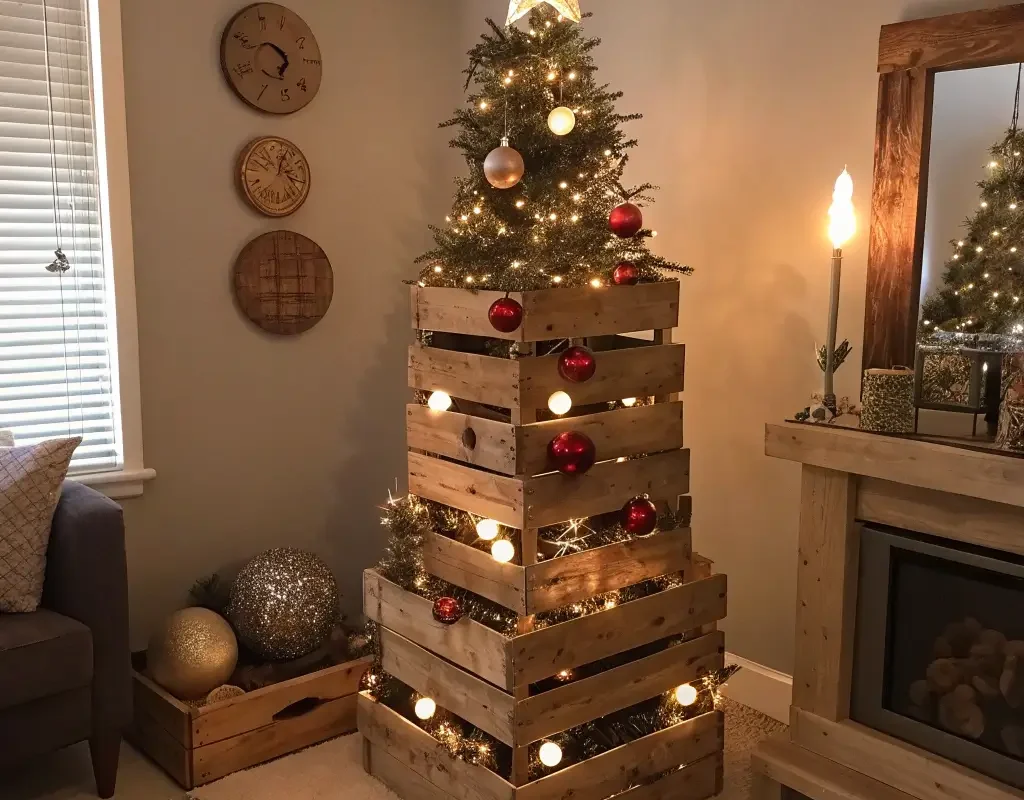
This project started when I found three old wooden crates at an estate sale. Stack them in pyramid formation (largest on bottom, smallest on top), and suddenly you’ve got structure. The built-in compartments are perfect for creating vignettes.
Secure the crates together with wood screws from the inside – we don’t want any tragic collapses here. Sand rough edges and stain if desired. I went with a dark walnut stain that makes the wood grain pop.
String lights around the edges and fill each compartment with different decorations. Mini villages, pinecones, ornaments, candles – each box becomes its own little Christmas scene. The depth and shadows created by the compartments give this amazing 3D effect that flat trees can’t match.
FYI, this design also works great with wine crates if you’re feeling fancy.
Wooden Star Stacked Tree

Stars, stars, and more stars – this design is what happens when you can’t stop at just one. Cut wooden stars in graduated sizes and stack them up for a tree that’s both simple and striking.
Creating Your Star Stack:
You’ll need 5-7 stars ranging from 24 inches to 6 inches. Cut them from plywood using a jigsaw (or sweet-talk someone with better tools). Sand smooth and paint or stain each star.
Stack them largest to smallest with small wooden spacers between each star. This creates depth and allows light to play between the layers. I painted mine in gradient shades from dark green at bottom to pale mint at top – the ombre effect is surprisingly sophisticated.
Drill a hole through the center of all stars and thread onto a dowel for stability. Top with a smaller decorative star or leave the point bare for a minimalist look.
DIY Wooden Slice Ornament Tree
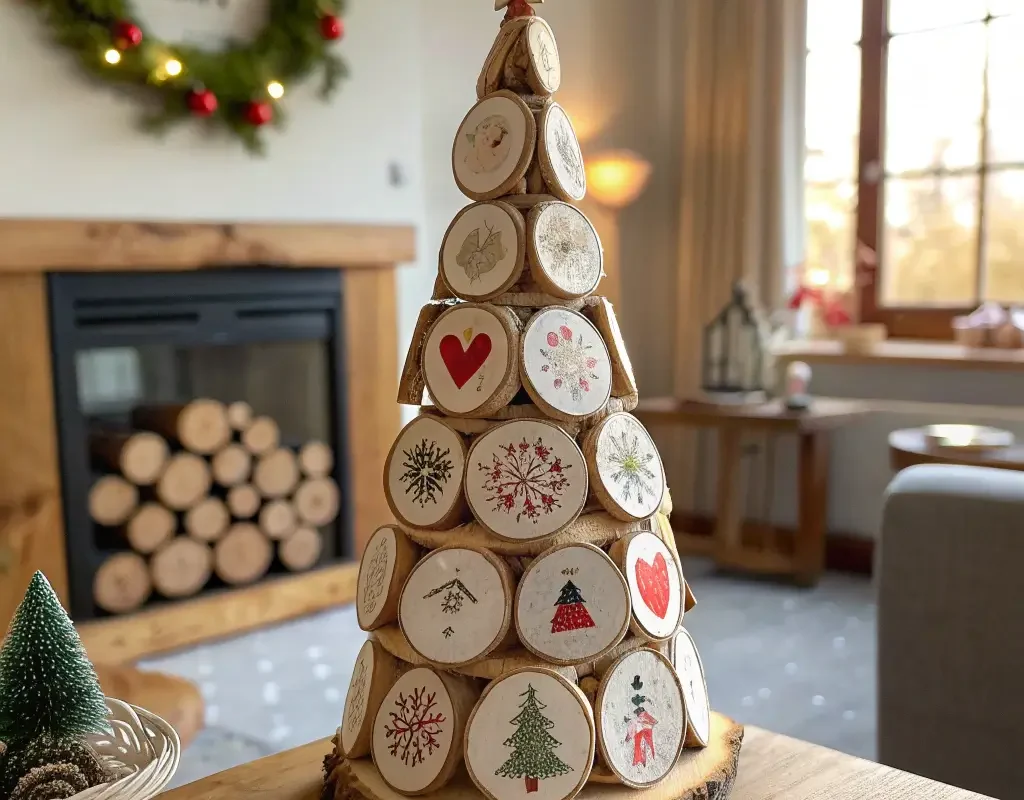
Remember those wooden slice ornaments everyone was making a few years ago? This tree takes that idea and runs with it. You’ll need various sizes of wood slices, which you can cut yourself or buy pre-made.
Arrange slices on a flat surface in tree formation. Start with larger slices at the bottom, gradually decreasing size as you go up. Once you’re happy with the arrangement, transfer to a backing board, gluing each slice in place.
The natural wood grain patterns create gorgeous texture. Leave them natural, or wood burn designs onto some slices. I added our family’s initials to different slices – instant personalization that makes this tree special.
Hang on the wall or prop on a mantel. The organic edges and varying tones of the wood make this feel like art, not just holiday decor.
Also Read: 10 Festive Modern Christmas Decor Ideas You’ll Love
Foldable Compact Wall Tree
Living in a small space doesn’t mean skipping Christmas decorations. This foldable design stores flat and sets up in seconds. Perfect for apartments, dorms, or anyone who values their square footage.
Build a hinged frame using 1×2 lumber, creating triangular panels that fold accordion-style. When expanded, it creates a 3D tree shape against your wall. When Christmas is over, it folds down to about 4 inches thick.
Space-Saving Features:
- Stores behind doors or in closets
- Sets up in under a minute
- Lightweight and portable
- Can be different colors on each panel
Paint each panel a different shade of green, or go wild with patterns. Mine has chalkboard paint on one side, so I can write holiday messages or let kids draw decorations. Multifunctional and space-saving – what’s not to love?
Layered Plank Christmas Tree

This design creates incredible depth using simple planks arranged in overlapping layers. Think of it as a wooden shingle Christmas tree. The overlapping creates shadows that give this amazing dimensional effect.
Cut planks into graduated lengths and attach them to a triangular backing board. Start from the bottom with your longest pieces, overlapping each row like roof shingles as you work up.
Leave gaps between some planks for stringing lights through – the light peeking through the layers creates magic at night. I stained each row a slightly different shade, creating subtle striping that adds visual interest without being overwhelming.
Modern Slat Wall Tree

This contemporary design would look at home in a minimalist Scandinavian apartment. Horizontal slats create a sleek, architectural tree that’s more art installation than traditional holiday decor.
Space thin wood slats evenly on your wall, decreasing length as you go up. The precision here is what makes it work – use a level and measuring tape religiously. Paint them matte black for drama or keep natural for warmth.
What I love about this design is how it plays with negative space. The wall becomes part of the tree, and shadows change throughout the day as light moves. It’s like having a living art piece that happens to be Christmas-themed.
Wooden Block Pyramid Tree
Got kids? This one’s for you. Stack wooden blocks in pyramid formation for a tree kids can help build (and rebuild when it inevitably gets knocked over).
Cut various sizes of wooden blocks, sand smooth, and paint in festive colors. Or leave natural and let kids paint them – messy, but memorable. Stack largest to smallest, using wood glue if you want permanence.
My nephew loves rearranging his every few days, creating new patterns and designs. It’s become part of our holiday tradition, and honestly, his arrangements are sometimes better than mine. Kids have that creative freedom we adults sometimes lose.
Farmhouse Rustic Plank Tree
This design screams cozy farmhouse Christmas. Using reclaimed barn wood or weathered planks, create a tree that looks like it’s been in your family for generations.
Cut planks into tree shape – one long piece for the trunk, then increasingly shorter pieces for branches. Attach to a backing board at slight angles, not perfectly horizontal. The imperfection is what makes it charming.
Rustic Finishing Touches:
- Leave nail holes visible
- Keep original paint patches
- Add burlap ribbon
- String with Edison bulb lights
Don’t over-sand – we want texture and character. Mine still has old white paint in places and even a few rust stains. These imperfections tell a story, even if that story is “I found this wood behind my garage.”
Painted Ombre Wooden Tree
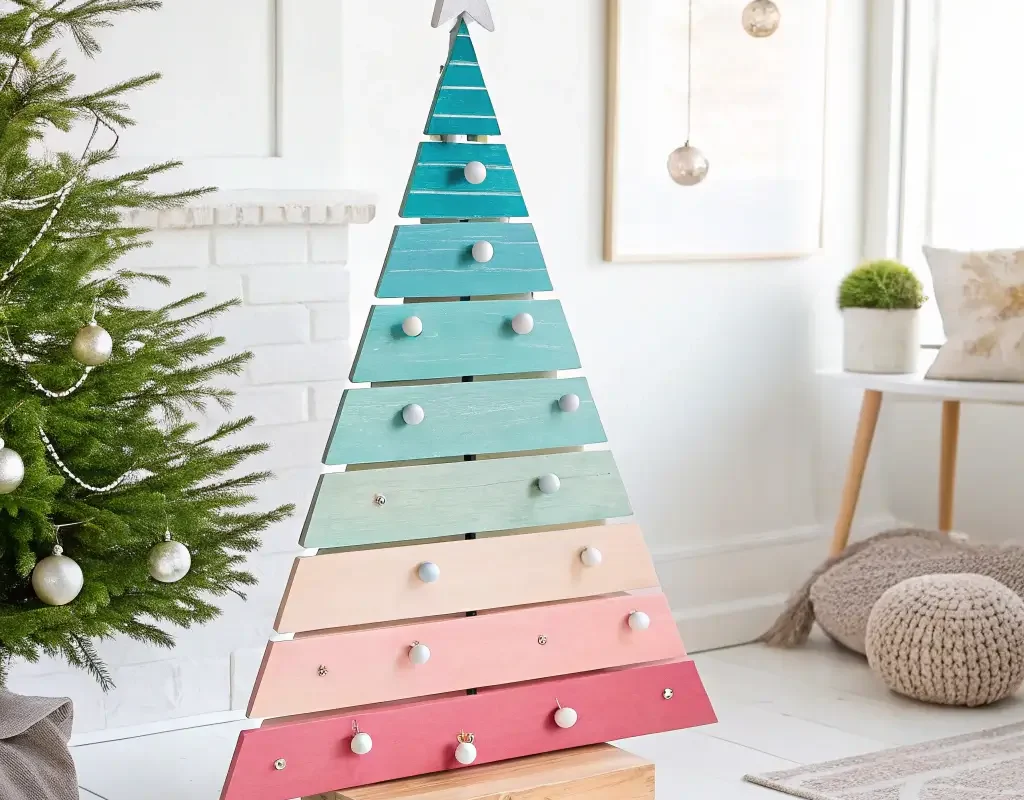
For those who love color, this gradient tree is pure eye candy. The ombre effect creates movement and depth that draws you in from across the room.
Cut a tree shape from plywood or arrange individual boards. Choose your color palette – I went from deep forest green to mint, but you could do red to pink, blue to white, or even rainbow if that’s your vibe.
Mix your paint colors to create 5-7 shades for smooth transitions. Paint from dark at bottom to light at top, blending where colors meet. The gradient effect is surprisingly forgiving – imperfections look intentional IMO.
Seal with clear coat to protect your paint job. The glossy finish makes colors pop and adds a professional touch that elevates the whole project.
Final Thoughts on Your Wooden Christmas Adventure
Creating your own wooden Christmas tree isn’t just about saving money or being trendy – it’s about making something uniquely yours. Each of these projects tells a story, whether it’s driftwood collected on family beach trips or reclaimed wood from your grandfather’s barn.
The best part? These trees improve with age. Unlike artificial trees that get raggedy, wooden trees develop character. That scratch from when you dropped it becomes part of its charm. The slight fade from sunlight adds authenticity.
Start with whichever design speaks to you most. Don’t stress about perfection – handmade means human-made, and humans aren’t perfect. That slightly crooked star or uneven spacing gives your tree personality that store-bought versions lack.
Your wooden Christmas tree becomes a conversation starter, a family tradition, and possibly an heirloom. Plus, when January rolls around, storage is a breeze. No giant boxes, no shedding needles, just your beautiful creation waiting for next year’s magic.
Now grab your tools, channel your inner carpenter, and create some holiday magic. Your perfect wooden Christmas tree is just a weekend project away, and trust me, the satisfaction of building it yourself beats any shopping mall experience. Happy building, and may your holidays be filled with the warmth of handmade love!