So your living room wall is staring back at you like a blank canvas, and you’re tired of that “just moved in” vibe even though you’ve been there for three years? Been there, done that, got the nail holes to prove it.
Let me share some killer wall decor ideas that’ll transform your space from “meh” to “magazine-worthy” without requiring an art degree or trust fund.
Here’s the thing – decorating a large wall doesn’t have to feel like you’re painting the Sistine Chapel. I’ve spent years experimenting with different approaches (and patching up way too many mistakes), and I’m here to spill the tea on what actually works. Ready to make that wall work harder than your morning coffee? Let’s get into it.
Table of Contents
- 1 Oversized Canvas Art
- 2 Gallery Wall Collage
- 3 Large Geometric Wall Panels
- 4 Statement Mirrors
- 5 Floating Shelves with Decor
- 6 Wall-Mounted Sculptures
- 7 Tapestry or Fabric Wall Hangings
- 8 Metal Wall Art
- 9 Oversized Clocks
- 10 Wooden Accent Panels
- 11 Floor-to-Ceiling Photo Frames
- 12 DIY Macramé Wall Art
- 13 Wall Murals or Decals
- 14 Vertical Indoor Green Wall
- 15 Layered Framed Prints
- 16 Wrapping It Up
Oversized Canvas Art
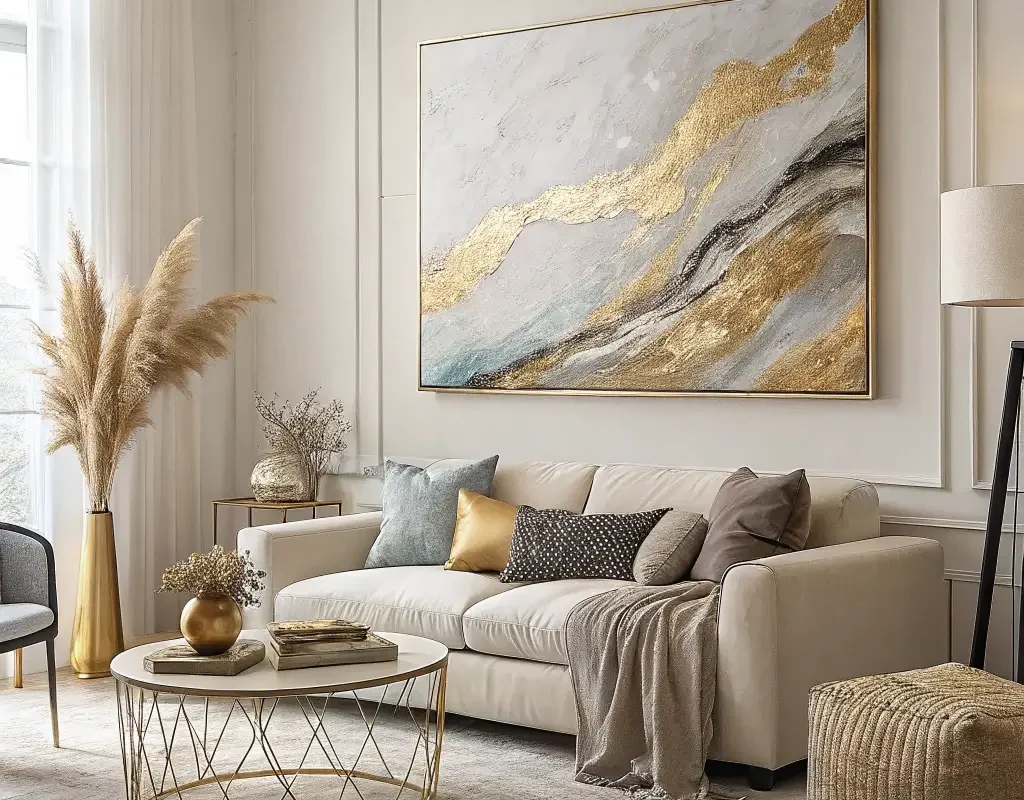
Nothing says “I have my life together” quite like a massive canvas dominating your living room wall. And honestly? It’s probably the easiest way to fill that intimidating blank space without overthinking everything.
I recently splurged on a 60×40 inch abstract piece, and let me tell you – it changed the entire room’s personality overnight. The beauty of oversized canvas art lies in its simplicity. You hang one piece, and boom, you’re done. No measuring seventeen different frames or second-guessing your spacing.
Choosing the Right Piece
When selecting oversized canvas art, think about your existing color scheme first. You want something that complements, not competes. Here’s what I’ve learned works best:
• Abstract pieces offer flexibility – they match almost anything
• Photography prints create focal points and conversation starters
• Minimalist designs keep things sophisticated without overwhelming
• Bold colors can tie together accent pieces throughout the room
The key measurement rule? Your canvas should take up 60-75% of your wall space horizontally. Any smaller and it looks like you’re afraid of commitment. Any bigger and your guests might think you robbed a museum.
Budget-Friendly Options
Who says you need to drop a mortgage payment on art? I’ve discovered some fantastic alternatives. Check out local art schools for student exhibitions – you’ll find original pieces at fraction of gallery prices. Online marketplaces offer stunning prints on canvas that look incredibly authentic. FYI, nobody needs to know your “original artwork” came from a print-on-demand service 🙂
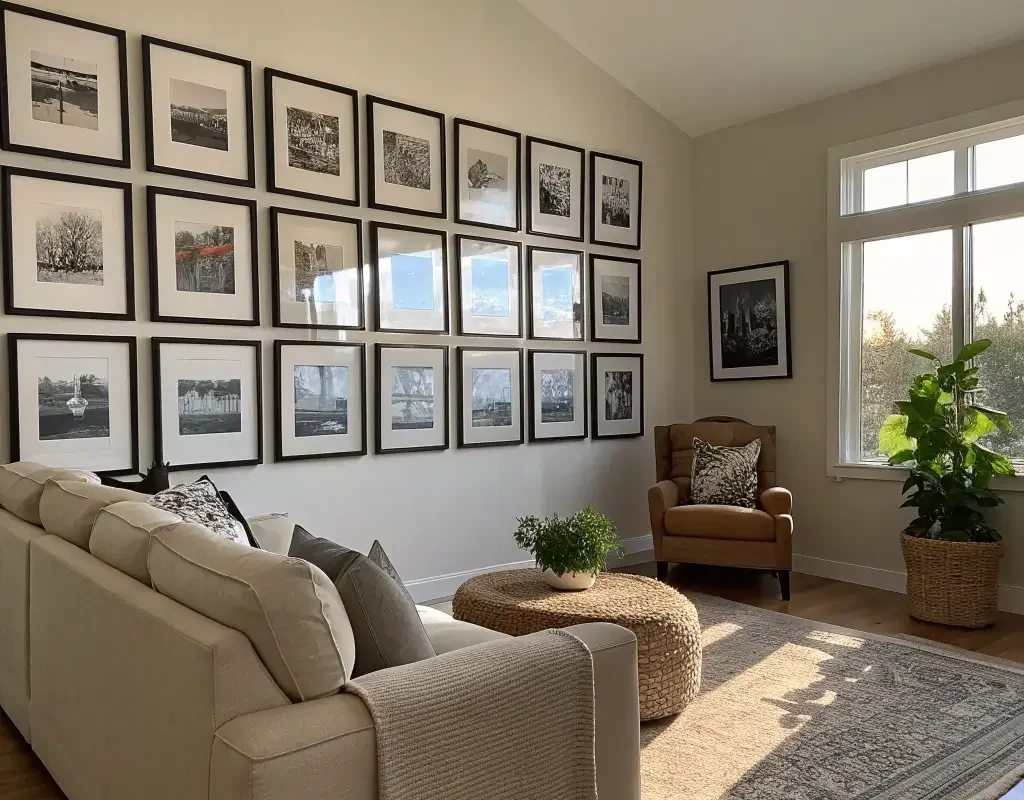
Gallery Wall Collage
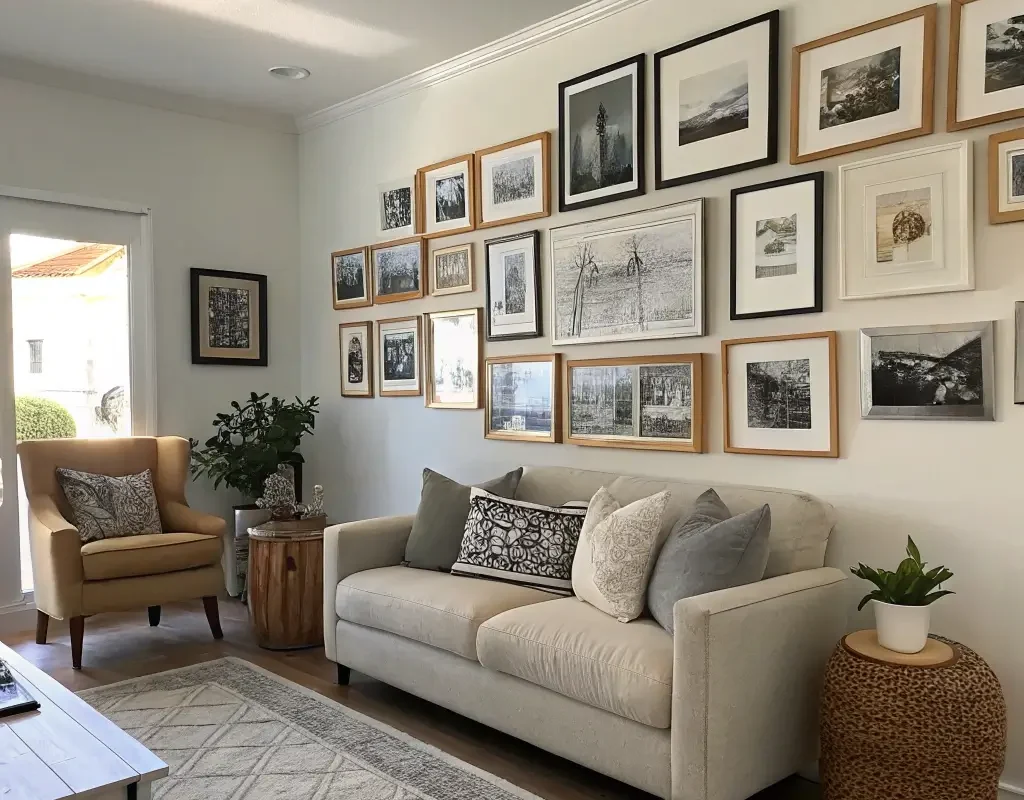
Ah, the gallery wall – Pinterest’s favorite child and every perfectionist’s nightmare. But here’s the secret nobody tells you: there’s no wrong way to create one. Seriously, I’ve seen gallery walls that break every “rule” and still look phenomenal.
Planning Your Layout
Before you start hammering away like a caffeinated woodpecker, lay everything out on the floor first. Take a photo with your phone. Trust me on this one – it’ll save you from creating a Swiss cheese wall situation.
I like to start with my anchor piece – usually the largest frame or most eye-catching artwork. Everything else builds around this centerpiece. Mix different frame sizes, colors, and even materials. Wood, metal, plastic – throw them all in there. The contrast creates visual interest that keeps people looking.
What to Include
Your gallery wall should tell your story. Here’s what I typically mix in:
• Family photos (but not just the posed ones – candid shots add personality)
• Travel memories like postcards or small souvenirs in shadow boxes
• Inspirational quotes (sparingly – we’re decorating, not creating a motivational poster shop)
• Small mirrors to add depth and reflect light
• Unexpected objects like vintage plates or small shelves with trinkets
Remember to leave 2-3 inches between each piece for breathing room. Too close and it looks cluttered; too far and you lose the cohesive gallery effect.
Large Geometric Wall Panels
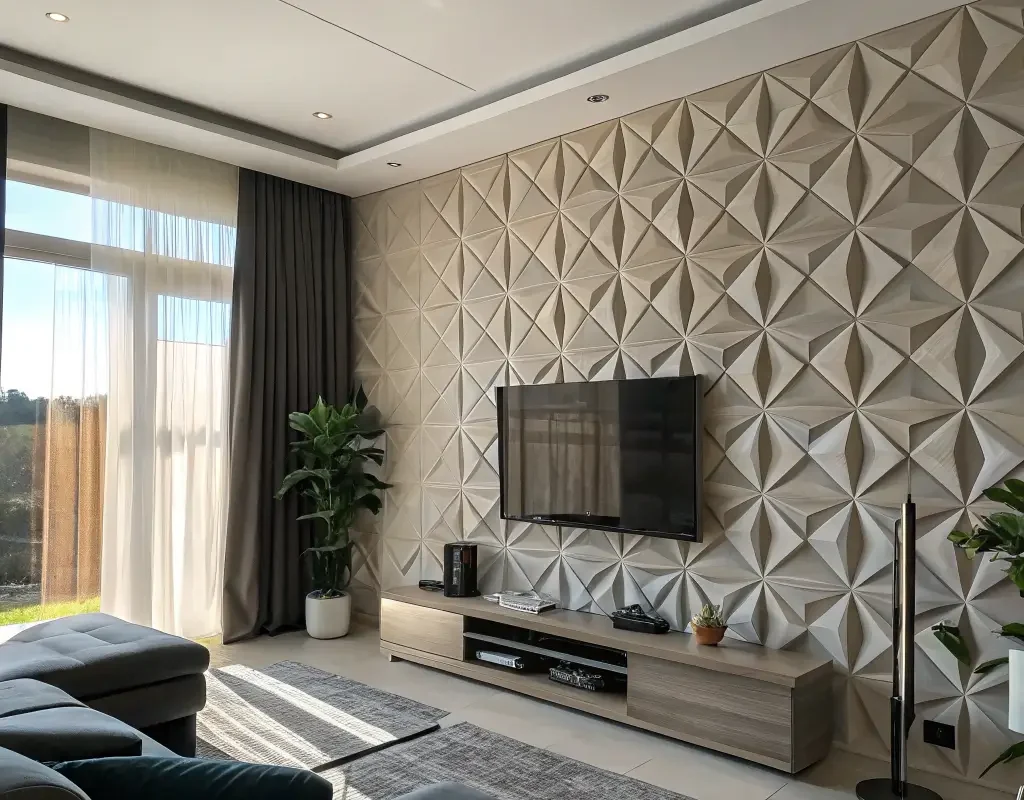
Want to look like you hired an interior designer without actually hiring one? Geometric wall panels are your new best friend. These bad boys add dimension, texture, and that modern edge everyone’s after these days.
I installed wood hexagon panels in my living room last year, and the number of compliments I get? Ridiculous. The best part – they’re surprisingly easy to install yourself if you’re even slightly handy with a level and drill.
Material Options
You’ve got choices here, and each brings its own vibe:
• Wood panels warm up the space and add natural texture
• 3D plastic panels offer modern appeal at budget-friendly prices
• Foam panels provide easy installation and can be painted any color
• Metal geometric designs create industrial chic aesthetics
Installation Tips
Here’s what I wish someone had told me before I started: map out your pattern completely before installing anything. Use painter’s tape to outline where each panel goes. It might seem like overkill, but you’ll thank yourself when everything lines up perfectly.
Also, invest in a good level. Not your phone app – an actual level. The slight angles that seem minor at first become glaringly obvious once you step back.
Also Read: 15 Easy Album Cover Wall Decor Ideas to Transform Walls
Statement Mirrors
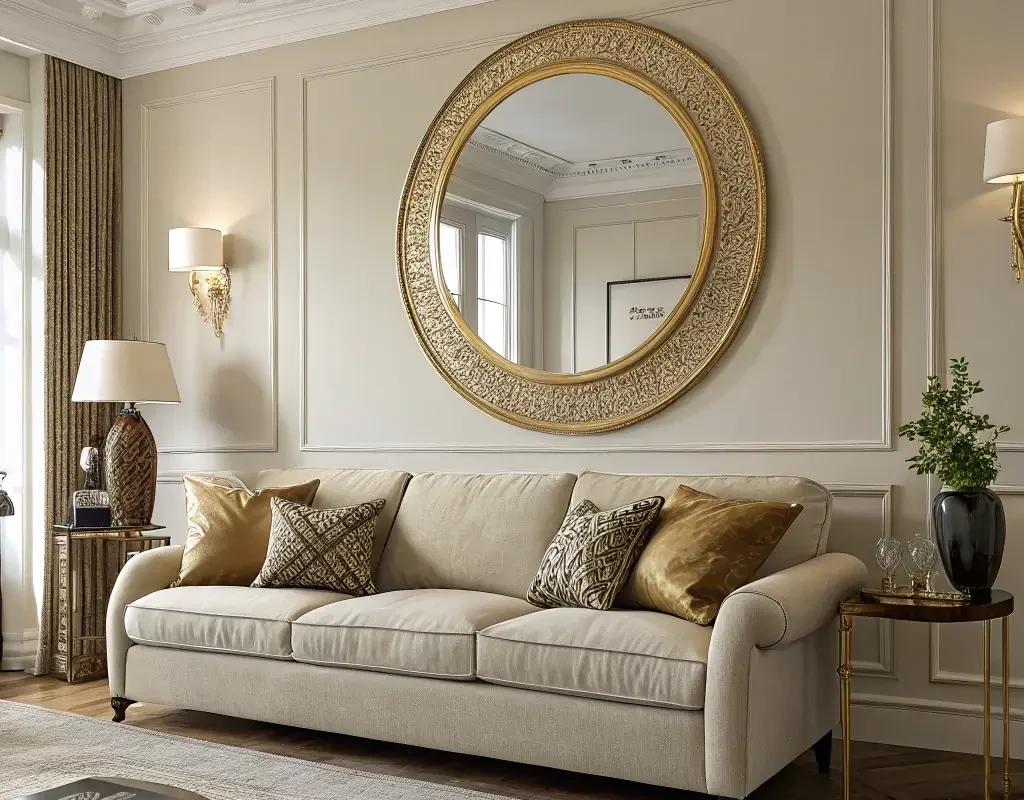
Mirrors do triple duty in living rooms – they reflect light, create illusion of space, and serve as stunning decor. And when we’re talking large wall decor, statement mirrors absolutely deliver.
Style Selection
The frame makes all the difference here. A sunburst mirror screams mid-century modern, while an ornate gilded frame whispers old-world elegance. I’ve got a massive industrial-style mirror with a black metal frame that basically doubles as architecture.
Consider these popular styles:
• Venetian mirrors for glamorous spaces
• Rustic wood frames for farmhouse vibes
• Minimalist designs for contemporary rooms
• Antique or vintage pieces for character and charm
Strategic Placement
Here’s where mirrors get interesting. Place one opposite a window and watch your natural light double. Position it behind a light source to amplify evening ambiance. Just avoid placing mirrors where they’ll reflect clutter or less attractive views – nobody needs to see your pile of unopened mail magnified.
Floating Shelves with Decor
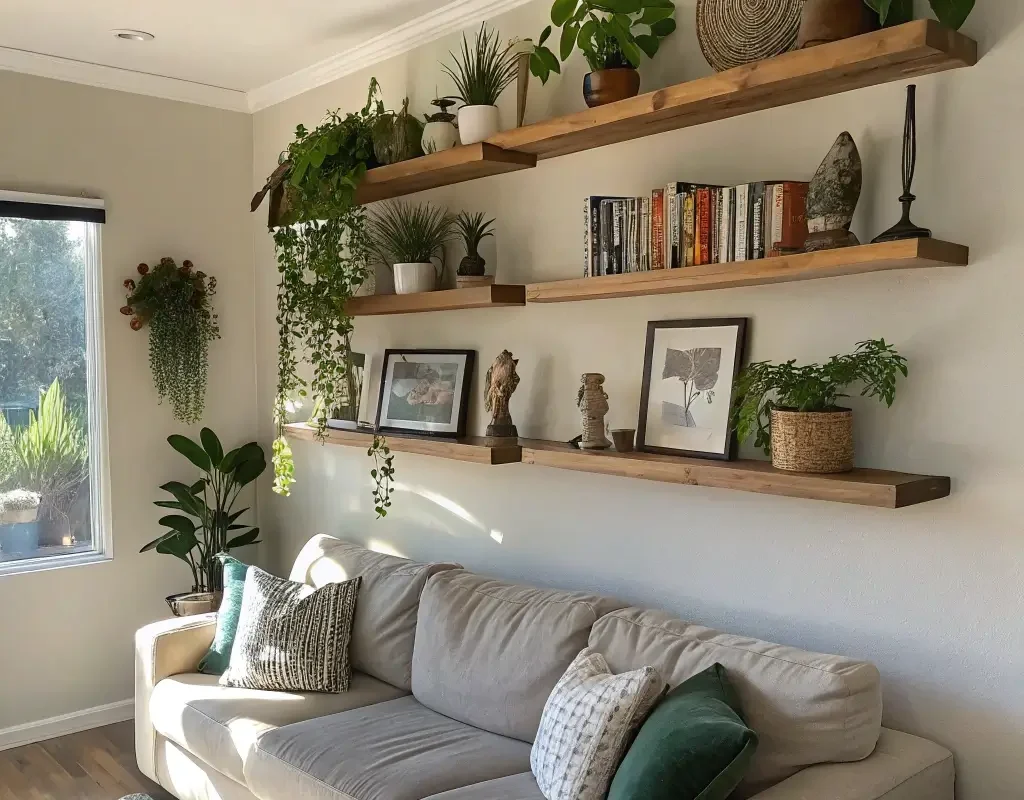
Floating shelves might seem basic, but they’re actually versatile decor powerhouses. They provide storage, display space, and visual interest all at once. Plus, you can change up what’s on them whenever you get bored.
Shelf Styling Secrets
The key to gorgeous floating shelves? The rule of odds. Group items in sets of three or five. Mix heights, textures, and colors. And please, for the love of good design, don’t line up books like soldiers. Stack some horizontally, lean others at angles, and break up book sections with decorative objects.
Here’s my go-to formula:
• Books (mix vertical and horizontal placement)
• Plants (real or quality faux – no judgment)
• Personal objects (travel souvenirs, family heirlooms)
• Candles or lighting elements
• Small artwork or framed photos
Installation Considerations
Don’t cheap out on the mounting hardware. Those shelves holding your grandmother’s china need heavy-duty brackets properly anchored into studs. I learned this lesson the hard way – RIP to my favorite ceramic vase.
Wall-Mounted Sculptures

Ready to get three-dimensional? Wall-mounted sculptures add depth and sophistication that flat art simply can’t match. They cast interesting shadows, catch light differently throughout the day, and basically guarantee your walls won’t be boring.
Material Matters
Metal sculptures work brilliantly in modern spaces. I’ve got a copper tree branch piece that oxidizes slightly over time, constantly evolving its appearance. Wood sculptures bring warmth and organic feel. Ceramic or plaster pieces offer classic elegance.
Consider the weight and mounting requirements carefully. That gorgeous stone sculpture might require professional installation to avoid a midnight crash that scares everyone senseless.
Also Read: 15 Perfect Hallway Wall Decor Ideas for Any Style
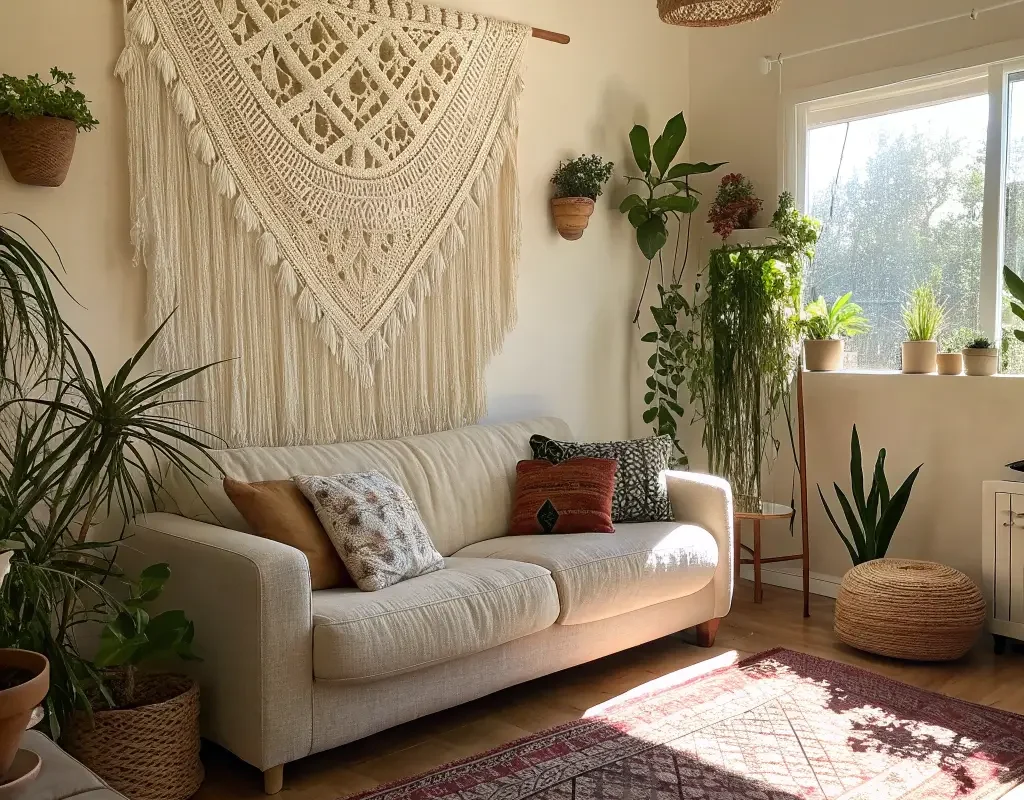
Tapestry or Fabric Wall Hangings
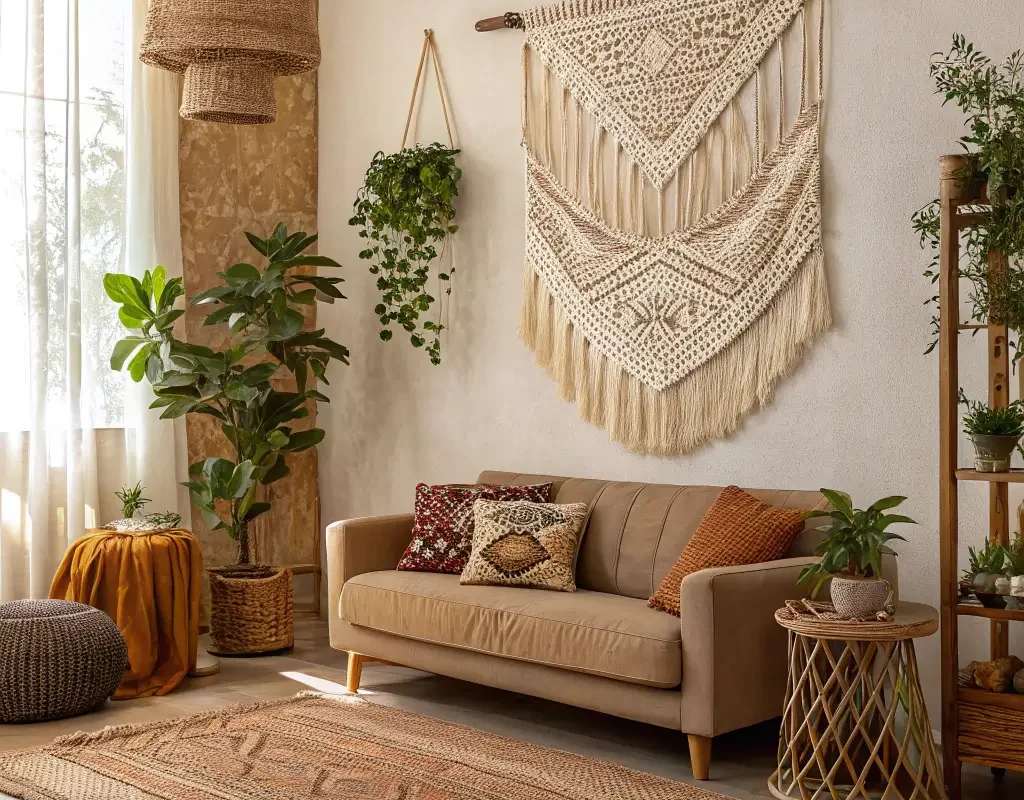
Tapestries aren’t just for college dorms anymore (though we all had that Bob Marley one, didn’t we?). Modern fabric wall hangings offer texture, warmth, and acoustic benefits that hard surfaces can’t provide.
Choosing Your Style
Today’s options range from bohemian macramé to minimalist linen pieces to elaborate woven artworks. I’ve noticed fabric hangings work especially well in rooms with lots of hard surfaces – they soften the echo and create cozier atmosphere.
Look for:
• Natural fibers for organic appeal
• Geometric patterns for modern spaces
• Vintage or antique textiles for unique character
• Custom pieces from local artisans for one-of-a-kind appeal
Hanging Techniques
Skip the thumbtacks. Invest in a proper hanging system – either a decorative rod or invisible mounting system. Your tapestry should hang flat without sagging or pulling. Steam or iron it first (following fabric care instructions) because wrinkles ruin the whole effect.
Metal Wall Art

Metal wall art walks that perfect line between industrial cool and artistic sophistication. Whether you prefer abstract designs or nature-inspired pieces, metal brings drama to large walls like nothing else.
Design Variety
The options here blow my mind. You’ve got:
• Laser-cut designs with intricate patterns
• Hammered metal for textured appeal
• Mixed metal compositions combining copper, brass, and steel
• Kinetic pieces that actually move with air currents
I recently added a large metal world map to my living room – the kind where each continent is a separate piece. It sparks more conversations than any other decor I own.
Maintenance Reality Check
Let’s be real – metal art requires some upkeep. Dust regularly with a soft cloth. Some pieces might need occasional polishing or rust protection, depending on the finish. But IMO, the visual impact totally justifies the minimal maintenance.
Oversized Clocks
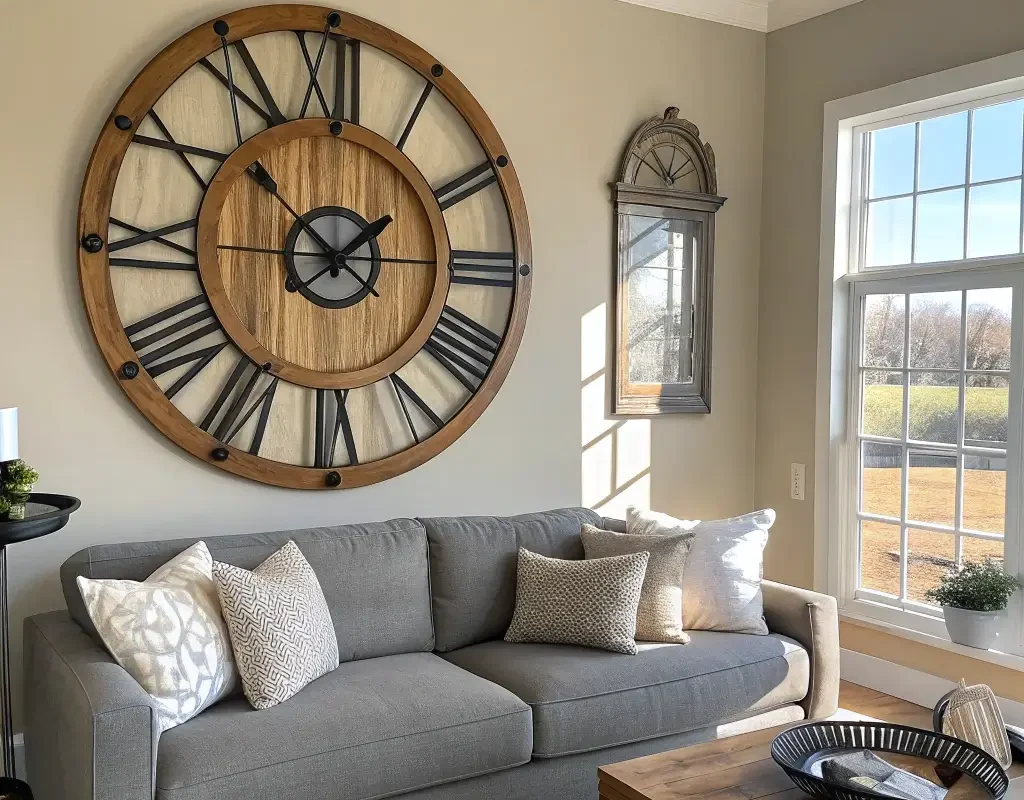
Who says clocks are just functional? An oversized wall clock serves as both practical timepiece and stunning focal point. We’re talking 30+ inches in diameter here – go big or go home.
Style Selection
Your clock choice sets the room’s tone:
• Roman numerals for traditional elegance
• Minimalist designs for contemporary spaces
• Vintage station clocks for industrial charm
• Wooden farmhouse styles for rustic appeal
The best part about clock decor? Nobody questions why you have it. It’s functional art that even your practical-minded partner can’t argue against.
Also Read: 15 Easy Bathroom Wall Decor Ideas for Instant Charm
Wooden Accent Panels
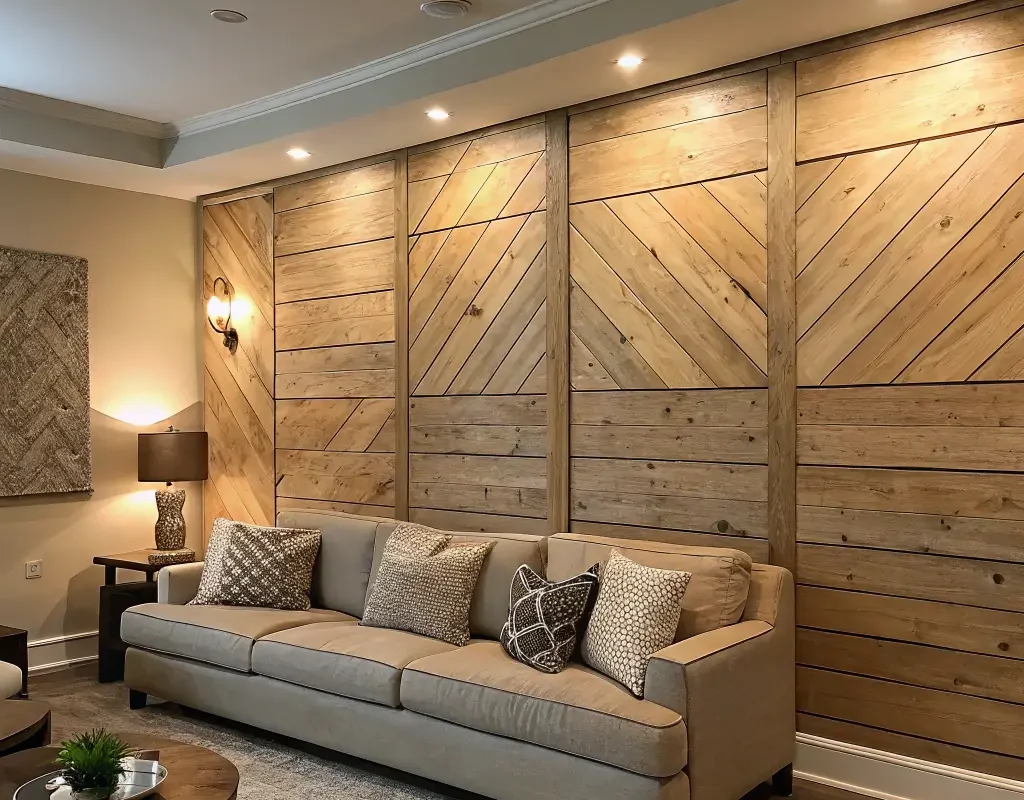
Wood accent walls create warmth and texture that paint alone never could. Whether you go for reclaimed barn wood or sleek modern panels, wood transforms flat walls into architectural features.
Installation Approaches
You’ve got options depending on your DIY confidence:
• Peel-and-stick wood panels for renters or commitment-phobes
• Traditional wood planks for authentic appeal
• 3D wood tiles for geometric interest
• Reclaimed wood for sustainable character
I installed horizontal wood slats on one wall, and it completely changed the room’s proportions. The horizontal lines make the space feel wider and more grounded.
Treatment and Finish
Don’t skip the finishing touches. Seal your wood properly to prevent warping or discoloration. Some people love the natural wood grain, others prefer painted panels. There’s no wrong answer – just make sure it complements your existing decor.
Floor-to-Ceiling Photo Frames
Want maximum impact? Floor-to-ceiling photo arrangements create gallery-worthy displays that tell your story. This isn’t about one massive frame – it’s about creating a cohesive collection that spans vertical space.
Arrangement Strategies
Start from the center and work outward. Mix frame sizes but keep consistent spacing between pieces. I like using paper templates cut to frame sizes – tape them to the wall first to perfect your arrangement without committing to nail holes.
Include:
• Various photo sizes from 4×6 to 16×20
• Mix of color and black-and-white images
• Different frame styles within a cohesive color palette
• Negative space to prevent overwhelming the viewer
DIY Macramé Wall Art
Macramé is having a serious moment, and honestly? Large-scale macramé pieces make incredible statement decor. Plus, making your own means getting exactly what you want at a fraction of retail prices.
Getting Started
Don’t let the knots intimidate you. Basic macramé uses maybe four different knot types, and YouTube University has all the tutorials you need. Start with a simple wall hanging before attempting that elaborate plant hanger system.
Materials you’ll need:
• Cotton cord (thickness depends on your project scale)
• Wooden dowel or branch for hanging
• Scissors (sharp ones – frayed ends look amateur)
• Patience (and maybe wine)
Design Ideas
Think beyond traditional patterns. I’ve seen macramé combined with copper pipes, incorporated into geometric frames, and even featuring colored cords for modern twists. The texture adds something special that printed art can’t replicate.
Wall Murals or Decals
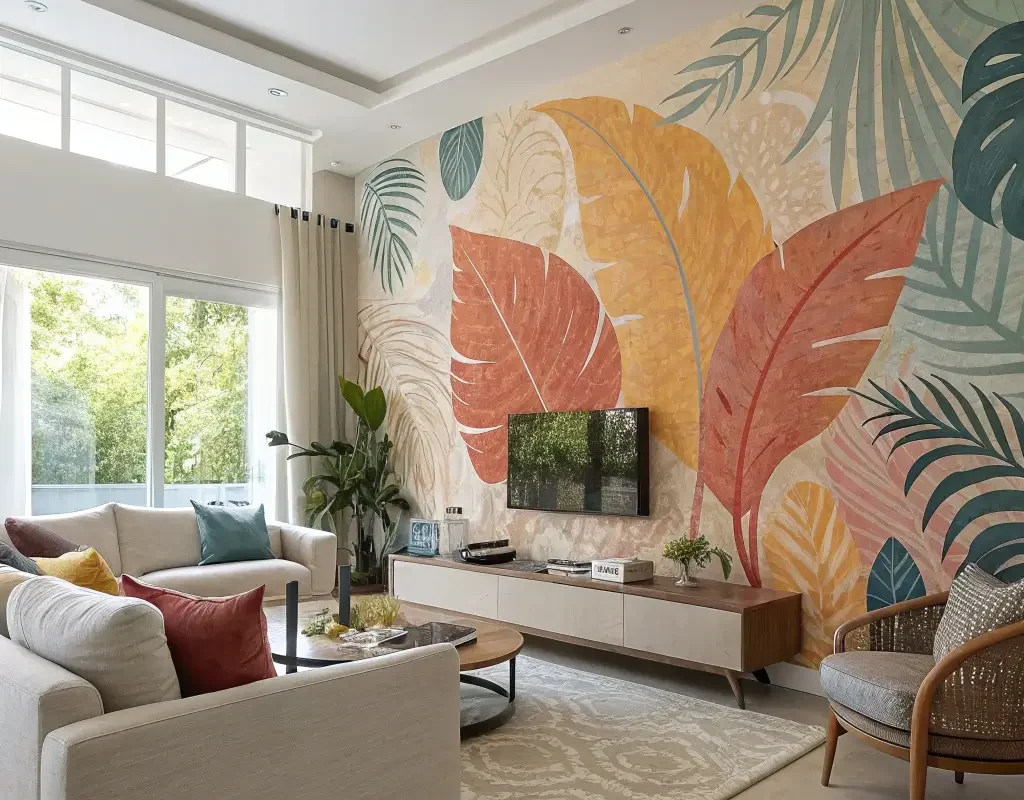
Modern wall murals and decals have come so far from those cheesy quotes your aunt plastered everywhere. Today’s options include photorealistic murals, artistic decals, and removable wallpaper that transform walls into art.
Application Tips
The secret to professional-looking results? Prep work. Clean your walls thoroughly. Smooth out any bumps or imperfections. Use a level and measuring tape religiously. Rushing this part guarantees bubbles and crooked designs.
For large murals, recruit a friend. Four hands work better than two when you’re dealing with massive vinyl pieces. Take your time with the squeegee – smooth from center outward to eliminate air pockets.
Design Selection
Choose designs that enhance, not overwhelm:
• Nature scenes for calming atmospheres
• Geometric patterns for modern appeal
• City skylines for urban vibes
• Abstract designs for artistic flair
Vertical Indoor Green Wall
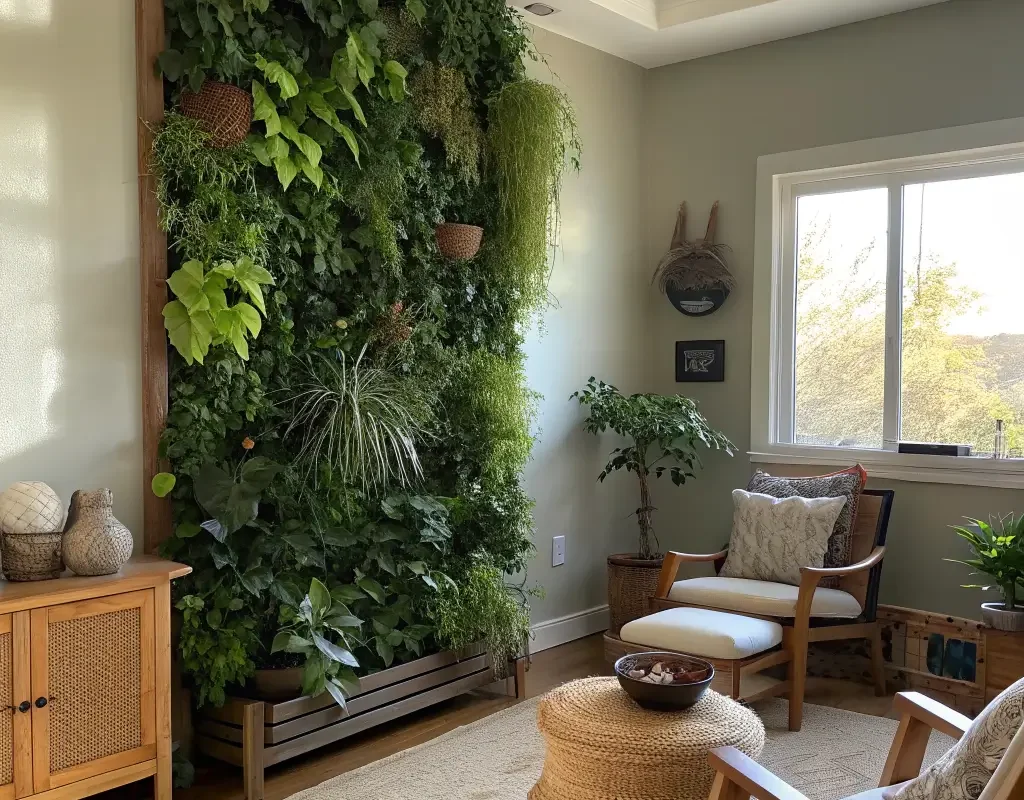
Nothing says “I have my life together” quite like a living wall in your living room. Whether you go full-on vertical garden or strategic plant placement, greenery brings life to large walls.
Plant Selection
Choose plants based on your commitment level and light situation:
• Pothos for low-maintenance drama
• Ferns for lush texture
• Succulents for modern minimalism
• Air plants for nearly zero maintenance
I started with a simple grid of mounted planters and gradually expanded. Now my living wall gets more compliments than actual furniture.
Installation Systems
Options range from simple mounted planters to elaborate hydroponic systems. Consider:
• Pocket planters for easy installation
• Modular systems for flexibility
• DIY wooden frames with multiple small pots
• Professional living wall systems for serious plant parents
Remember – plants need water, and water can damage walls. Invest in quality waterproofing or catch systems to prevent expensive repairs later.
Layered Framed Prints
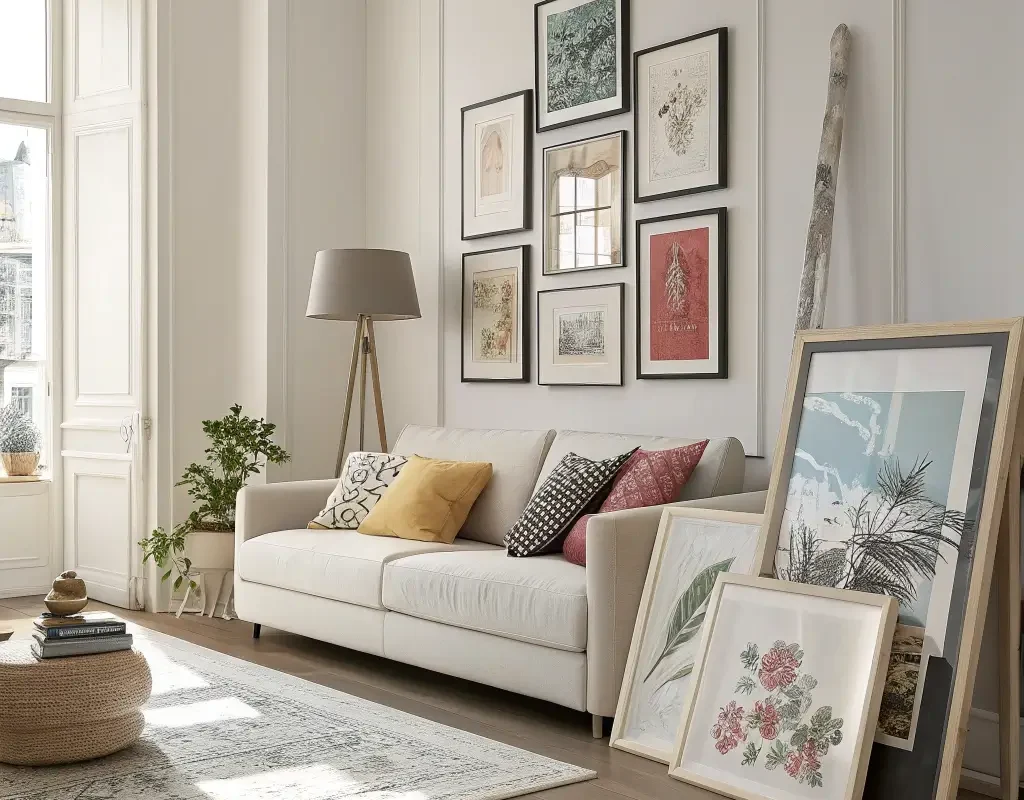
Why hang frames flat when you can create depth through layering? This technique adds dimension and allows for easy swapping when you want change.
Layering Techniques
Start with larger pieces leaning against the wall on a floating shelf or console. Layer medium frames in front, slightly overlapping. Add smallest pieces last. This creates depth that standard hanging can’t achieve.
The beauty of layering? No commitment. Rearrange whenever inspiration strikes. Swap seasonal art without patching nail holes. It’s perfect for renters or the chronically indecisive.
Styling Tips
Mix more than just sizes:
• Combine photography with illustrations
• Vary frame materials (wood, metal, acrylic)
• Include mirrors for reflective elements
• Add small objects between frames for interest
Keep the color palette cohesive to prevent chaos. I stick to three main colors max, using black or white frames as neutrals.
Wrapping It Up
There you have it – fifteen ways to transform that intimidating blank wall into something spectacular. The best part? None of these ideas require an interior design degree or lottery win to pull off.
Remember, your living room should reflect your personality, not some magazine’s idea of perfection. Start with one idea that speaks to you. Test it out. Live with it for a while. You can always adjust, add, or completely change direction – that’s the beauty of decor.
The biggest mistake I see? People getting paralyzed by choices and doing nothing. Pick something and start. Your wall will thank you, your guests will compliment you, and you’ll wonder why you stared at that blank space for so long. Trust me, once you start decorating that large wall, you might find yourself eyeing every other wall in your house with newfound creative ambition. And hey, that’s not necessarily a bad thing :/
Ready to tackle that wall? Grab your measuring tape, channel your inner designer, and make that living room wall work for you. Because life’s too short for boring walls, and your space deserves to be as fabulous as you are.