Your entryway walls are staring at you blankly, aren’t they? Let me guess – you walk past them every single day thinking “I really should do something about this,” but then life happens and those walls keep waiting. Well, friend, today we’re changing that boring story into something way more exciting.
I’ve spent the last three years obsessing over entryway decor (yes, I’m that person), and I’ve discovered that transforming your entrance doesn’t require a complete renovation or a trust fund.
Sometimes all you need are the right ideas and maybe a free weekend. Ready to make your guests go “wow” before they even take their shoes off?
Table of Contents
- 1 Gallery Wall with Family Photos
- 2 Floating Shelves with Plants
- 3 Statement Mirror Display
- 4 Vintage Wall Hooks for Coats
- 5 Seasonal Wall Art Rotation
- 6 Woven Wall Hangings
- 7 Geometric Accent Wall
- 8 Minimalist Floating Key Rack
- 9 Chalkboard Wall for Notes
- 10 Macrame Wall Decor
- 11 Framed Inspirational Quotes
- 12 Rustic Wooden Wall Panels
- 13 Painted Ombre Accent Wall
- 14 Wall-Mounted Planter Garden
- 15 Decorative Wall Sconces
- 16 Bringing It All Together
Gallery Wall with Family Photos
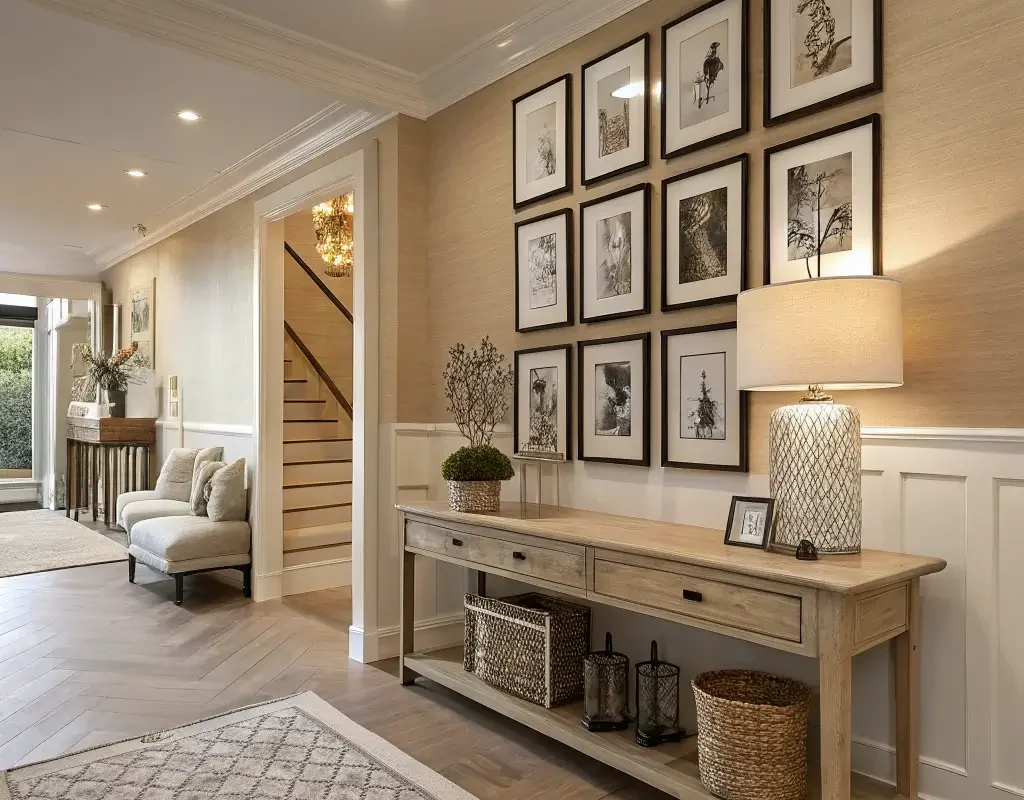
Nothing says “welcome to our home” quite like a gallery wall packed with memories. I remember when I first attempted this – I thought I’d need some fancy design degree to pull it off. Spoiler alert: you don’t.
The secret sauce lies in mixing frame sizes and colors while keeping one element consistent. Maybe you stick with all black frames, or perhaps every photo has the same warm filter. Pick your rule and break everything else – that’s when the magic happens.
Start by laying everything out on the floor first. Trust me on this one – I learned the hard way after putting seventeen holes in my wall before getting the arrangement right. Grab some paper, trace your frames, and tape those papers to the wall first. Your drywall will thank you later.
Making It Personal Without Going Overboard
Here’s where people usually mess up – they think every single photo needs to be a professional portrait. Nope! Mix in some candid shots, maybe that hilarious photo from your disastrous camping trip, or the one where grandma photobombed your wedding pictures. These imperfect moments create the real charm.
Consider adding unexpected elements between the photos. I threw in a small vintage mirror and a wooden letter from our last name. Suddenly, it wasn’t just a photo wall – it became an art installation that happens to feature our favorite people.
Floating Shelves with Plants
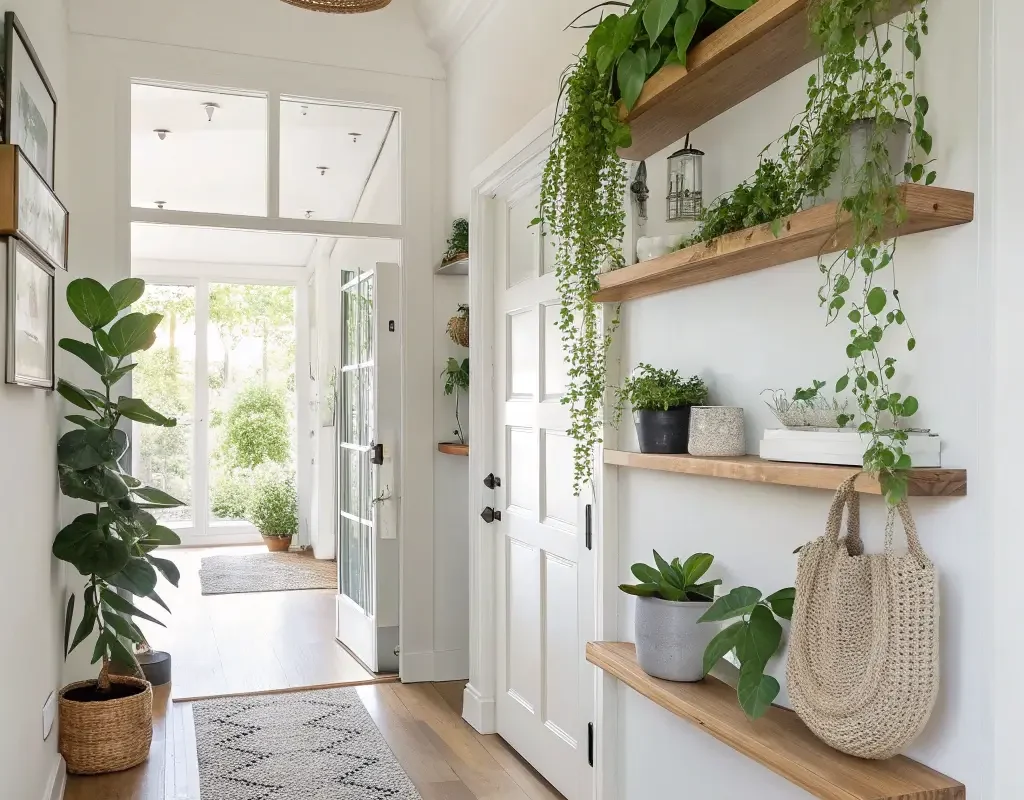
Who decided entryways couldn’t be mini botanical gardens? Floating shelves with plants bring life to your entrance in the most literal way possible. Plus, they’re practically foolproof if you choose the right green friends.
Pothos, snake plants, and ZZ plants are your best bets here – they’ll survive even if you forget they exist for weeks. I’ve tested this theory extensively (not on purpose, but life gets busy, right?). Position your shelves at different heights to create visual interest. Three shelves in a staggered pattern works better than a straight line every single time.
The Plant-Shelf Combo Strategy
Mix your plants with other small decor items. A tiny sculpture here, a beautiful rock there, maybe a small framed photo. The key? Keep it to three items per shelf maximum. Any more and you’re running a cluttered yard sale, not creating an inviting entrance.
Consider the lighting situation in your entryway too. No natural light? No problem! Snake plants and ZZ plants practically thrive on neglect and darkness. They’re the introverts of the plant world, and we love them for it.
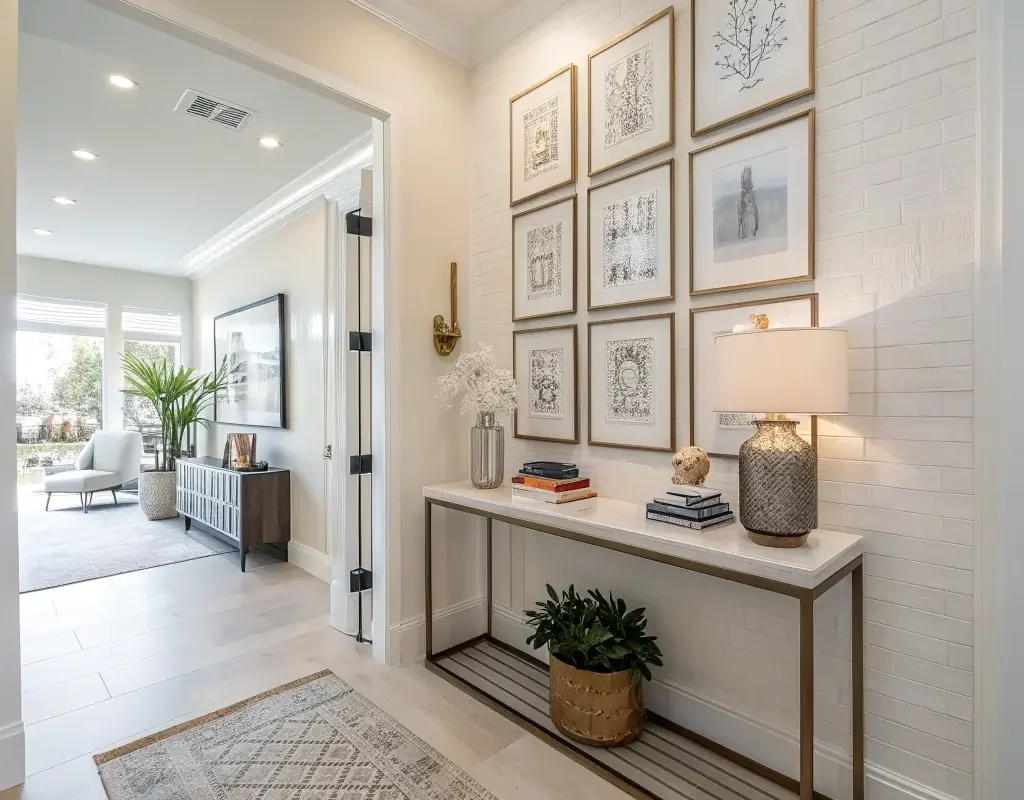
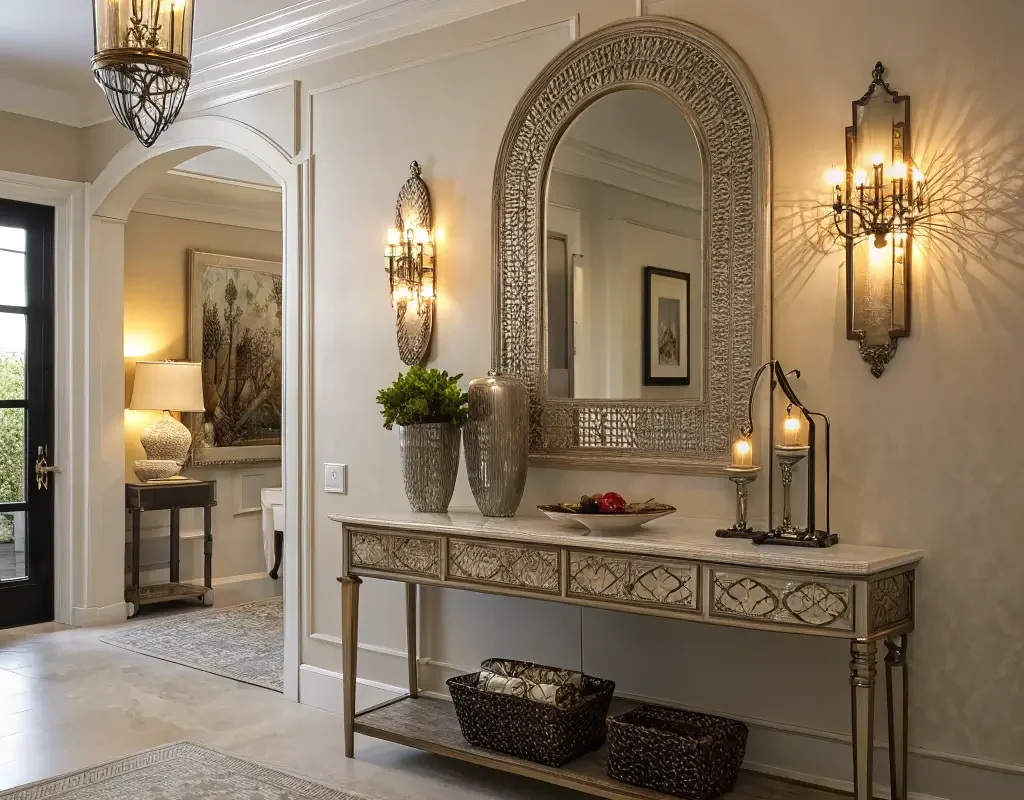
Statement Mirror Display
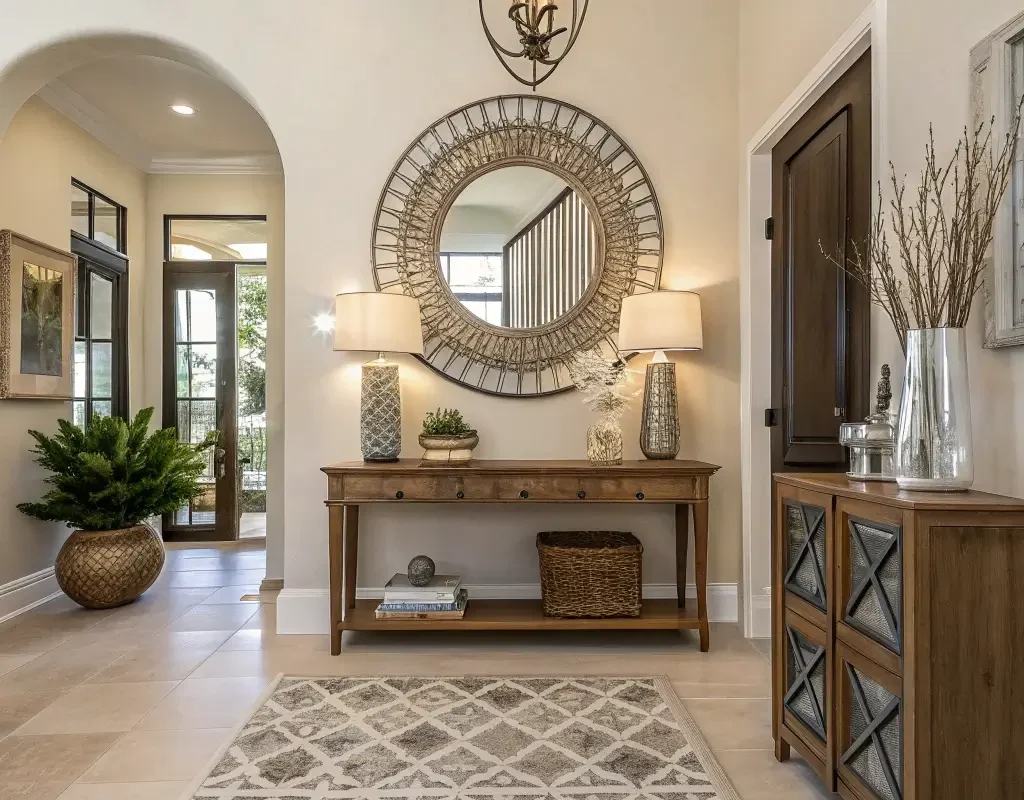
Ever notice how every fancy hotel has a massive mirror in the lobby? There’s a reason for that, and we’re stealing their trick. A statement mirror doesn’t just make your entryway look bigger – it gives everyone a chance to check their appearance before heading out.
Round mirrors soften angular spaces. Rectangular ones add structure to curvy areas. Sunburst mirrors? They scream personality without saying a word. I went with an oversized vintage mirror I found at an estate sale, and honestly, it’s become the conversation starter I never knew I needed.
Positioning Your Mirror for Maximum Impact
Height matters more than you think. Hang your mirror at eye level for the average person in your household – not too high that only basketball players can use it, not so low that everyone has to crouch. Around 57-60 inches from the floor to the center usually hits the sweet spot.
Want to really amp things up? Layer a console table beneath your mirror and style it seasonally. Spring flowers, autumn leaves, holiday decorations – your mirror becomes the backdrop for an ever-changing vignette.
Also Read: 15 Fresh Black Entryway Table Decor Ideas and Design Tricks
Vintage Wall Hooks for Coats
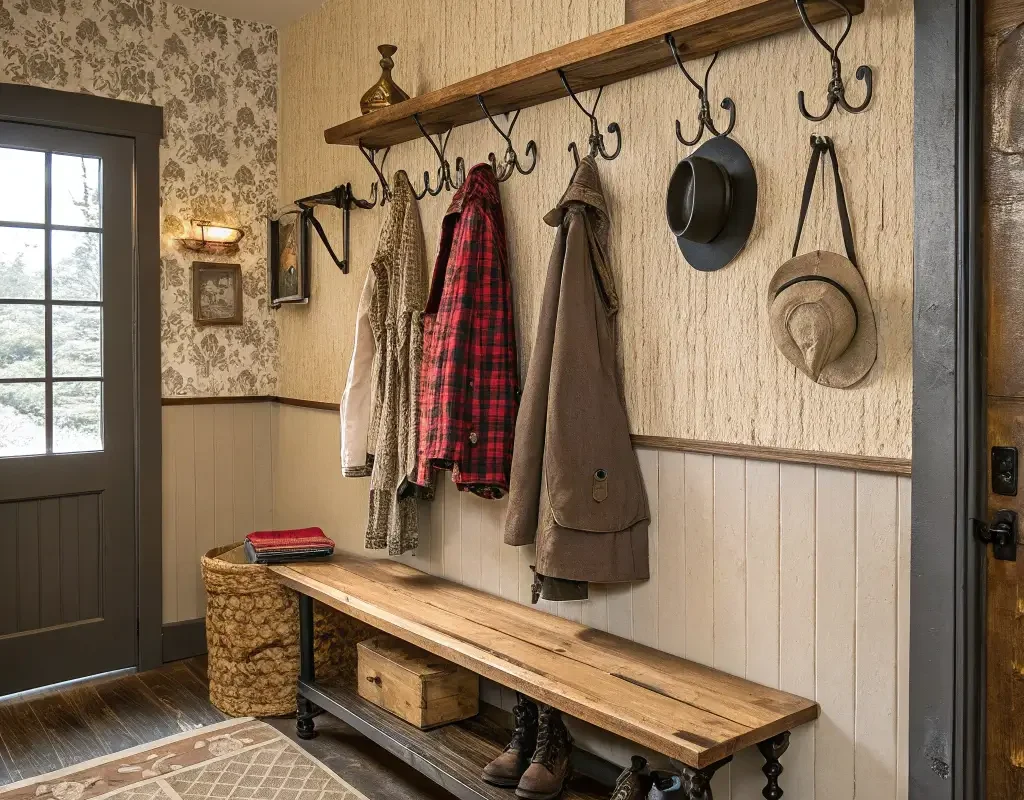
Functional decor is having a moment, and vintage wall hooks are leading the charge. Why hide your beautiful coats in a closet when they can become part of your decor? Found some gorgeous brass hooks at a flea market last summer, and now they’re the hardest working decorations in my home.
Space them about 6-8 inches apart for actual functionality. Too close and you’ll create a tangled mess of sleeves and scarves. Too far and you’re wasting precious wall space that could hold more coats, bags, or even decorative items when not in use.
The trick is choosing hooks that tell a story. Maybe they’re from an old school, a defunct hotel, or your grandmother’s house. Each hook should feel intentional, not like you grabbed a multi-pack from the hardware store (though between you and me, some of those vintage-style reproductions look pretty convincing).
Seasonal Wall Art Rotation
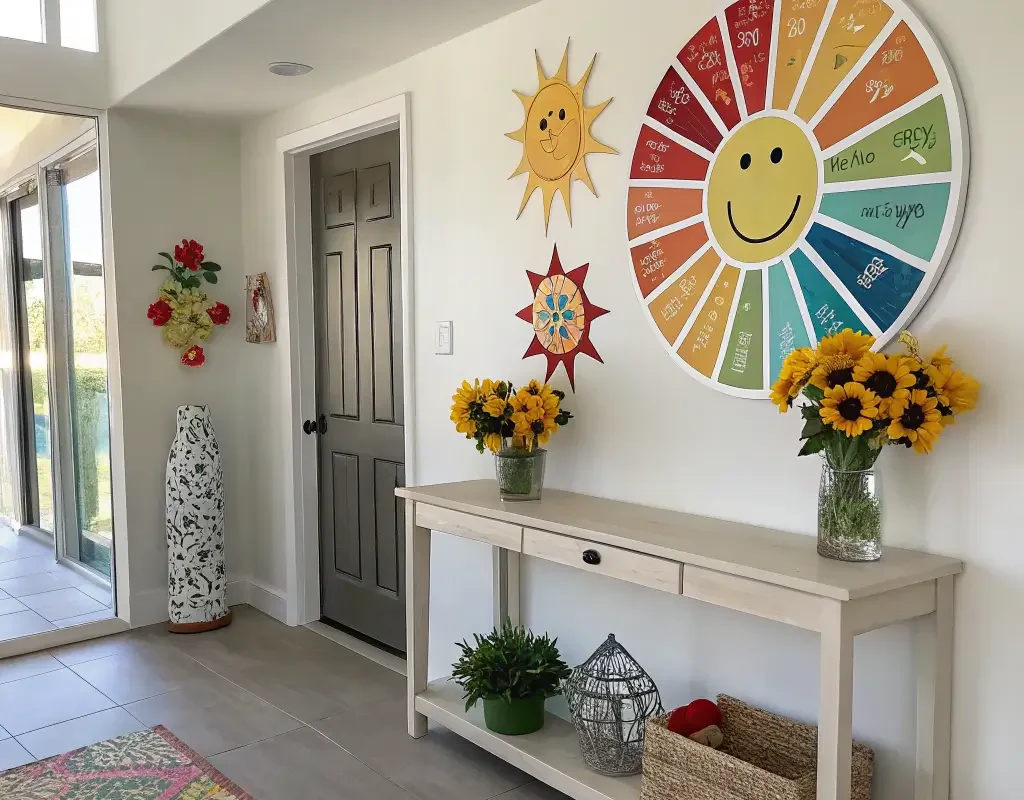
Here’s a controversial opinion: permanent wall art is overrated. Why commit to one look when you can switch things up every few months? Seasonal rotation keeps your entryway fresh and gives you an excuse to go art shopping four times a year. Win-win!
I use a simple picture ledge system that lets me swap artwork without making new holes. Spring gets botanical prints, summer brings beach photography, fall showcases warm abstracts, and winter? That’s when the moody landscapes come out to play.
Building Your Rotation Collection
Start building your collection slowly. Hit up local art fairs, download and print digital art (Etsy is a goldmine), or frame your own photos. The key is keeping your frames consistent while the art changes. Same frames, different vibes – it’s like having four entryways for the price of one.
Store your off-season pieces flat under your bed or in a closet. Label everything clearly because, trust me, you’ll forget which piece goes where when you’re doing the switch at 10 PM on a Sunday night.
Woven Wall Hangings
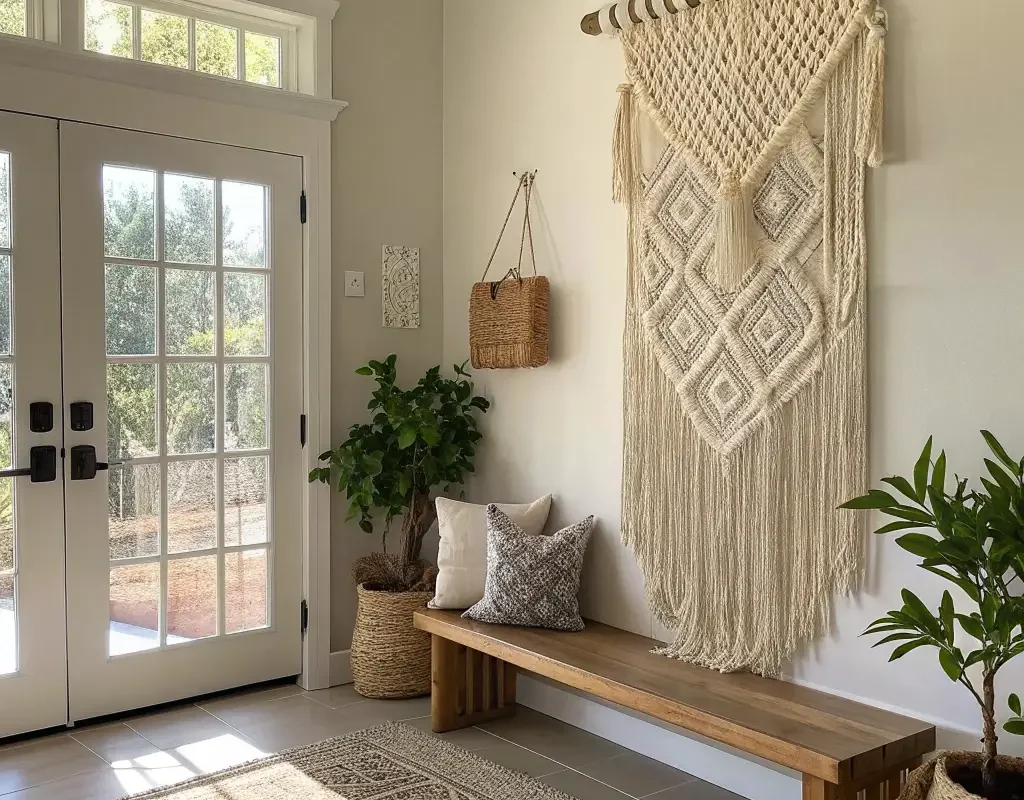
Texture is the unsung hero of good design, and woven wall hangings bring it in spades. They soften hard surfaces, add warmth, and give your entryway that “I definitely didn’t buy everything from the same store” look we’re all after.
Macramé isn’t your only option (though we’ll get to that later). Think about jute tapestries, woven baskets arranged artfully, or even vintage textile pieces. I found an incredible hand-woven piece at a craft fair that cost less than a fancy dinner out, and it gets more compliments than anything else in my home.
Size and Scale Matter
Don’t go too small here – a tiny weaving on a large wall looks like you ran out of money mid-decorating. If your budget’s tight, go for one substantial piece rather than several small ones. A single 3-foot-wide hanging makes more impact than five tiny ones scattered around.
Hang your woven piece at eye level or slightly higher. Use a wooden dowel or branch for hanging if it doesn’t come with one – it adds to that organic, artisanal vibe everyone’s chasing these days.
Also Read: 15 Simple Church Entryway Decor Ideas with Big Impact
Geometric Accent Wall
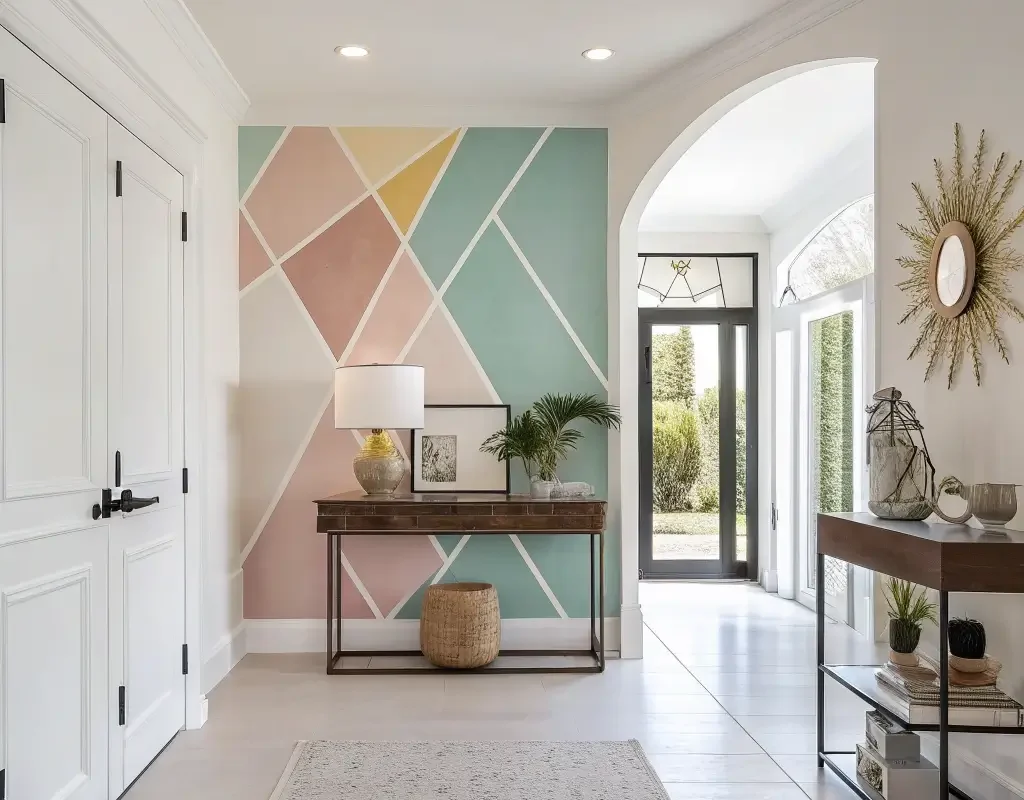
Ready to commit to something bold? A geometric accent wall transforms your entryway from “meh” to “magnificent” in a weekend. And before you panic – no, you don’t need to be a math genius or own a protractor.
Painter’s tape is your best friend here. I created a stunning triangle pattern using nothing but tape, three paint colors, and probably too much coffee. The hardest part? Deciding on the pattern. Mountain peaks, chevrons, color-blocked sections – the possibilities make my head spin in the best way.
Planning Your Geometric Design
Start simple if this is your first rodeo. A single diagonal line creating two color blocks makes a huge impact with minimal risk. Feeling braver? Try a large triangle or diamond shape in a contrasting color. The bolder the contrast, the bigger the statement.
FYI, remove your painter’s tape while the paint is still slightly wet. Learned this one the hard way when I peeled off dry tape and took half my design with it :/ Not my finest moment, but hey, now you know!
Minimalist Floating Key Rack
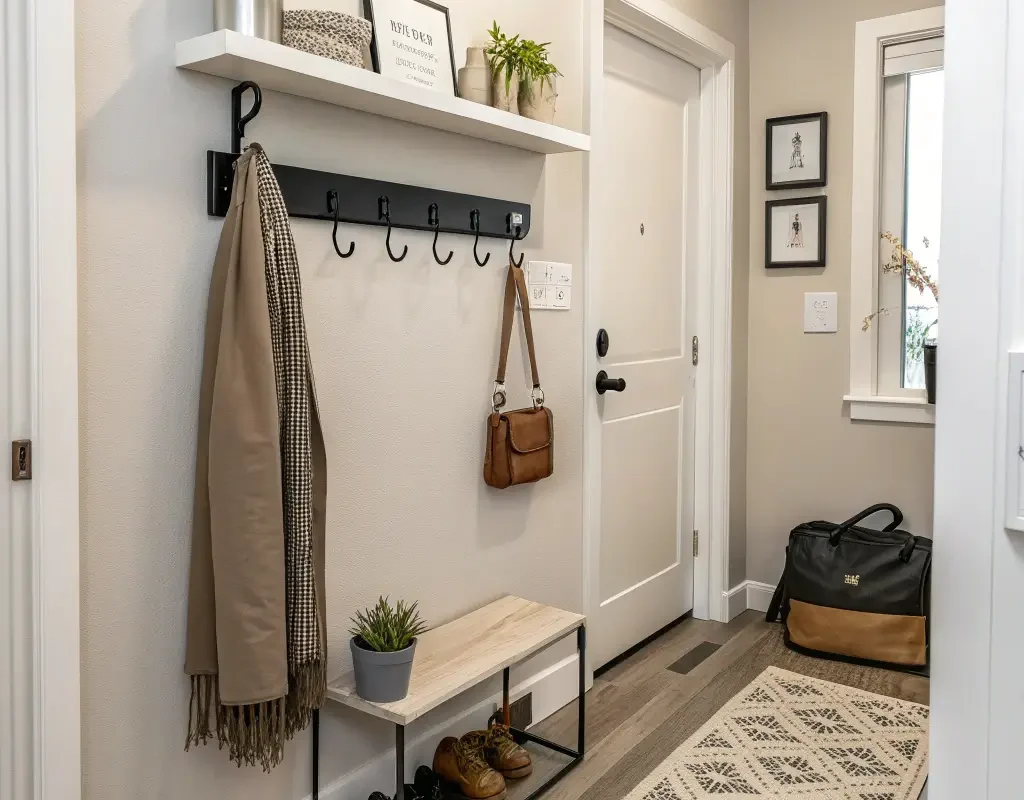
Sometimes less really is more, especially in smaller entryways. A minimalist floating key rack combines form and function without screaming for attention. Think clean lines, quality materials, and just enough space for your essentials.
I made mine from a piece of walnut wood and some small brass hooks. Total cost? Under $20. Total compliments received? Countless. The wood provides warmth while the brass adds a touch of elegance – it’s minimalism with personality.
Positioning and Styling Tips
Install your key rack at about shoulder height near the door. Any lower and you’ll knock keys off with your bag. Any higher and you’ll forget to hang them up (speaking from experience here). Keep it within arm’s reach of your entrance for maximum convenience.
Leave some hooks empty on purpose. Weird advice? Maybe. But empty space prevents that cluttered, overwhelming look that defeats the whole minimalist vibe. Plus, you’ll have room for guests’ keys when they visit.
Chalkboard Wall for Notes

Remember when chalkboard walls were everywhere? Well, they’re back, but smarter this time. An entryway chalkboard wall serves as command central for your household – grocery lists, reminders, sweet notes, or passive-aggressive messages about taking out the trash.
You don’t need to paint the entire wall (though you could). A framed chalkboard or a painted section works just as well. I painted a 3×4 foot rectangle and framed it with molding – instant charm with maximum functionality.
Making It Actually Useful
Here’s the thing nobody tells you about chalkboard walls – regular chalk sucks. Invest in quality chalk markers instead. They don’t create dust, the colors pop, and your writing actually stays legible for more than five minutes.
Create designated zones on your board. Maybe the top is for the week’s schedule, the middle for shopping lists, and the bottom for doodles and quotes. Having a system prevents your chalkboard from becoming an overwhelming mess of random information.
Also Read: 15 Inviting Entryway Decor Ideas That Feel So Cozy
Macrame Wall Decor
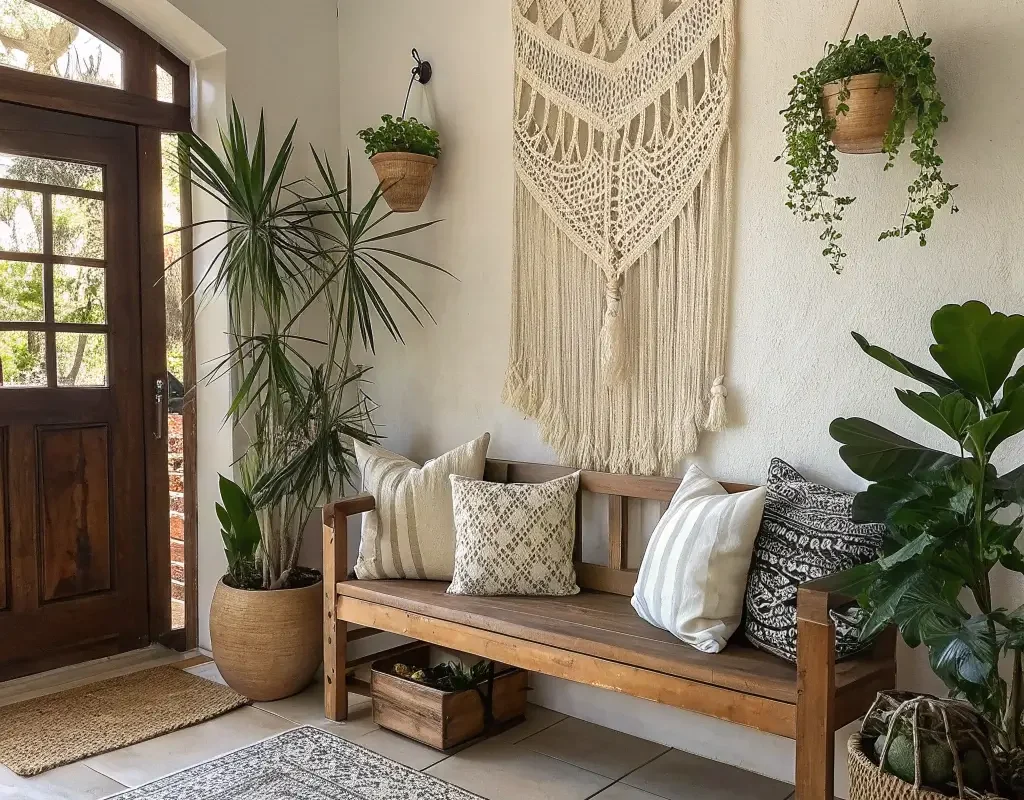
Macrame deserves its own moment beyond just woven hangings. These knotted beauties bring boho charm without the full commitment to a bohemian lifestyle. You can love macrame and still keep your sleek furniture – I promise the design police won’t come for you.
Size variety is crucial here. Mix a large statement piece with smaller accompanying hangings. I have one massive macrame piece flanked by two smaller ones, creating a gallery effect without frames. The texture adds depth to flat walls while keeping things light and airy.
DIY vs. Buy Decision
Want to try making your own? Start with a simple pattern – YouTube University has everything you need. But honestly? Sometimes buying from an actual artisan is worth every penny. They’ve already made all the mistakes and perfected their craft. Support small businesses and get a quality piece – everyone wins.
If you go the DIY route, choose quality cord. Cotton rope creates a softer look, while jute gives you that rustic vibe. Whatever you do, don’t use that scratchy synthetic stuff – it looks cheap and feels worse.
Framed Inspirational Quotes
Before you roll your eyes, hear me out. We’re not talking about those generic “Live, Laugh, Love” situations. Choose quotes that actually mean something to you, that make you smile, or remind you why you get up in the morning.
I’ve got a framed quote from my favorite book that nobody else understands, but it makes me happy every time I see it. Mix typography styles, frame colors, and sizes to create visual interest. Hand-letter one yourself if you’re feeling artsy – imperfection adds character.
Making Quotes Feel Fresh
The secret to non-cheesy quote displays? Quality over quantity and presentation over preachiness. One beautifully framed, meaningful quote beats ten random motivational posters every time. Choose fonts that match your decor style – modern sans-serif for contemporary spaces, script for traditional homes.
Consider the frame as much as the quote. A vintage frame can make even a simple word feel special. Metallic frames add glamour, while natural wood keeps things grounded. The frame is half the impact, IMO.
Rustic Wooden Wall Panels

Wood paneling isn’t just for mountain cabins anymore. Rustic wooden wall panels bring instant warmth and texture to sterile entryways. We’re talking reclaimed barn wood, shiplap, or even those peel-and-stick wood-look panels that fool everyone (your secret’s safe with me).
I installed horizontal wood planks on just the bottom half of my entryway wall, and suddenly the whole space felt intentional. The wood adds architectural interest without overwhelming the space. Plus, it hides scuff marks from bags and shoes – practical magic at its finest.
Installation Without Intimidation
Real wood installation requires some DIY confidence and proper tools. But those peel-and-stick options have gotten seriously sophisticated. They look remarkably real and install in an afternoon. No saw required, no marriage-testing arguments about measurements.
Whatever route you choose, vary your wood tones slightly. All one color looks flat and fake. Mix in some lighter and darker pieces to create that authentic, weathered look everyone’s after. Sand down any rough edges if using real wood – splinters in the entryway aren’t welcoming.
Painted Ombre Accent Wall
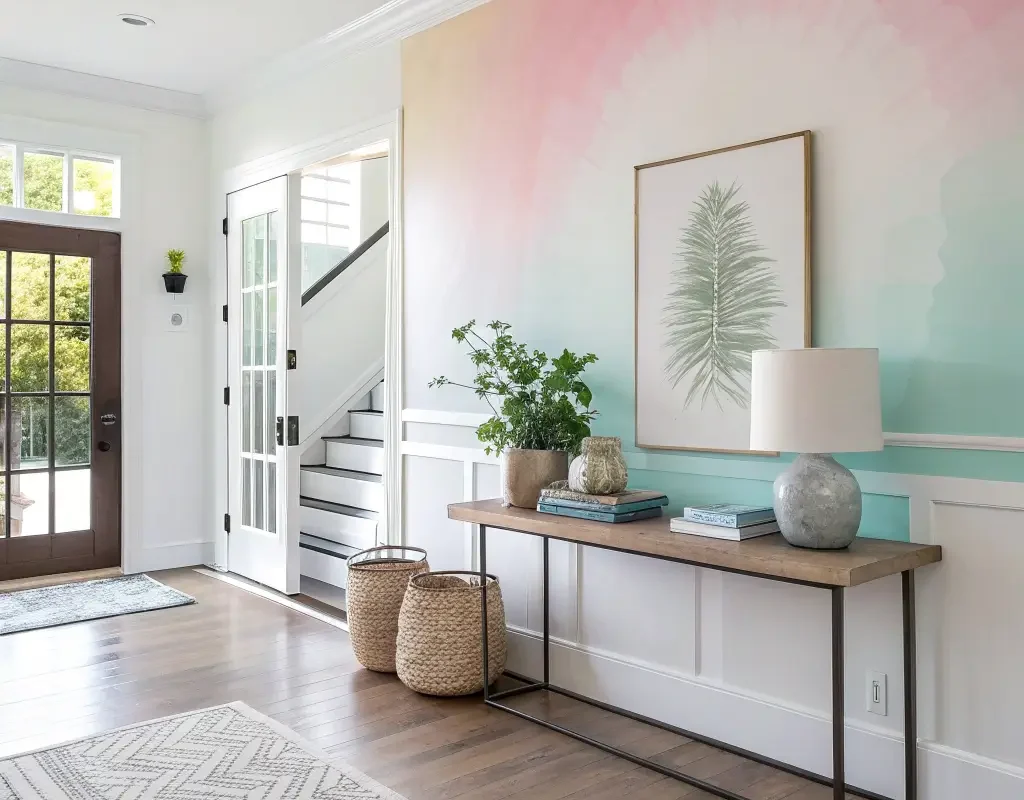
Ombre walls create drama without aggression. The gradual color fade draws eyes upward, making ceilings feel higher and spaces feel larger. It’s basically the push-up bra of wall treatments – enhancing what you’ve got in the best possible way.
Choose colors from the same family for a subtle effect, or go bold with contrasting hues. I went from deep navy at the bottom to pale sky blue at the top, and now my entryway feels like it opens to the heavens. Too dramatic? Maybe. Do I care? Not even a little.
The Blending Technique That Actually Works
Here’s the real secret: work in horizontal sections and blend while wet. Use a large brush or sponge to blur the lines between colors before they dry. Work quickly but don’t panic – ombre is forgiving because it’s supposed to look organic.
Start with your lightest color as the base coat. Once dry, mark your sections lightly with pencil. Apply colors from light to dark or dark to light, overlapping slightly. A spray bottle with water helps keep edges wet for blending. This technique saved my sanity and my wall.
Wall-Mounted Planter Garden

Why should outdoor walls have all the fun? Wall-mounted planters turn your entryway into a vertical garden that makes everyone stop and stare. We’re bringing the outside in, but in a controlled, non-messy way.
Mix planter styles for visual interest. Geometric metal planters, woven baskets, ceramic pots – variety is your friend here. I combined three different styles at varying heights, and it looks intentionally eclectic rather than randomly thrown together.
Plant Selection for Vertical Success
Choose trailing plants for drama – pothos, string of pearls, or trailing philodendrons create that jungle vibe. Mix in some upright plants for structure – snake plants or small ferns work great. The combination of trailing and upright creates a full, lush look.
Install planters securely – nobody wants a face full of soil when they’re trying to leave for work. Use appropriate anchors for your wall type. Drywall needs proper anchors, not just screws. Learn from my first attempt that ended with a dirt explosion at 7 AM on a Monday.
Decorative Wall Sconces
Lighting changes everything, and decorative wall sconces do double duty as art and illumination. Forget boring overhead fixtures – sconces add ambiance and style while actually helping you see your keys.
Battery-operated LED sconces have revolutionized the game. No electrician needed, no rewiring required. Just install and enjoy. I found vintage-style brass ones that run on rechargeable batteries, and guests always assume we had them professionally installed.
Placement and Pairing Strategies
Install sconces at about 60-66 inches from the floor for optimal light distribution. Pair them flanking a mirror or artwork for a designer look. Or stagger them at different heights for an asymmetrical approach that feels modern and intentional.
Consider dimmer options or smart bulbs if you’re going the wired route. Bright light for finding things, soft light for ambiance – your entryway becomes a mood ring for your home. The ability to adjust lighting based on time of day or occasion? That’s next-level hosting.
Bringing It All Together
So there you have it – fifteen ways to transform those blank entryway walls from forgotten surfaces into conversation starters. The best part? You don’t have to choose just one. Mix and match these ideas to create an entrance that’s uniquely yours.
Start with what speaks to you most. Maybe it’s the gallery wall because you’re sentimental, or perhaps the geometric accent wall because you’re bold. Whatever you choose, remember that your entryway sets the tone for your entire home. Make it count, make it yours, and most importantly, make it something that makes you smile every time you come home.
Your walls have been patient long enough. Time to give them the glow-up they deserve. Which idea are you tackling first? Because honestly, those blank walls have had their moment – it’s time for something way more interesting to take center stage.