You know that feeling when you walk into someone’s home during the holidays and everything just feels right? That warm, cozy vibe that makes you want to curl up with hot chocolate and never leave? Yeah, that’s farmhouse Christmas magic right there. And honestly, achieving that look isn’t as complicated as Pinterest makes it seem.
I’ve spent the last five years perfecting my own farmhouse Christmas aesthetic (and making plenty of mistakes along the way). Trust me, you don’t need to blow your entire December budget at Magnolia Market to nail this style.
What you really need are some solid ideas and maybe a trip to your local craft store. Or your backyard. Seriously.
Let’s talk about 10 farmhouse Christmas decor ideas that’ll transform your space from basic to breathtaking. And before you ask – yes, these actually work in real homes where people live, not just those pristine Instagram shots where nobody ever sits on the furniture.
Rustic Wooden Ornament Display
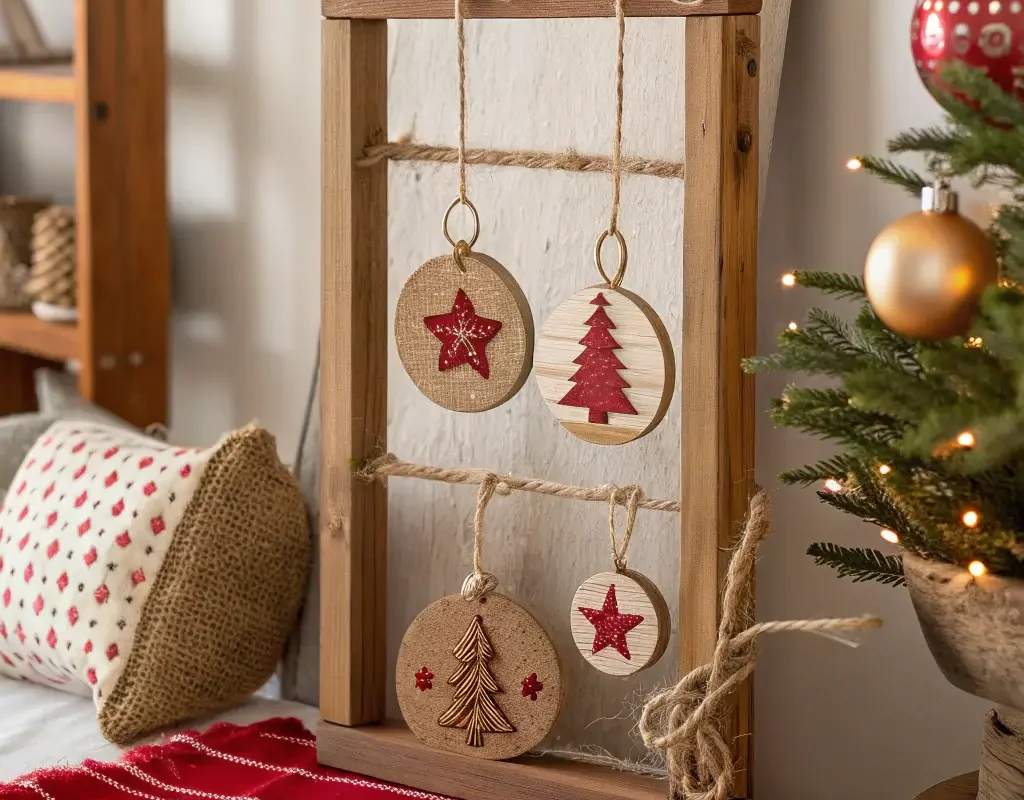
Remember those fancy ornament displays at high-end boutiques that cost more than your monthly coffee budget? Skip ’em. Creating your own rustic wooden ornament display brings way more character to your space, and you actually get to enjoy making it.
The Magic of Imperfect Wood
I stumbled upon this idea last year when my artificial tree decided to give up on life mid-December. Instead of panicking, I grabbed some reclaimed barn wood from our garage and created something unexpectedly gorgeous. The beauty lies in the imperfections – knots, grain patterns, even old nail holes add character you can’t fake.
Start with a simple wooden ladder, old window frame, or even thick branches from your yard. Mount them against a wall or lean them in a corner. Then hang your ornaments at varying heights using jute twine or fishing line. The key? Mix textures like burlap balls, wooden stars, and metal bells.
Making It Work in Small Spaces
Don’t have room for a full tree? This display method works brilliantly. Here’s what makes it perfect:
- Takes up minimal floor space
- Creates vertical interest on blank walls
- Easily customizable to any size
- Doubles as year-round decor with different ornaments
Pro tip: Add battery-operated fairy lights weaved through the display. It creates this magical glow that makes even the simplest ornaments look expensive.
Cozy Plaid Throw & Pillow Setup
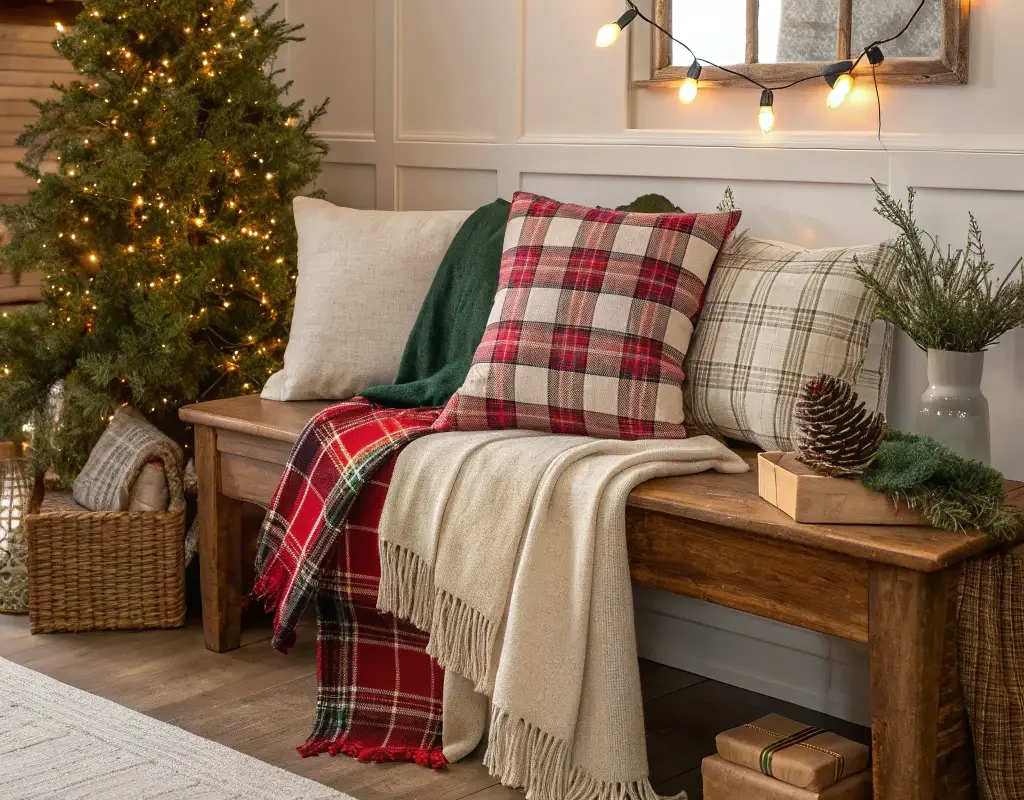
Nothing screams farmhouse Christmas quite like plaid everything. But here’s the thing – you can definitely overdo it. I learned this the hard way when my living room looked like a lumberjack convention exploded in it.
The Art of Plaid Balance
The secret to nailing this look? Layer different plaid scales and colors strategically. Start with one large-scale plaid throw on your sofa. Then add smaller plaid patterns on accent pillows. Mix in some solid textures like cable knit or faux fur to break things up.
My go-to combination that never fails:
- Buffalo check throw in classic red and black
- Small gingham pillows in cream and green
- One solid cream cable-knit pillow
- A chunky knit throw for texture contrast
Creating Conversation Areas
Ever notice how the coziest farmhouse spaces make you want to sit and chat for hours? That’s intentional. Arrange your throws and pillows to create inviting conversation nooks. Drape that plaid throw casually over a chair arm – not perfectly folded, but like someone just got up for more cookies.
Place pillows at angles that encourage people to sit and stay. And here’s a weird trick that works: leave one throw slightly unfolded on an ottoman. It basically screams “grab me and get comfy” to your guests.
Mason Jar Candle Centerpieces
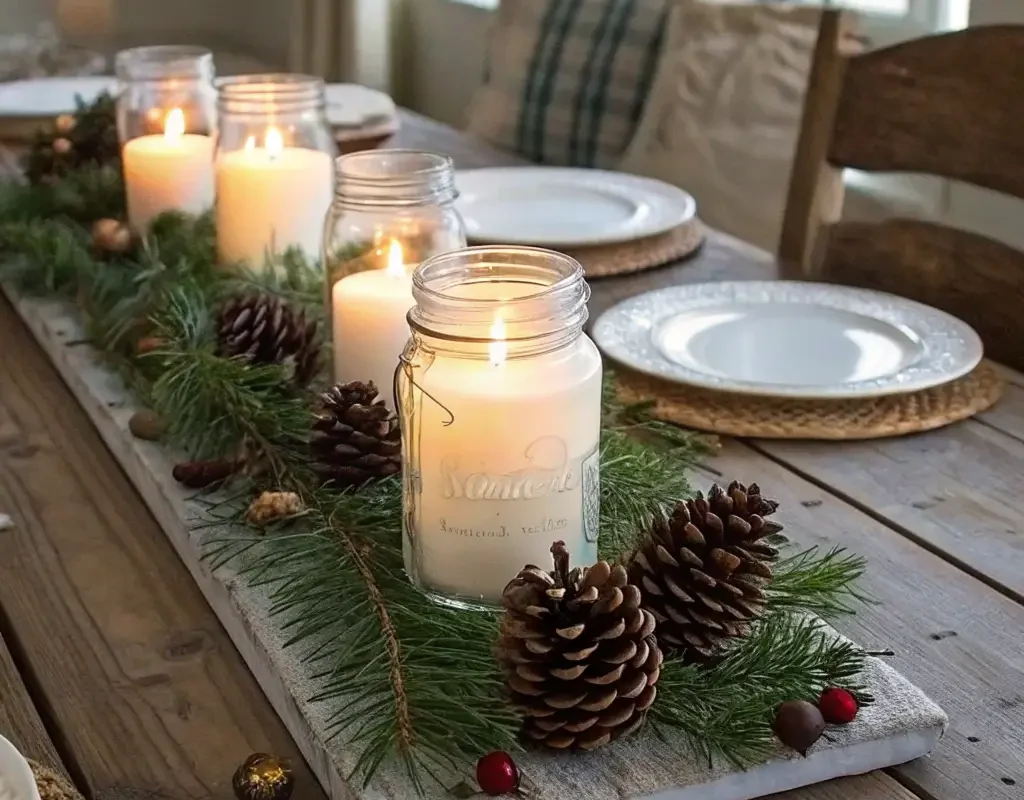
Okay, I know what you’re thinking. Mason jars? How original, right? But hear me out – when done right, mason jar centerpieces bring that perfect farmhouse glow without looking like you raided a craft fair from 2015.
Elevating the Basic Jar
The trick is all in the details. Don’t just plop a candle in a jar and call it done. Layer elements to create depth:
- Fill the bottom with coarse salt or fake snow
- Add cranberries, mini pinecones, or coffee beans
- Use pillar candles that fit snugly, not tiny votives swimming in space
- Wrap the rim with twine, ribbon, or mini garland
Creating Impact with Groupings
Single mason jars look lonely. Group them in odd numbers (three or five work best) on a wooden tray or rustic board. Vary the heights by placing some on wooden blocks or thick books wrapped in brown paper.
Here’s my favorite setup that guests always compliment:
- Three different sized jars
- Each filled to different levels with Epsom salt
- White pillar candles of varying heights
- Fresh rosemary sprigs tucked around the base
- Everything sitting on a slice of tree trunk
The whole thing costs maybe $15 to make but looks like those $75 centerpieces from fancy home stores.
Also Read: 10 Festive Christmas Door Decorating Contest Ideas for Winners
Farmhouse Kitchen Holiday Garland
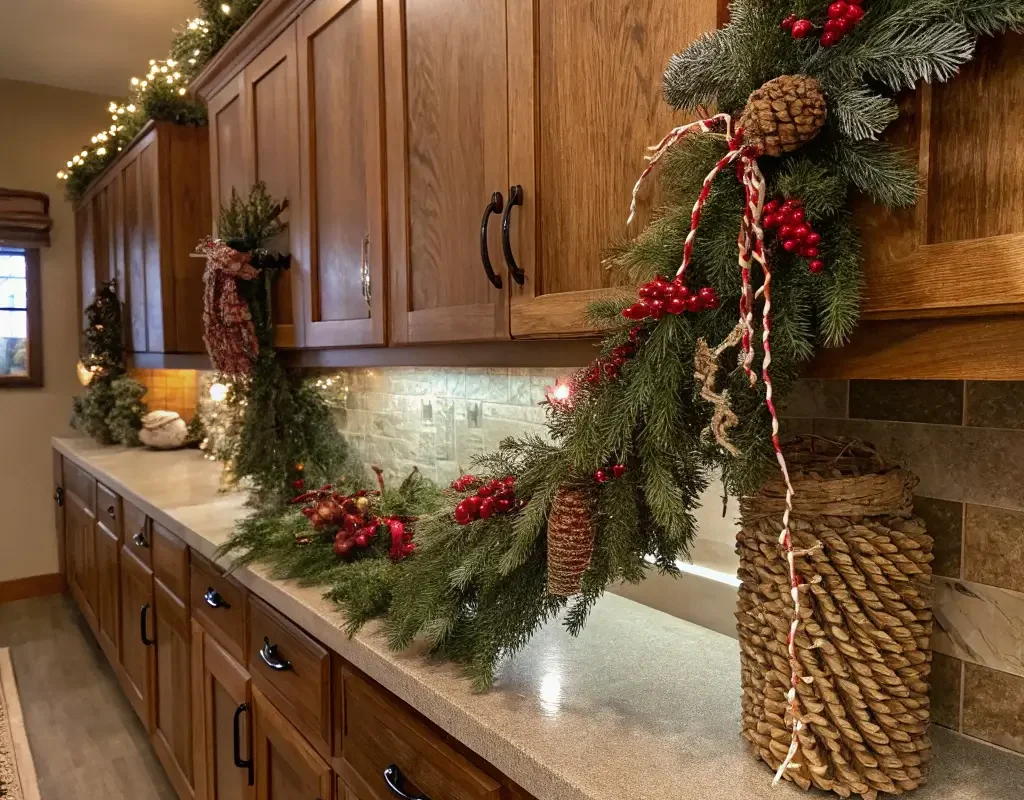
Your kitchen works hard all year. During Christmas? It deserves to look festive while still being functional. Kitchen garland that doesn’t interfere with cooking? That’s the dream.
Practical Meets Pretty
Skip the traditional pine garland that drops needles in your soup. Instead, create garland using elements that can handle kitchen life:
- Dried orange slices (bonus: they smell amazing)
- Cinnamon sticks bundled with twine
- Mini wooden spoons painted with festive designs
- Felt balls in neutral colors
- Popcorn and cranberry strings (classic for a reason)
String these along twine or thin rope, leaving space between elements so it doesn’t look cluttered. The best part? Most of these materials can survive steam from cooking and won’t wilt like fresh greenery.
Strategic Placement Tips
Don’t just drape garland anywhere. Think about high-impact spots that won’t get in your way:
- Above upper cabinets (that dusty space finally has purpose!)
- Along open shelving between dishes
- Around a window frame above the sink
- Across the range hood (if it’s not too close to heat)
IMO, the key is keeping it simple enough that you can still function in your kitchen. Nobody wants to dodge garland while flipping pancakes on Christmas morning.
DIY Wooden Advent Calendar
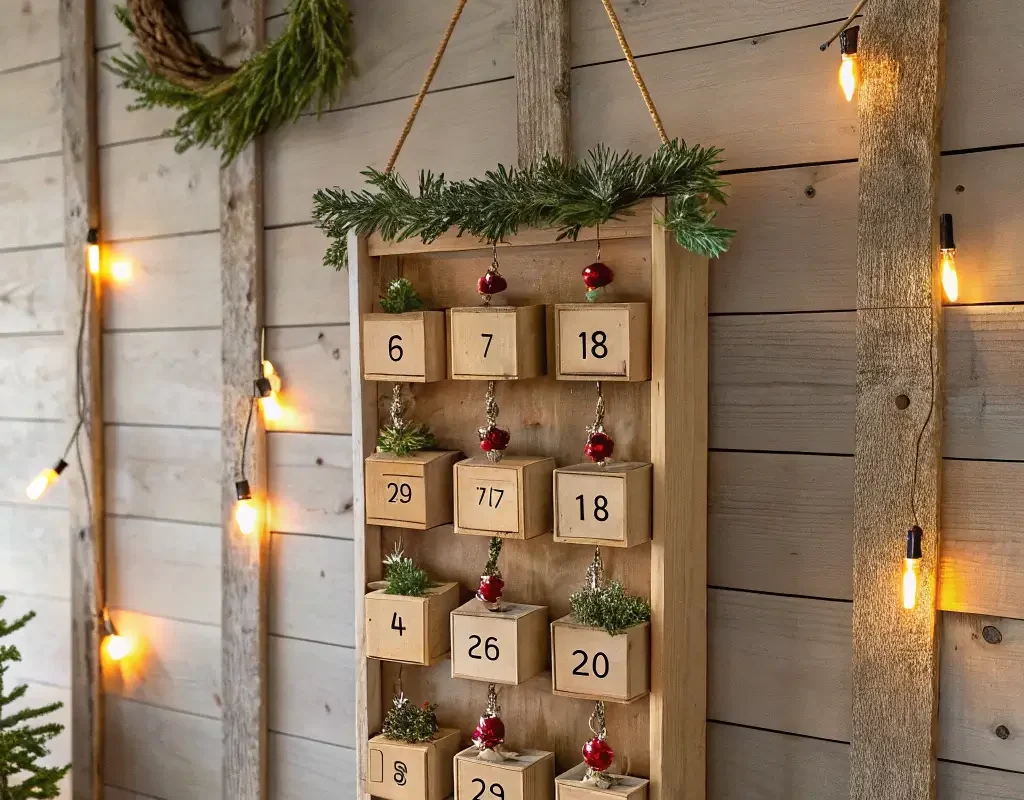
Store-bought advent calendars always disappoint me. They’re either too cutesy or filled with terrible chocolate. Creating your own wooden advent calendar changes the game completely – plus, you can reuse it every year.
Building Your Base
You don’t need advanced woodworking skills here. Seriously. My first attempt used an old wooden frame and tiny paper bags. It worked perfectly! Here are three approaches that anyone can tackle:
The Ladder Method:
- Use a decorative ladder or make one from branches
- Hang 24 small bags or boxes from the rungs
- Number them with stamps or hand-lettering
The Board Approach:
- Mount a large wooden board on the wall
- Attach 24 small hooks or nails in a grid pattern
- Hang numbered pouches or mini stockings
The Tree Design:
- Cut a triangular piece of plywood
- Paint it green or leave natural
- Attach small boxes or pockets in tree formation
Filling Ideas Beyond Candy
What makes farmhouse advent calendars special? Thoughtful, non-commercial fillings. Try these:
- Handwritten activity cards (bake cookies, watch a holiday movie)
- Small ornaments that build a collection
- Tea bags or hot chocolate packets
- Mini puzzles or brain teasers
- Family photo memories
- Coupons for experiences (extra bedtime story, choose dinner menu)
My kids actually prefer these to candy now. Well, mostly. They still ask for chocolate on December 24th :/
Vintage Sign Christmas Wall Decor
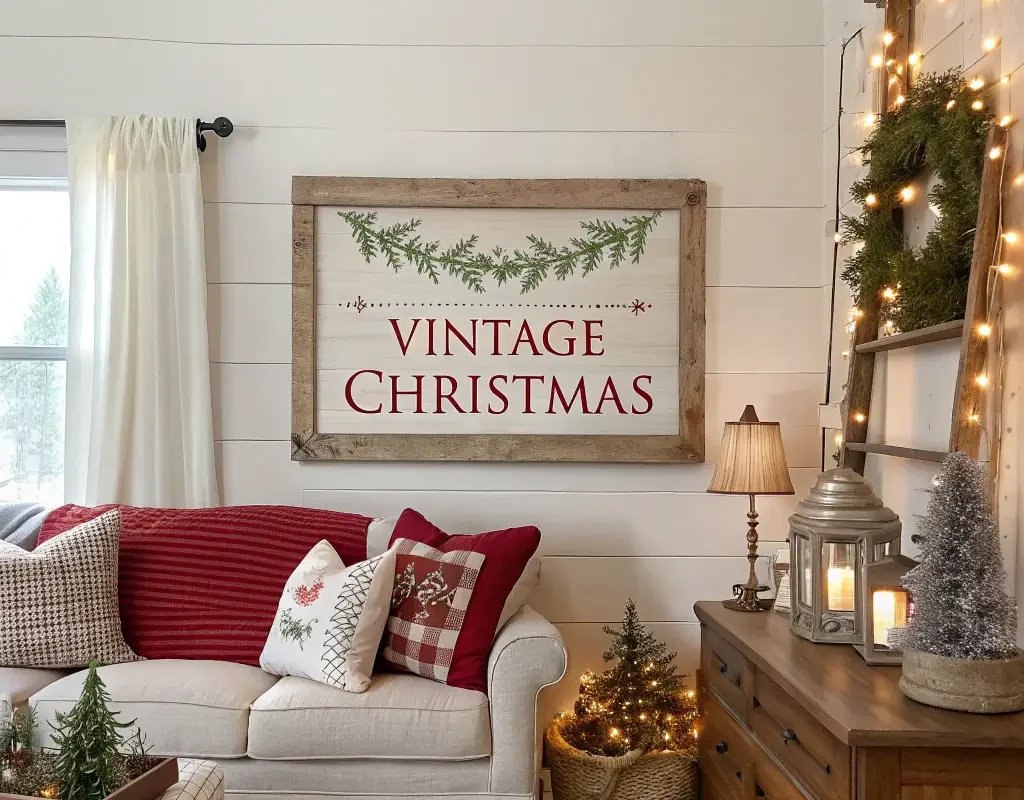
Those perfectly distressed signs at boutique shops? They want $80 for something you can make for $10. Creating vintage-style Christmas signs adds instant farmhouse charm without the boutique price tag.
Achieving Authentic Vintage Look
The secret to great farmhouse signs isn’t perfection – it’s controlled imperfection. Start with plain wood boards from any hardware store. Sand the edges rough, not smooth. This creates that worn, handled-for-decades look.
For lettering, you’ve got options:
- Stencils for consistent typography
- Hand-painting for authentic imperfection
- Transfer method using printed text and Mod Podge
- Wood burning for permanent designs
My favorite technique? Paint your letters, then sand them lightly after drying. It creates natural distressing exactly where real wear would occur.
Message Ideas That Feel Genuine
Skip the generic “Joy” and “Peace” unless they really speak to you. Farmhouse style celebrates real life, so choose messages that feel authentic:
- “Christmas Cookies Made Daily”
- “Chaos & Cocoa Served Here”
- “Farm Fresh Christmas Trees” (even if you bought yours at Target)
- “Sleigh Parking Only”
- Family quotes or inside jokes
- Coordinates of your home
Group different sized signs together for maximum impact. Lean them on mantels, shelves, or create a gallery wall. The mismatched look? Totally intentional.
Also Read: 14 Sparkling Christmas Haul Ideas and Cozy Home Touches
Minimalist Neutral Tree Styling
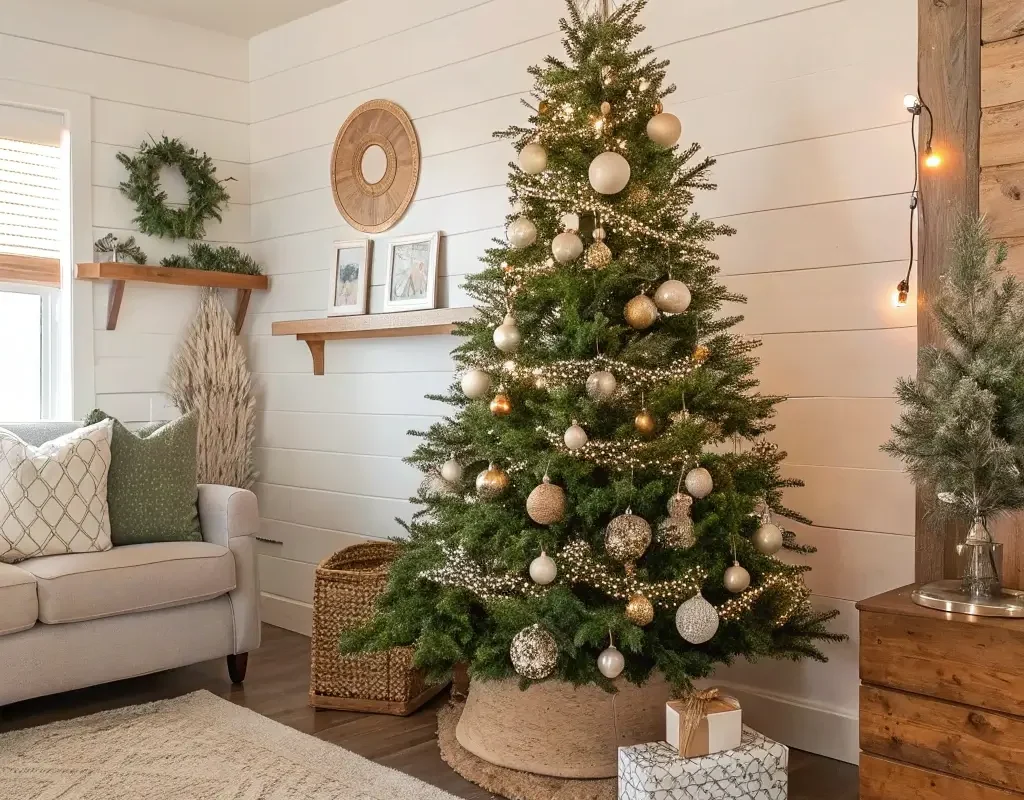
Who says farmhouse Christmas needs to be red and green? Neutral tree styling creates sophistication while maintaining that cozy farmhouse feel. Plus, it photographs beautifully if you’re into that whole Instagram thing.
Building Your Neutral Palette
Start with a base of three to four coordinating neutrals. My go-to combination:
- Warm white or cream
- Natural wood tones
- Soft gray or taupe
- Metallic accents (champagne gold or pewter, not shiny silver)
The trick is choosing ornaments with varying textures within your color scheme. Think knit balls, wooden stars, felt shapes, and metal bells all in your neutral palette.
Adding Interest Without Color
Worried about boring? Don’t be. Texture becomes your best friend when color takes a backseat:
- Mix matte and slightly shimmery finishes
- Combine smooth glass with rough burlap
- Layer different sizes of the same ornament style
- Add natural elements like pinecones or dried flowers
Keep your tree topper simple – a wooden star, burlap bow, or even just a cluster of branches. The understated look makes other room elements pop.
Lighting Makes Everything
With neutral ornaments, lighting becomes crucial. Warm white lights create coziness, while cool white feels modern. I prefer warm white string lights with larger bulbs – they cast better shadows and create depth.
Layer your lights deeper into the tree, not just on the tips. This creates glow from within that makes even simple ornaments look magical. Trust me, proper lighting makes a $30 tree look like a $300 designer situation.
Hot Cocoa Bar Christmas Corner
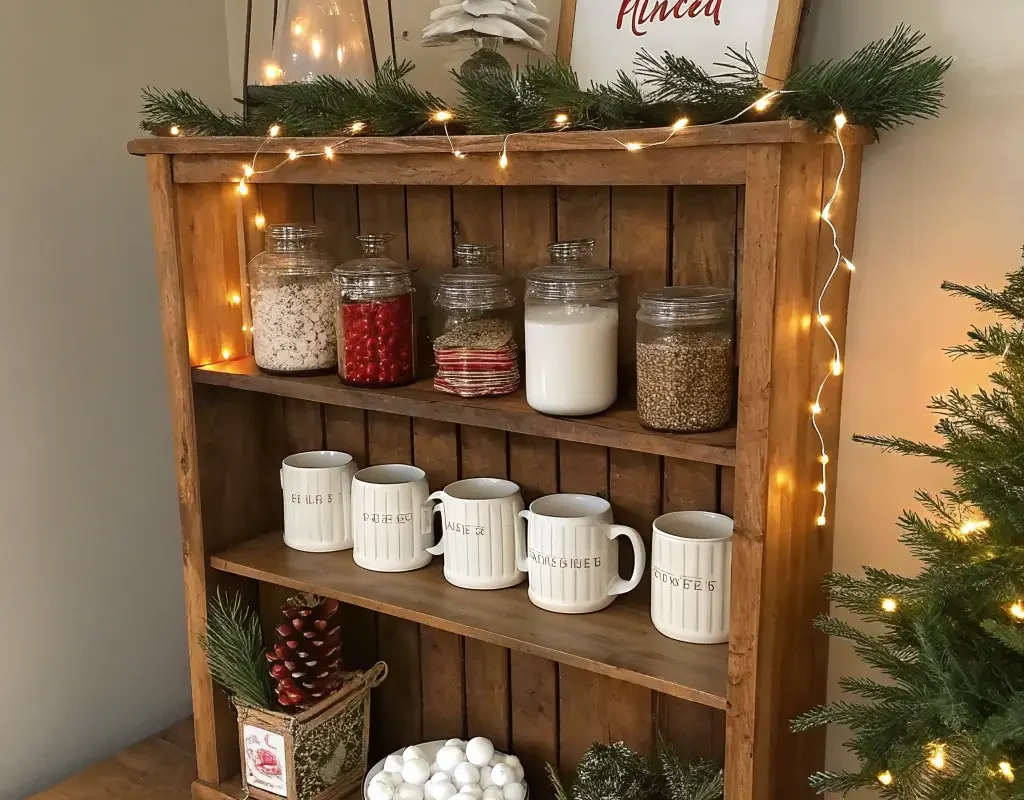
Every farmhouse needs a dedicated hot cocoa station during the holidays. It’s practical, festive, and gives kids (and adults) something to get excited about. Plus, it keeps all the chocolate mess contained to one area – parenting win!
Setting Up Your Station
Choose a spot that makes sense – corner of the kitchen counter, bar cart, or side table. You need about 2-3 square feet of surface space. Here’s your basic setup:
Essential Components:
- Wooden tray or vintage crate as your base
- Glass canisters for cocoa powder and marshmallows
- Ceramic mugs (mismatched adds charm)
- Small bowls for toppings
- Wooden spoons for stirring
The Fancy Extras:
- Whipped cream in a vintage pitcher
- Candy canes in a mason jar
- Chocolate shavings in tiny bowls
- Cinnamon sticks for stirring
- Flavored syrups in glass bottles
Styling Your Cocoa Bar
Make it look intentional, not cluttered. Layer heights using cake stands or stacked books. Add a small chalkboard sign with serving suggestions or funny quotes about chocolate.
My favorite touch? String battery-powered lights around the area. When someone makes cocoa at night, those soft lights create the perfect cozy moment. Also helps kids find the marshmallows without turning on harsh overhead lights.
FYI, keep napkins handy. Lots of napkins. Farmhouse style embraces real life, and real life with hot chocolate gets messy.
Handmade Felt Stocking Collection
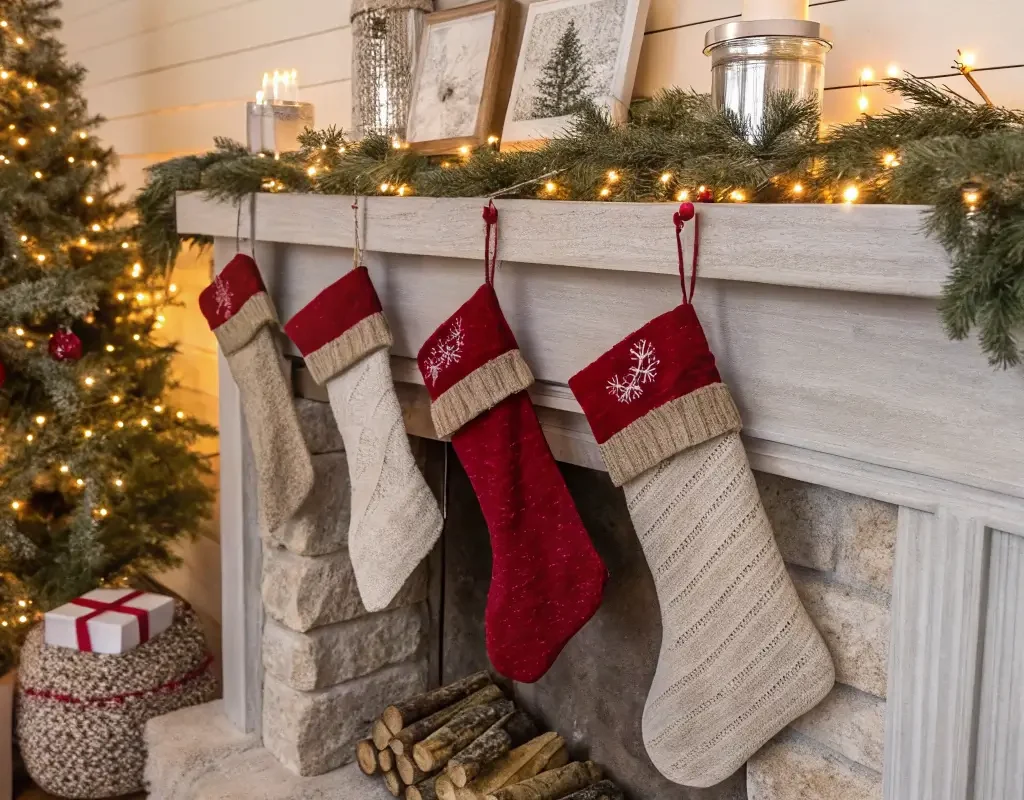
Those matching stocking sets from stores? They’re fine, but handmade felt stockings bring personality that mass-produced never can. Each stocking tells a story, and isn’t that what farmhouse style is really about?
Creating Cohesive Variety
The trick to handmade stockings that look good together? Stick to a consistent color palette but vary the designs. Choose 3-4 felt colors that coordinate with your decor. For farmhouse, I love:
- Cream, burgundy, and forest green
- Gray, white, and natural tan
- Red, white, and burlap brown
Make each stocking unique through different:
- Cuff designs (straight, scalloped, pointed)
- Embellishment styles (buttons, embroidery, appliqué)
- Pattern combinations (stripes on one, polka dots on another)
Personal Touches That Matter
What makes handmade special? Personal details that reflect each family member:
- Embroider nicknames instead of formal names
- Add felt shapes representing hobbies
- Use fabric from meaningful clothing (old flannel shirt, baby blanket)
- Include the year you made them
- Add pockets for Santa letters
Don’t stress about perfection. Slightly crooked stitching adds character. My daughter’s stocking has a lopsided star that she specifically requested stay “exactly like that forever.”
Display Ideas Beyond the Mantel
No fireplace? No problem. Hang stockings from:
- A wooden ladder leaned against the wall
- Vintage hooks on a barn door
- A tension rod in a window frame
- Wooden crates stacked and secured
- A decorative branch mounted on the wall
The key is making your display look intentional, not like you’re making do. Sometimes alternative displays look even better than traditional mantel hanging.
Also Read: 15 Unique Christmas Gift Ideas for a Magical Holiday
Pinecone & Eucalyptus Table Runner

Forget those expensive table runners that you use twice and then store for 11 months. A natural pinecone and eucalyptus runner costs almost nothing and looks like something from a magazine spread.
Gathering Your Materials
Here’s where living anywhere near trees pays off. Collect pinecones of varying sizes from your yard or local park. If you’re buying them, get different types for visual interest. For eucalyptus, fresh works best but dried lasts longer.
Prep your pinecones properly:
- Bake at 200°F for 30 minutes (kills bugs)
- Let cool completely
- Lightly spray with matte sealer (optional but helps with shedding)
- Paint tips with white paint for snow effect (or leave natural)
Assembly Without the Mess
The secret to a runner that looks effortless but stays put? Create a base layer. Use a strip of burlap or kraft paper down your table’s center. This defines the space and protects your table.
Layer your elements:
- Start with larger pinecones as anchors
- Fill gaps with smaller cones
- Weave eucalyptus throughout
- Add battery-operated fairy lights for evening ambiance
- Scatter in some cinnamon sticks or dried orange slices
Keep the runner low enough for conversation across the table. Nobody wants to peer through pinecones to talk during dinner. Aim for 4-6 inches maximum height.
Making It Last
Want your runner to survive the whole season? Here’s how:
- Spray eucalyptus with hairspray (seriously, it works)
- Use battery lights instead of candles (fire hazard with dry materials)
- Keep a can of compressed air handy for quick dust removal
- Store elements in a box for next year
The best part about natural runners? When Christmas ends, you can toss everything in your yard for birds and squirrels. Zero storage needed.
Bringing It All Together
So there you have it – ten farmhouse Christmas ideas that actually work in real homes where people live, cook, and occasionally spill things. You don’t need a massive budget or Pinterest-perfect skills to create that warm, inviting farmhouse Christmas atmosphere.
Start with one or two ideas that speak to you. Maybe it’s the cocoa bar because your family lives on hot chocolate in December. Or perhaps those neutral tree ornaments match your style perfectly. The beauty of farmhouse decor lies in its flexibility and focus on comfort over perfection.
Remember, farmhouse style celebrates the imperfect, the handmade, and the meaningful. That crooked sign you painted? It has more character than anything store-bought. Those mismatched stockings? They tell your family’s story better than a coordinated set ever could.
The real magic happens when you stop trying to recreate someone else’s farmhouse Christmas and start creating your own. Mix these ideas with your family’s traditions. Add elements that make you smile. Keep what works, ditch what doesn’t.
Your home should feel like a warm hug during the holidays, not a museum display. So grab some pinecones, heat up that glue gun, and create something that makes your space feel like Christmas. Because at the end of the day, the best farmhouse Christmas decor is the kind that makes people want to stay a little longer, laugh a little louder, and create memories that last long after the decorations come down.
What are you waiting for? Christmas is coming whether your decor is ready or not. Might as well make it beautiful, right? Now excuse me while I go adjust my mason jar centerpiece for the fifth time today – because that’s totally normal behavior. Happy decorating!