These Christmas cookies decorated ideas will turn your holiday baking into the most joyful part of the season. A plate of beautifully decorated cookies is more than a dessert; it is a handmade gift, a party centerpiece and a memory in the making, and you do not need professional skills to make cookies that look wonderful.
From flooded royal icing trees and hand-painted snowflakes to sprinkle-covered stars and marbled baubles, every idea below comes with a step-by-step method, the tools you need and beginner-friendly tips. Bake a batch of sturdy sugar cookies or gingerbread, mix a bowl of royal icing, and work through the designs in order. Start with the simplest cookie and save the fanciest designs for last.
1. Classic Royal Icing Christmas Tree Cookies

Green flooded trees are the cookie that says Christmas at a glance. Each tree-shaped sugar cookie is covered in smooth green royal icing, then dotted with tiny white and red sprinkles for ornaments, a gold star on top and a brown trunk at the base. The result is cheerful, classic and easy enough for a first attempt at flooding. Bake tree-shaped sugar cookies and let them cool completely, then outline each cookie with stiff green royal icing using a piping bag fitted with a small round tip. Thin the rest of the icing to flooding consistency, about the thickness of honey, and fill the outline, guiding it to the edges with a toothpick. While the icing is still wet, add sprinkles and a piped star. Let the cookies dry uncovered for at least eight hours, or overnight, before stacking or gifting.
Quick tip: Pop any air bubbles in the wet icing with a toothpick or scribe tool for a perfectly smooth finish.
2. Snowman Cookies with Flooded White Icing

These cheerful snowmen wear white flooded icing, a black top hat, an orange carrot nose and a red scarf, and they are one of the most forgiving designs for beginners. Because the base is plain white, small wobbles disappear and every cookie still looks charming. Start with snowman-shaped sugar cookies and outline and flood the body in white royal icing. While the icing is still wet, pipe a black hat shape and a red scarf at the neck so the colors settle flat against the white. Let the base dry for four to six hours, then use stiff black icing to add eyes and coal buttons, and orange icing to pipe a small triangle nose. A tiny dot of white icing on each eye makes the snowman look alive. Keep the details small and simple, and the whole tray will look neat.
Quick tip: Pipe the hat and scarf while the white base is wet for a flat, smooth look, and add the face only after the base has crusted over.
3. Gingerbread People with Piped Details

Nothing smells more like Christmas than gingerbread, and these little people are dressed with nothing more than white piping icing and a few candies. Each cookie has a zigzag border around its edges, a smiling face, and red and green candy buttons down the front. Bake gingerbread people from a firm, no-spread dough and cool them fully on a wire rack. Fill a piping bag with stiff white royal icing and a small round tip, then pipe a wavy outline around the arms, legs and head. Add two dot eyes and a smile, then press candy buttons into a dab of icing while it is still wet. If you prefer a neater look, pipe the details first and let them dry for an hour before adding the candies. This design is perfect for decorating with children, since every cookie can have its own personality.
Quick tip: If your piping hand shakes, rest your wrist on the table and squeeze gently with both hands for steadier lines.
4. Candy Cane Striped Sugar Cookies

These candy cane cookies are crisp, bright and instantly festive, with diagonal red stripes piped over a snowy white base and a dusting of crushed candy cane on top. They look impressive but use one of the simplest techniques in cookie decorating: wet-on-wet stripes. Bake cane-shaped sugar cookies and flood them with white royal icing. While the white icing is still wet, pipe diagonal lines of red icing across each cookie and drag a toothpick through the lines to sharpen them slightly. For extra sparkle, sprinkle crushed candy cane over the wet icing before it sets. Let the cookies dry for eight hours before handling. A zip-top bag with a tiny corner snipped off works as a piping bag if you do not own one, which keeps this project truly budget-friendly.
Quick tip: Crush candy canes in a zip-top bag with a rolling pin, and sprinkle them on while the icing is wet so they stick.
5. Holiday Wreath Cookies with Green Piping
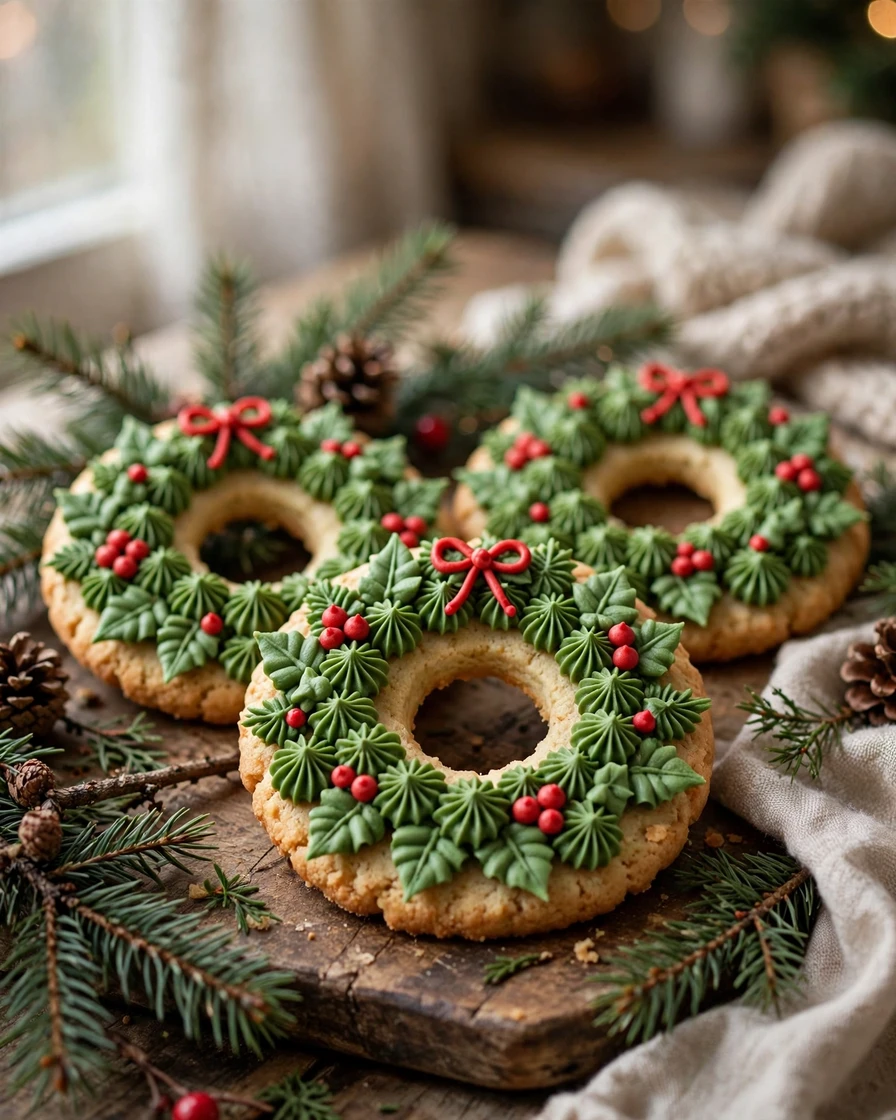
A wreath cookie is a ring of green icing leaves with red berries and a tiny bow, and it is one of the prettiest cookies on any holiday tray. The textured leaves are made with a star piping tip, so the design hides mistakes and looks lush even in beginner hands. Bake round cookies and cut a small hole in the center before baking, or use a donut-shaped cutter. Flood a thin base layer of green icing and let it crust for thirty minutes, then use a star tip and stiff green icing to pipe overlapping leaf dots all around the ring. Add red icing dots or small round sprinkles for berries, and pipe a small red bow at the bottom. The star tip does most of the work, so keep your piping slow and steady and let each leaf overlap the last.
Quick tip: Chill the cookies for ten minutes after piping the leaves so the texture holds its shape while the icing sets.
6. Snowflake Cookies with Lace-Like Piping
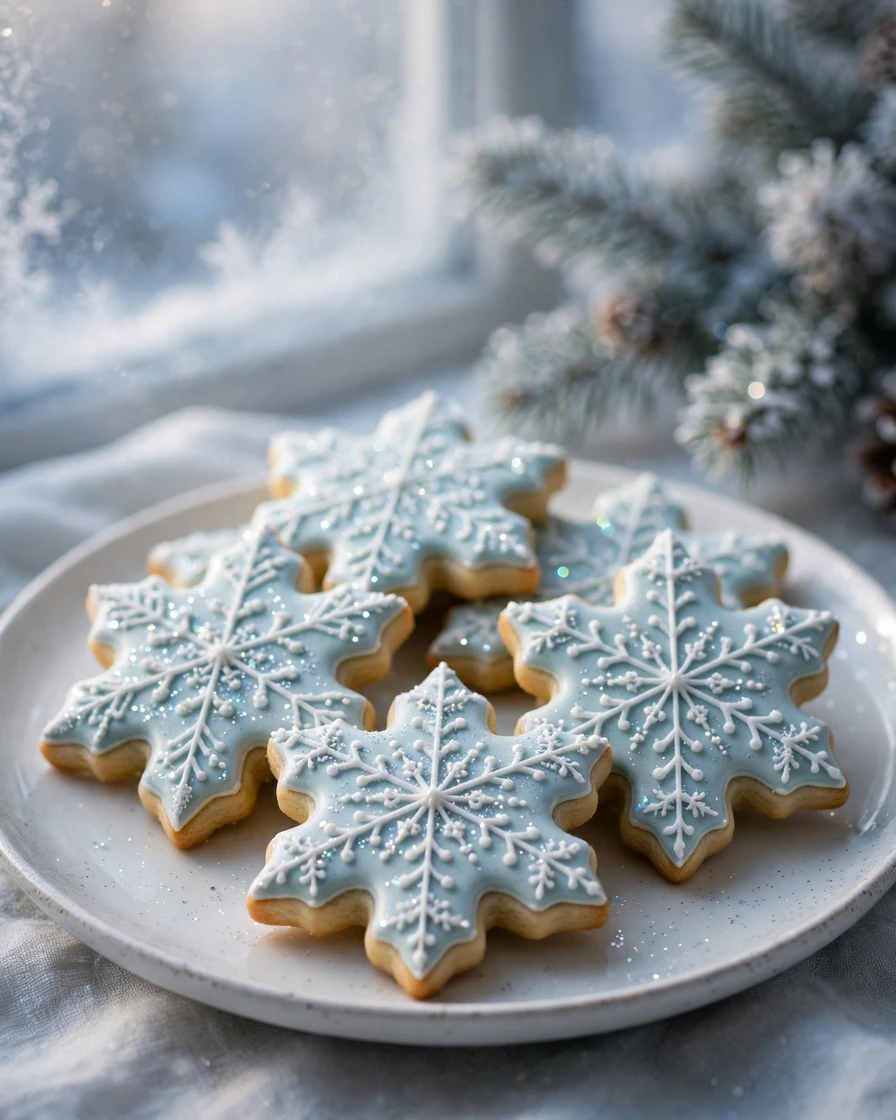
Snowflake cookies look like delicate lace, with fine white piping over a pale blue flooded base and a dusting of edible glitter that catches the light. They are elegant enough for a grown-up party tray and still simple to make. Bake snowflake-shaped sugar cookies and flood them with pale blue royal icing, then let the base dry for at least six hours. Using stiff white royal icing and the smallest round tip you own, pipe a six-pointed star in the center, then add small branches, dots and swirls to build the snowflake pattern. Work from the center outward so your hand does not smudge finished lines. A light sprinkle of edible glitter or sanding sugar over the wet white piping adds sparkle. Because every snowflake is different, no two cookies need to match.
Quick tip: Practice the snowflake pattern on parchment paper first, then pipe it on the cookie once you feel confident.
7. Reindeer Cookies with Pretzel Antlers

These reindeer cookies are always the first to disappear, thanks to their salty pretzel antlers, chocolate eyes and a bright red icing nose. The sweet-and-salty combination makes them as fun to eat as they are to look at. Bake round or oval chocolate or gingerbread cookies and flood them with warm brown royal icing. While the icing is still wet, press two mini pretzels into the top of each cookie for antlers and add two chocolate chip eyes. Let the base dry for several hours, then pipe a shiny red nose with stiff red icing and add a tiny white highlight dot. A small piped smile finishes the face. The pretzels should be added while the icing is wet so they set firmly in place, and the cookies keep well for several days in an airtight tin.
Quick tip: Use mini pretzel twists for antlers and press them in gently at a slight angle so they look like real reindeer antlers.
8. Christmas Stocking Cookies

Stocking cookies are a classic shape that invites creativity, with a red flooded body, a fluffy white cuff, a green heel and toe, and a name piped in white for a personal touch. They are wonderful as place cards at the Christmas table. Bake stocking-shaped sugar cookies and flood the body with red royal icing, leaving the cuff area bare. Let the red icing crust for about an hour, then fill the cuff with thick white icing and drag a toothpick through it to create a fluffy texture. Pipe the heel and toe in green once the red is dry, and add small white dots for snow. If you are making place cards, pipe each guest’s name in white icing on the red body and let the cookies dry overnight. The layered sections are what make this design look polished.
Quick tip: Let each icing section crust for at least an hour before adding the next color so the colors stay clean and sharp.
9. Sparkling Star Cookies with Edible Glitter

Gold star cookies bring instant glamour to a holiday tray, with smooth golden icing, a shower of edible glitter and a piped outline that makes each point shine. They are the easiest impressive cookie in this list, because the glitter does the decorating for you. Bake star-shaped sugar cookies and flood them with warm yellow or gold royal icing. While the icing is still wet, dust the surface generously with gold edible glitter or gold sanding sugar so it sticks as the icing dries. Once dry, pipe a thin white or darker gold outline around the edge with stiff icing and a small round tip. Let the cookies dry for eight hours before stacking. These stars also make lovely tree decorations if you poke a small hole near one point before baking and thread a ribbon through it.
Quick tip: Buy glitter labeled edible, not just non-toxic, and apply it over a tray so you can reuse the excess.
10. Marbled Christmas Ornament Baubles
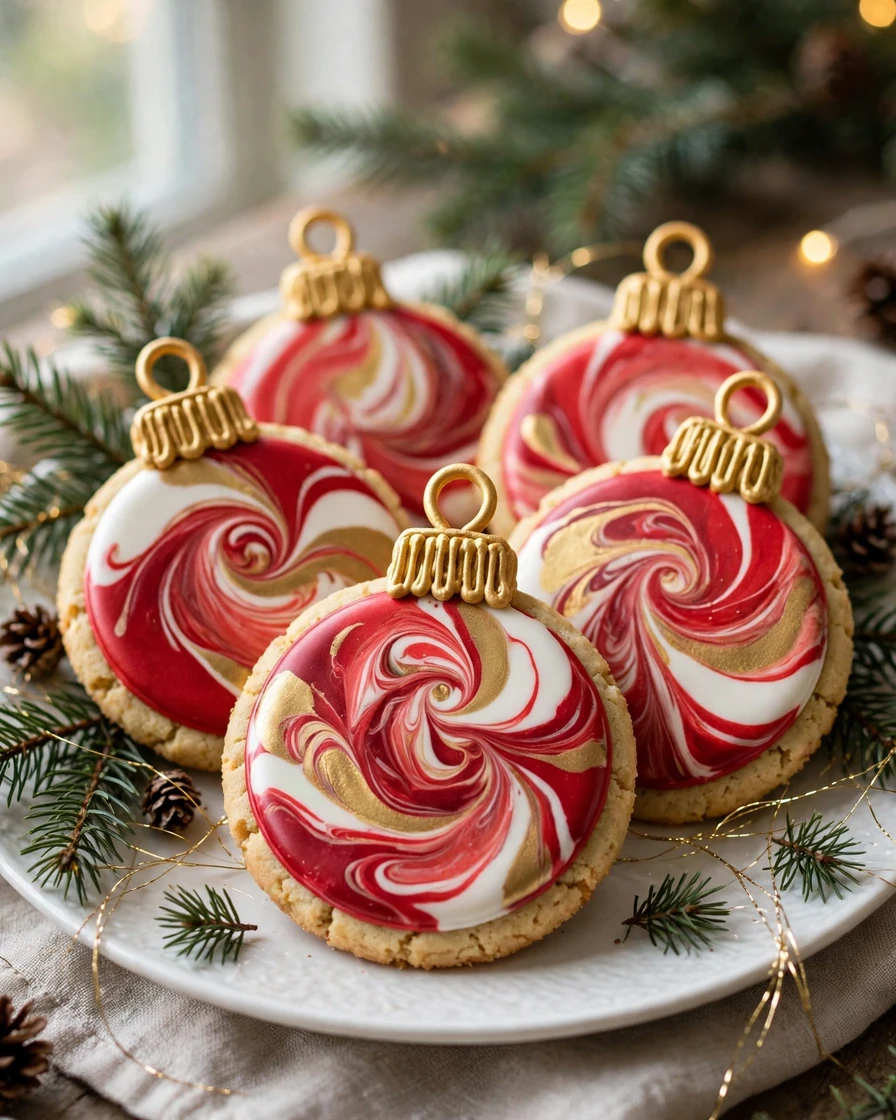
Marbled bauble cookies look like blown glass ornaments, with swirls of red, white and gold royal icing flowing across a round cookie, plus a piped gold cap and loop at the top. The marbling technique is fast, forgiving and different on every cookie. Bake round cookies and flood them with white royal icing. Immediately drop small lines of red and gold icing onto the wet white base, then drag a toothpick or scribe tool through the colors in gentle S-shaped curves to create the marble effect. Do not overmix, or the colors will turn muddy. Once the base is dry, pipe a small gold rectangle at the top for the ornament cap and a loop above it. These cookies look far harder than they are, which makes them perfect for impressing guests.
Quick tip: Use only two or three icing colors for marbling and stop swirling after three or four passes to keep the colors bright.
11. Santa Hat Cookies

Santa hat cookies are jolly, simple and instantly recognizable, with a bright red flooded hat, a fluffy white brim and a white pompom that flops to one side. They are a great choice if you are new to sectioned icing. Bake hat-shaped sugar cookies, or cut triangles from rolled dough and bend the tip slightly before baking. Flood the red part of the hat with red royal icing and let it crust for an hour. Then fill the brim and pompom with thick white icing, dragging a toothpick through it in short strokes to suggest fur. A tiny dot of white icing on the red hat adds a highlight. Let the cookies dry overnight before packaging. The contrast between the smooth red icing and the textured white trim is what makes this design pop.
Quick tip: Use thicker icing for the white trim than for the red base, so the fluffy texture holds instead of spreading flat.
12. Hot Cocoa Mug Cookies

These cozy mug cookies look like tiny cups of hot cocoa, complete with a red mug, a handle, piped white marshmallows and a dusting of cocoa powder. They are perfect for a winter coffee morning or a cocoa-themed cookie box. Bake mug-shaped sugar cookies, or use a round cutter and add a small handle shape with dough scraps. Flood the mug in red or green royal icing and let it crust for an hour. Then flood the top third with brown icing for the cocoa and, while it is wet, add small white icing squares for marshmallows. Once dry, pipe a swirl of white icing on top and dust lightly with cocoa powder using a small sieve. A tiny candy cane piped on the side adds a festive touch. These cookies pair beautifully with a real mug of cocoa.
Quick tip: Pipe the marshmallows while the cocoa icing is wet so they sit flat, and add the swirl only after the base has dried.
13. Penguin Cookies

Penguin cookies are the cutest cookies on the tray, with a black body, a white belly, orange feet and beak, and a tiny red scarf. Children love them, and adults always smile at them. Bake oval or penguin-shaped sugar cookies and flood the whole cookie with black royal icing. While the icing is still wet, flood a white oval on the lower half for the belly and let the two colors settle together. Once the base is dry, pipe two white dot eyes with black pupils, a small orange triangle beak and orange feet at the bottom. A red scarf piped across the neck, with a small knot and tails, finishes the look. Keep the face details tiny and neat, and use a toothpick to nudge any icing into place before it sets.
Quick tip: Let the black base dry fully, at least six hours, before adding the face so the white eyes stay crisp and do not bleed.
14. Ugly Sweater Cookies

Ugly sweater cookies turn the beloved holiday party theme into an edible joke, with a sweater-shaped cookie covered in clashing stripes, polka dots, a tiny tree and a pompom collar. The uglier, the better, which makes this the most relaxed design in the collection. Bake sweater-shaped sugar cookies, or cut the shape from rolled dough using a paper template. Flood the sweater in one bright color, such as red or green, and let it crust. Then pipe zigzag stripes, dots and a small tree in contrasting colors with stiff icing, and add a white pompom collar with a star tip. There are no rules here, so let each cookie be as loud as you like. These are ideal for an ugly sweater party, where guests can decorate their own. Let each sweater dry overnight before stacking so the bright colors stay crisp and clean.
Quick tip: Set out small bowls of colored icing and sprinkles and let party guests decorate their own ugly sweaters.
15. Holly Leaf and Berry Cookies
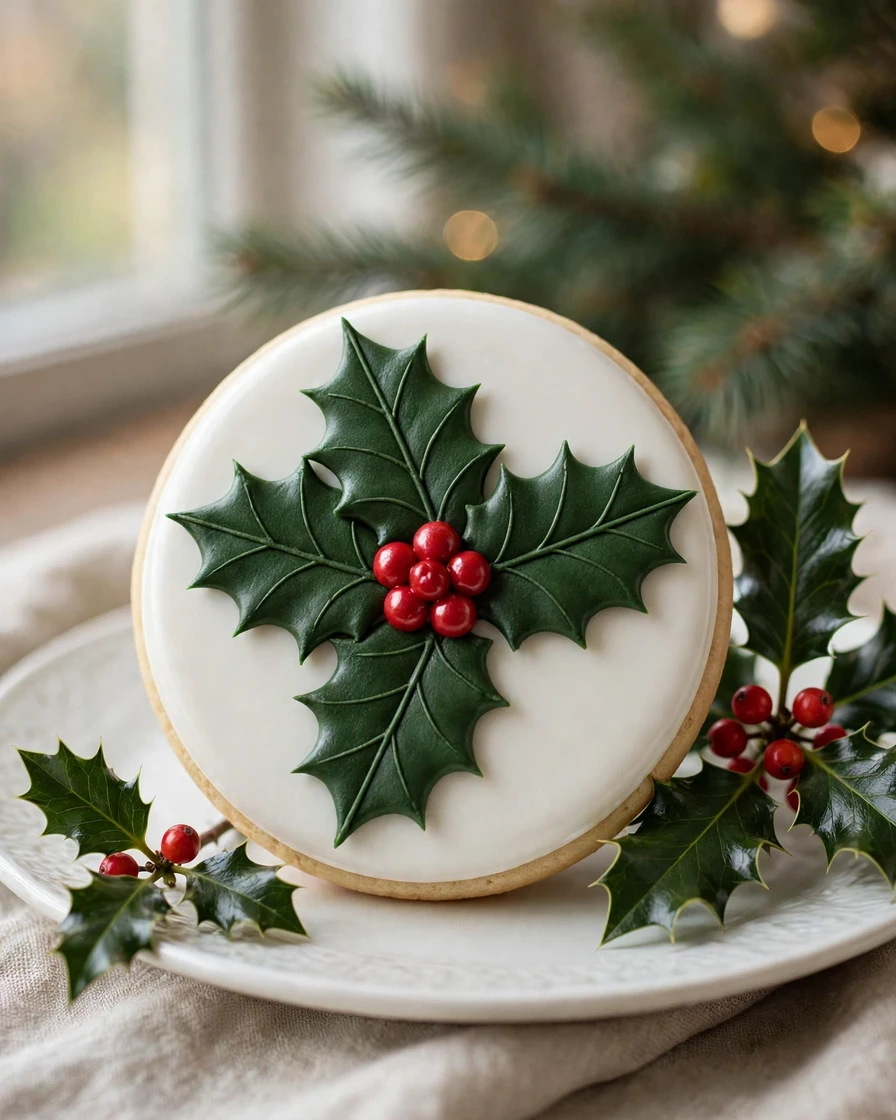
Holly cookies are elegant and traditional, with dark green leaves piped in a classic holly shape and clusters of glossy red berries on a white or pale green base. They suit a refined holiday table and look beautiful tucked into a cookie box. Bake round or leaf-shaped sugar cookies and flood them with white royal icing, then let the base dry for six hours. Using a leaf piping tip and stiff green icing, pipe three overlapping holly leaves in the center of each cookie, then add a cluster of three red icing dots for the berries. A fine line of darker green down the center of each leaf adds realism. The leaf tip creates the pointed holly shape for you, so focus on keeping your hand steady and the pressure even.
Quick tip: If you do not have a leaf tip, use a small round tip and pipe pointed ovals, then drag a toothpick down the center for the vein.
16. Poinsettia Flower Cookies
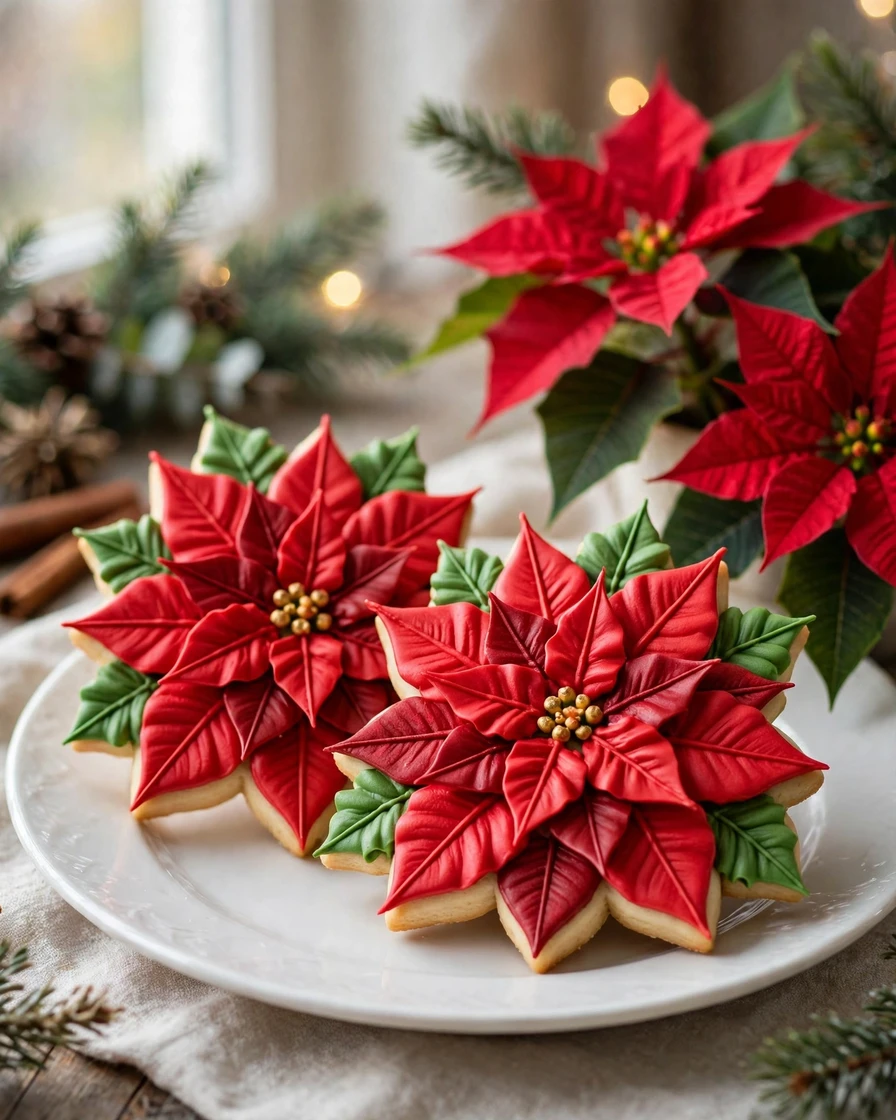
Poinsettia cookies are showstoppers, with layers of red icing petals, a golden center and a few green leaves peeking out from behind. They look like the Christmas flower itself and make a stunning centerpiece cookie. Bake flower-shaped sugar cookies with six or eight petals and flood the petals with red royal icing. While the icing is wet, use a toothpick to pull the red icing from the center outward, creating a soft petal texture. Let the base dry for six hours, then pipe a second, smaller layer of petals in a deeper red in the center and add gold icing dots for the flower’s heart. A few green leaves piped behind the petals complete the flower. The two layers of petals give the cookie depth and a realistic, blooming look.
Quick tip: Pipe the second layer of petals slightly smaller and offset from the first layer so the flower looks full and dimensional.
17. Watercolor Marbled Cookies
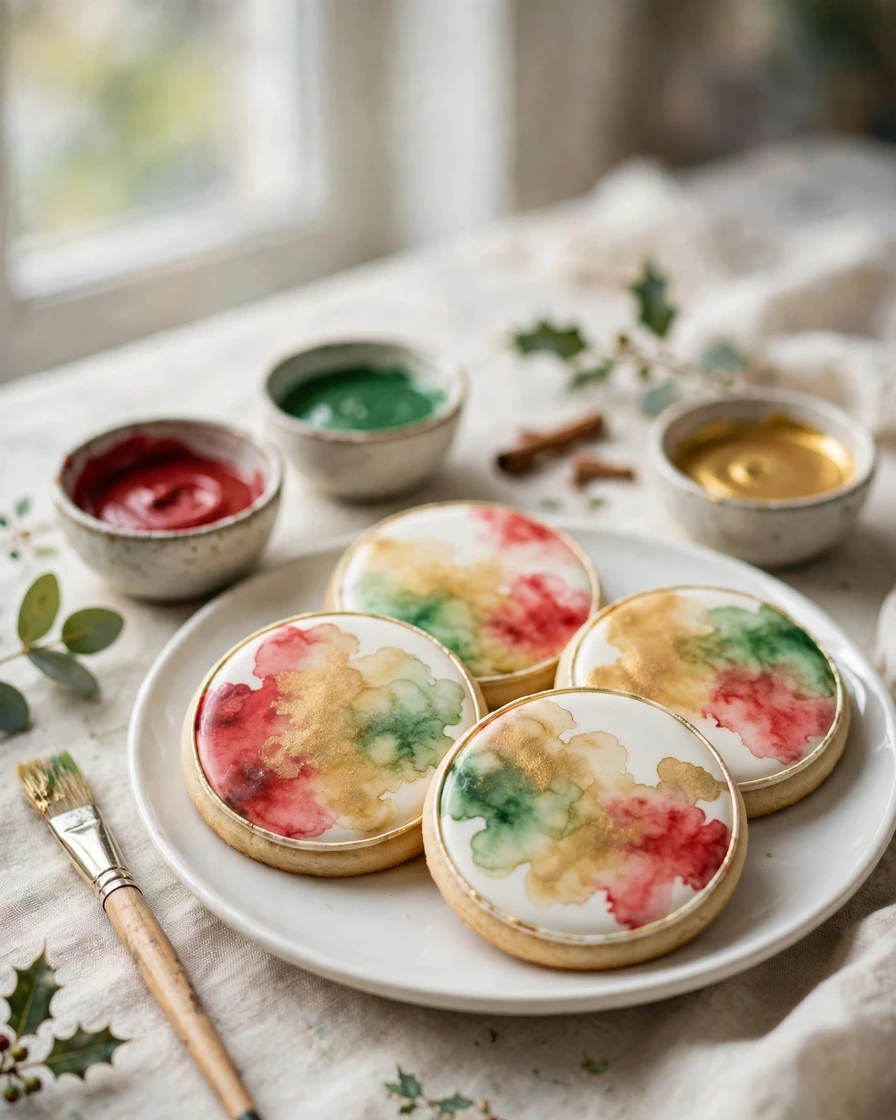
Watercolor cookies are the most artistic design in this list, with soft washes of red, green and gold royal icing blending like paint on a round or oval cookie. No piping skill is needed, which makes this a wonderful technique for beginners who love color. Bake round sugar cookies and flood them with white royal icing. While the icing is still wet, touch a toothpick dipped in thinned red, green or gold icing to the surface and let the color bloom outward in soft clouds. Repeat with two or three colors, working quickly before the icing begins to crust. Once dry, add a simple piped outline or a dusting of edible gold for contrast. Each cookie is a tiny abstract painting, so embrace the surprises. Let the cookies dry for at least eight hours before stacking them, since the wet watercolor icing takes longer to set than regular flooding.
Quick tip: Thin your accent icing with a few drops of water so it spreads softly like watercolor instead of sitting in hard lines.
18. Hand-Painted Cookie Ornaments
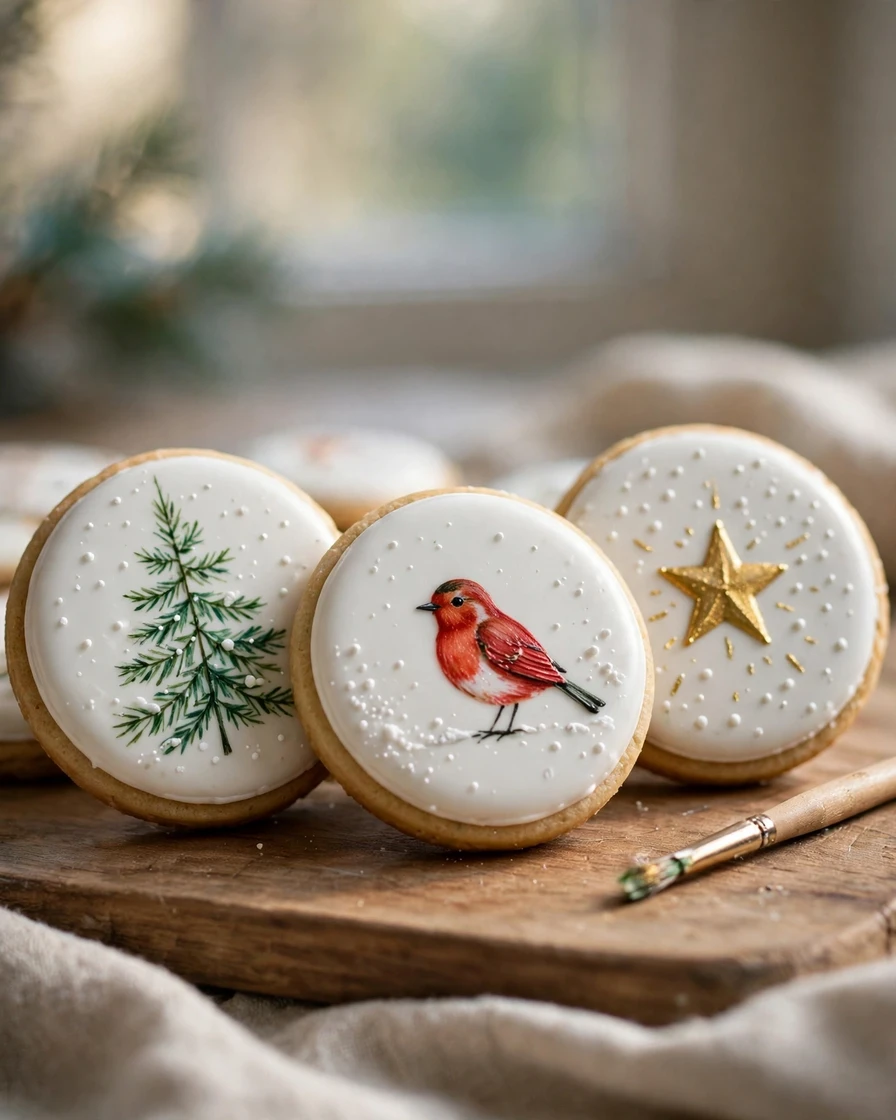
Hand-painted cookies are miniature works of art, with tiny pine trees, stars and snow scenes painted onto a smooth white icing canvas using edible food coloring. They are the most personal design here, and no two are ever alike. Bake round sugar cookies and flood them with white royal icing, then let them dry overnight until completely hard. Mix gel food coloring with a few drops of vodka or lemon extract to make edible paint, and use a clean, food-safe paintbrush to paint simple scenes: a green pine tree, a red bird, a gold star or falling snow. Work in thin layers and let each layer dry for a few minutes before adding the next. The vodka evaporates as it dries and leaves no taste behind. Keep a small cup of clean water nearby to rinse the brush between colors.
Quick tip: Use the smallest food-safe brush you can find and practice your design on paper before painting it on the cookie.
19. Sprinkle-Covered Confetti Cookies
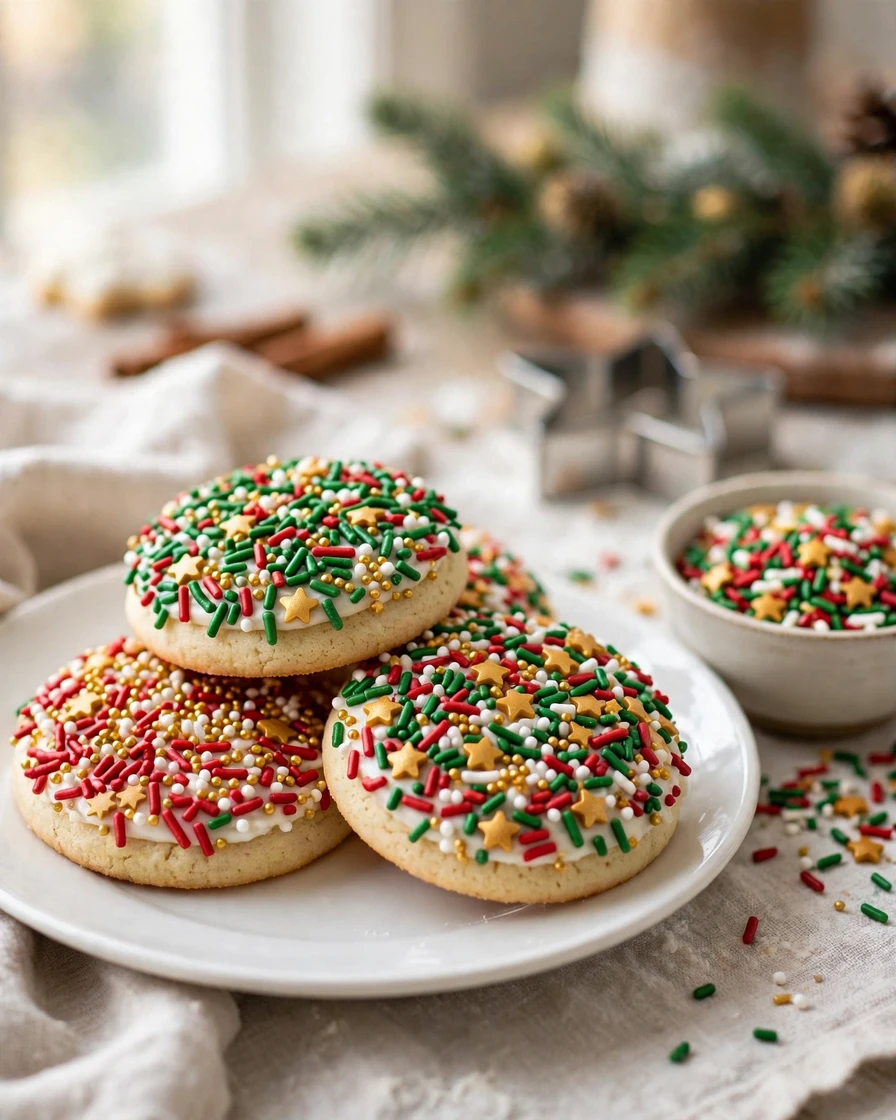
Sprinkle cookies are pure joy, with a thick layer of red, green, white and gold holiday sprinkles pressed into soft royal icing. They are the fastest decorated cookie in this list and the best one for decorating with kids. Bake any shape of sugar cookie and flood it with white or pale green royal icing. While the icing is still wet, hold the cookie over a bowl and shower it generously with holiday sprinkles, pressing gently so they stick. For a neater look, use one type of sprinkle, such as red and white nonpareils; for a party look, mix jimmies, stars and sanding sugar. Let the cookies dry for at least eight hours so the sprinkles set firmly. These cookies also keep well in gift boxes, since the sprinkle coating protects the icing underneath.
Quick tip: Work over a rimmed baking sheet to catch falling sprinkles, and reuse the extras from the tray for the next batch.
20. Santa Claus Face Cookies

Santa face cookies are the grand finale of the tray, with a red hat, a rosy face, twinkling eyes and a big fluffy white beard made with textured icing. They take a little patience, but the result is pure Christmas magic. Bake round sugar cookies and flood the top third with red icing for the hat, letting it crust for an hour. Flood the middle with skin-toned icing for the face, then fill the bottom third with thick white icing for the beard, dragging a toothpick through it in downward strokes for texture. Once dry, add a white hat brim and pompom, two black eyes, a pink nose and rosy cheeks with a touch of pink icing. The layered sections and textured beard make Santa look wonderfully real. A dusting of white sanding sugar on the beard adds a frosty sparkle.
Quick tip: Pipe the beard with a star tip for instant texture, then use a toothpick to shape the strands while the icing is still soft.
Final Thoughts
You do not need to make all twenty designs in one weekend. Pick three or four favorites, bake one big batch of sugar cookies or gingerbread, and decorate them over a relaxed afternoon with a cup of cocoa nearby. Start with the simple flooded designs like the stars and candy canes, then try a piped or hand-painted cookie once your confidence grows. The beauty of decorated Christmas cookies is that they are meant to be shared, so box up your favorites for neighbors, teachers and family, and keep a few for Santa. However your cookies turn out, they will taste like Christmas, and that is what matters most.
Frequently Asked Questions
How far in advance can I decorate Christmas cookies?
Baked and decorated sugar cookies keep for up to two weeks in an airtight container at room temperature, and undecorated baked cookies freeze well for up to three months. Decorate them two to three days before you plan to serve or gift them so the icing is fully dry and the cookies still taste fresh.
What is the best icing for decorating Christmas cookies?
Royal icing is the best choice because it dries hard, holds fine piped details and gives a smooth, professional finish. Use stiff icing for outlines and details, and thin it to flooding consistency for filling large areas. Meringue powder-based royal icing is the most reliable option for beginners.
How long does royal icing take to dry on cookies?
Royal icing forms a crust in about thirty minutes to one hour, but it needs eight to twelve hours, or overnight, to dry completely before cookies can be stacked or packaged. Drying time depends on humidity, so on damp days allow a full twenty-four hours for best results.
Can beginners decorate Christmas cookies?
Yes, absolutely. Start with simple designs like flooded stars, sprinkle cookies and candy cane stripes, which need only a piping bag and a toothpick. Practice piping on parchment paper first, keep your icing at the right consistency, and remember that sprinkles and edible glitter hide small mistakes beautifully.
How do I store decorated Christmas cookies?
Store them in a single layer in an airtight container, with parchment paper between layers if you must stack them. Keep the container at cool room temperature and away from humidity, which can soften the icing. Avoid the fridge, as condensation can smudge the decoration.