Let me guess – you’re standing in your bathroom right now, looking at those boring old tiles and thinking “there’s gotta be something better than this.”
Well, you’re absolutely right! Wood tiles have completely transformed the bathroom game, and I’m about to show you exactly why I’m obsessed with them.
Remember when everyone thought wood and water couldn’t mix? Yeah, those days are long gone. Modern wood tiles give you that gorgeous, warm look of hardwood without the maintenance nightmares.
Trust me, after renovating three bathrooms in the last five years (yes, I might have a problem), I’ve learned a thing or two about what works and what makes you want to tear your hair out.
Table of Contents
- 1 Floating Vanity with Wood Tiles
- 2 Wood Tile Accent Wall Behind Tub
- 3 Herringbone Wood Tile Floor
- 4 Two-Tone Wood and Marble Combo
- 5 Rustic Wood Tile Shower Niche
- 6 Diagonal Pattern Wood Tile Layout
- 7 Wood Tile Wainscoting for Bathroom
- 8 Spa-Inspired Wood Tile Flooring
- 9 Mixed Width Wood Tile Planks
- 10 Wood Tile with Geometric Patterns
- 11 Bathroom Shelf Backdrop with Wood Tiles
- 12 Wood Tile Around Bathroom Mirror
- 13 Minimalist White and Wood Tile Blend
- 14 Vintage Wood Tile Inspired by Barnwood
- 15 Mosaic Wood Tile for Small Bathrooms
- 16 Making Your Wood Tile Dreams Reality
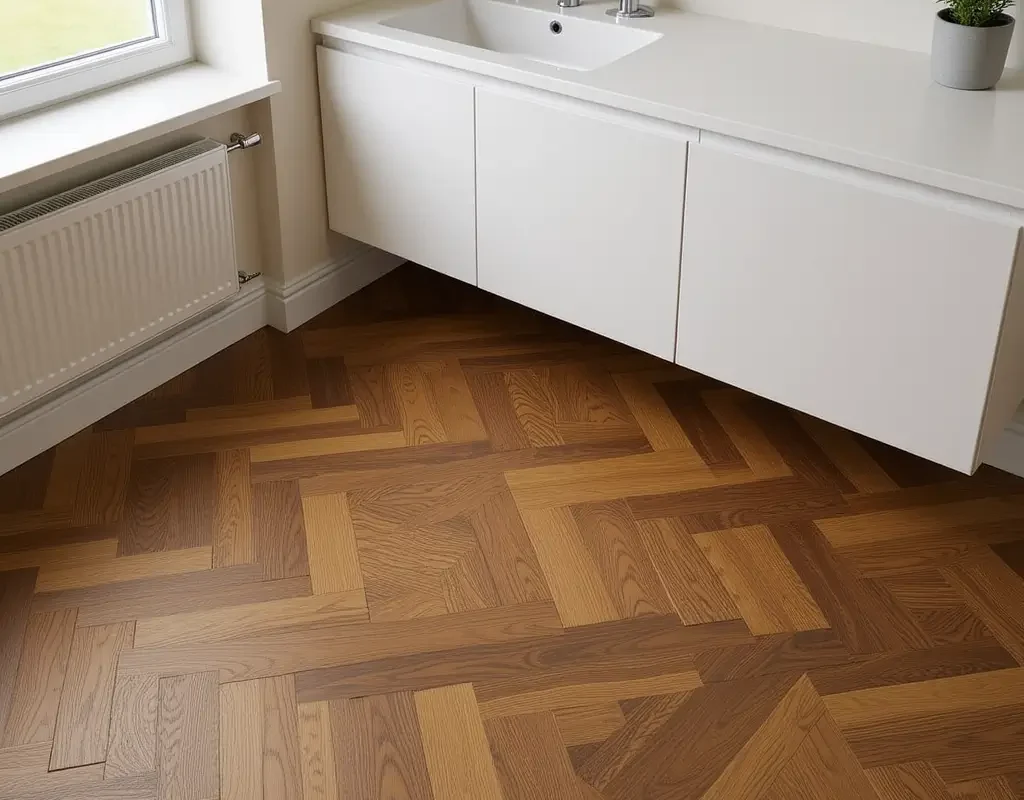
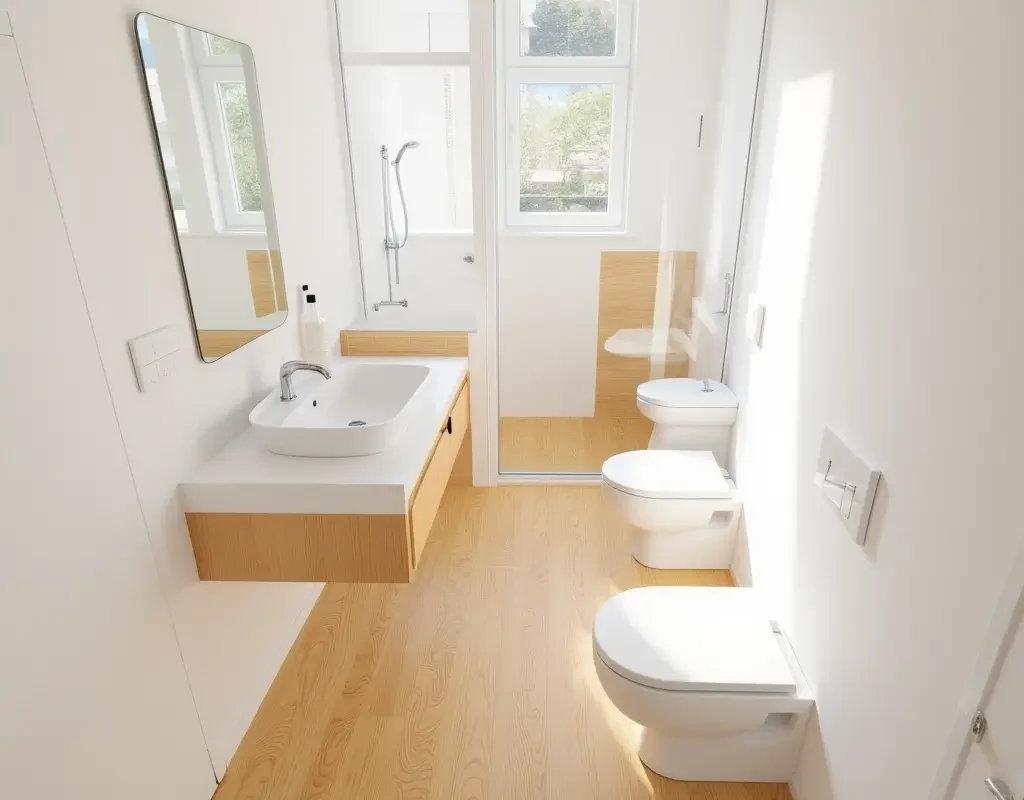
Floating Vanity with Wood Tiles
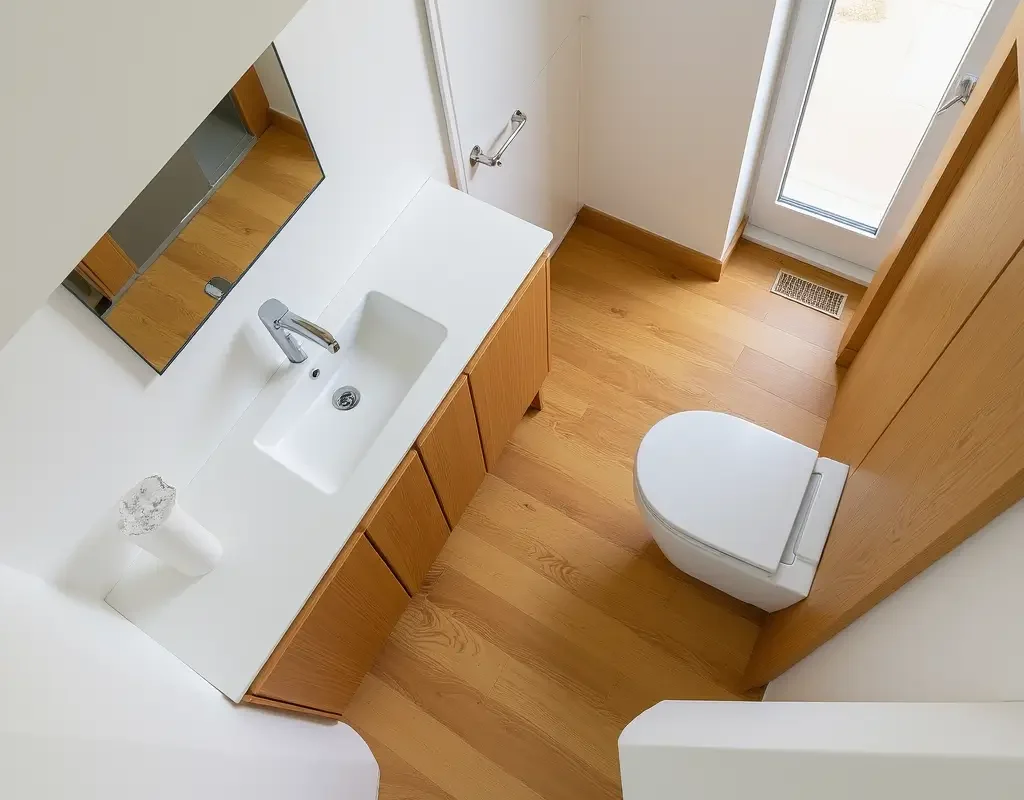
Picture this: you walk into your bathroom and see a sleek floating vanity with stunning wood tiles running behind it. The combination creates this incredible visual flow that makes your bathroom feel twice as spacious. I installed one of these setups in my master bath last year, and everyone who sees it asks if I hired a designer. Nope, just got inspired and went for it!
The beauty of pairing wood tiles with a floating vanity lies in the contrast. You get that modern, minimalist vibe from the vanity while the wood tiles add warmth and texture. Plus, cleaning underneath? So much easier when everything’s off the floor.
Here’s what makes this combo work:
- Light wood tiles brighten up the space and reflect natural light
- The floating design creates an illusion of more floor space
- Wood grain patterns add visual interest without overwhelming the room
- You can extend the tiles up the wall for a cohesive backsplash
Want to know the best part? You can totally DIY this look without breaking the bank. Just make sure you waterproof everything properly – learned that lesson the hard way.
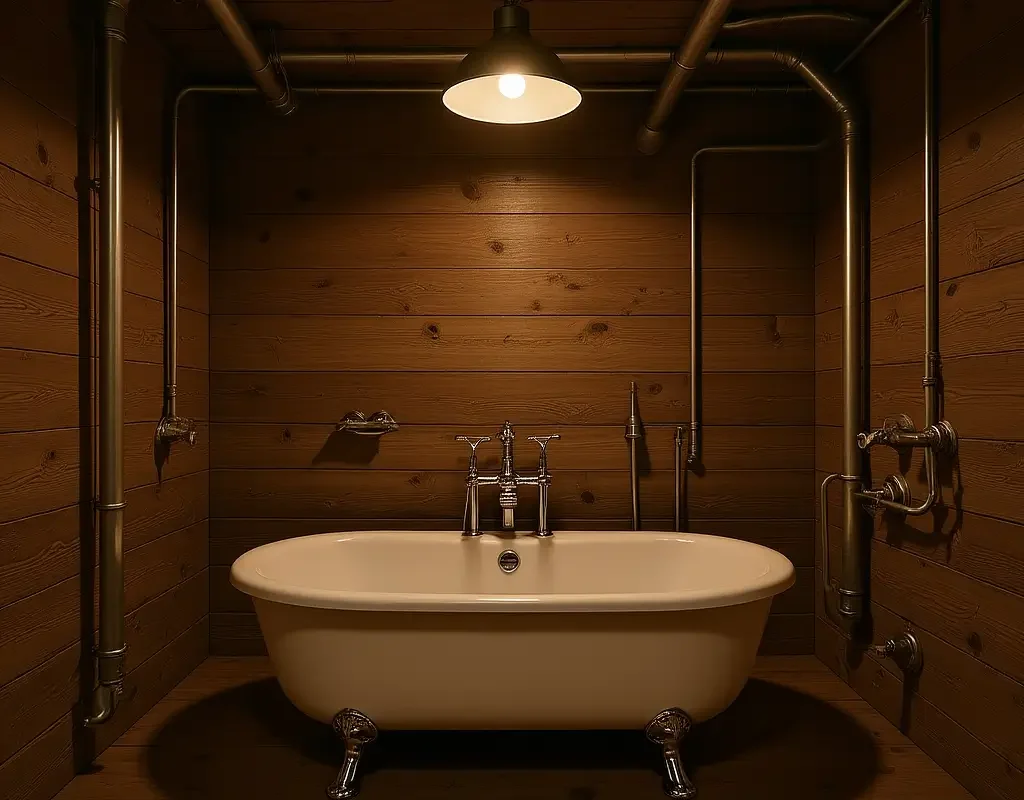
Wood Tile Accent Wall Behind Tub
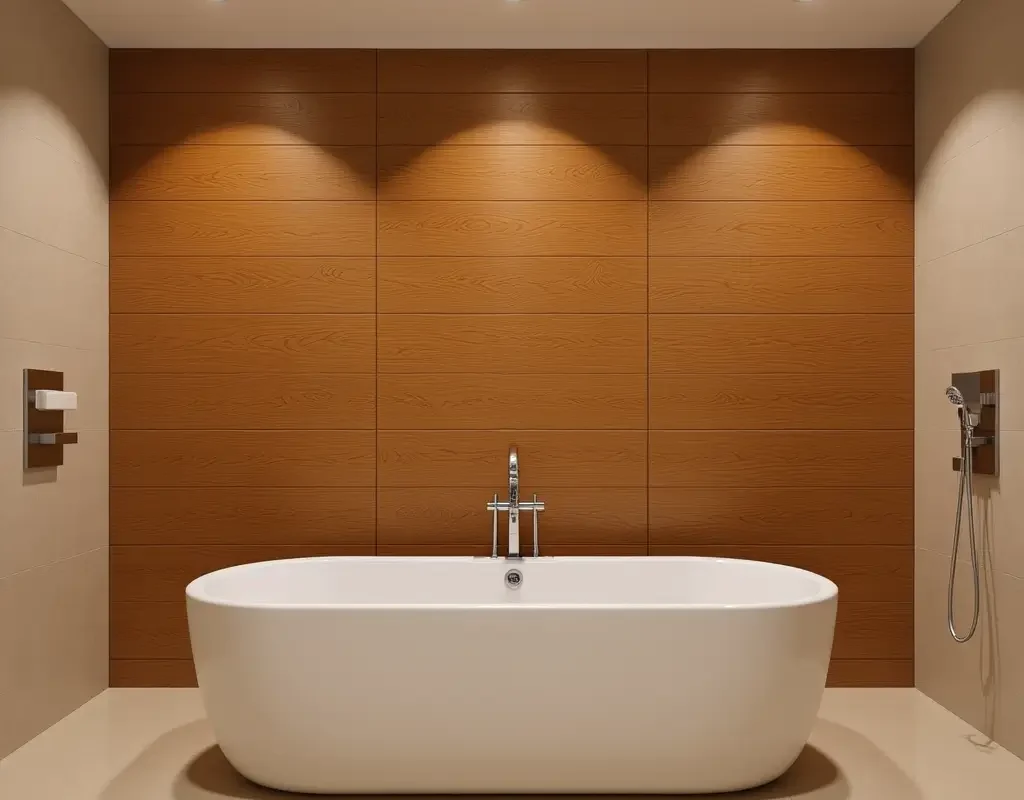
Creating an accent wall behind your tub with wood tiles? Now we’re talking! This idea transforms your basic bathtub area into a spa-worthy focal point. I’ve seen people use everything from weathered gray tiles to rich walnut tones, and each option completely changes the bathroom’s personality.
The trick here is choosing tiles that complement your tub style. Got a freestanding tub? Go bold with darker wood tiles that create drama. Working with a built-in tub? Lighter tiles help the space feel more open and airy.
Making It Work
Think about the height of your accent wall carefully. Running tiles from floor to ceiling makes a bold statement, while stopping at chair rail height feels more traditional. I personally love the floor-to-ceiling approach – go big or go home, right?
Don’t forget about grout color either. Matching grout to your tiles creates a seamless look, while contrasting grout adds definition to each plank. IMO, the seamless look wins every time for that authentic wood appearance.
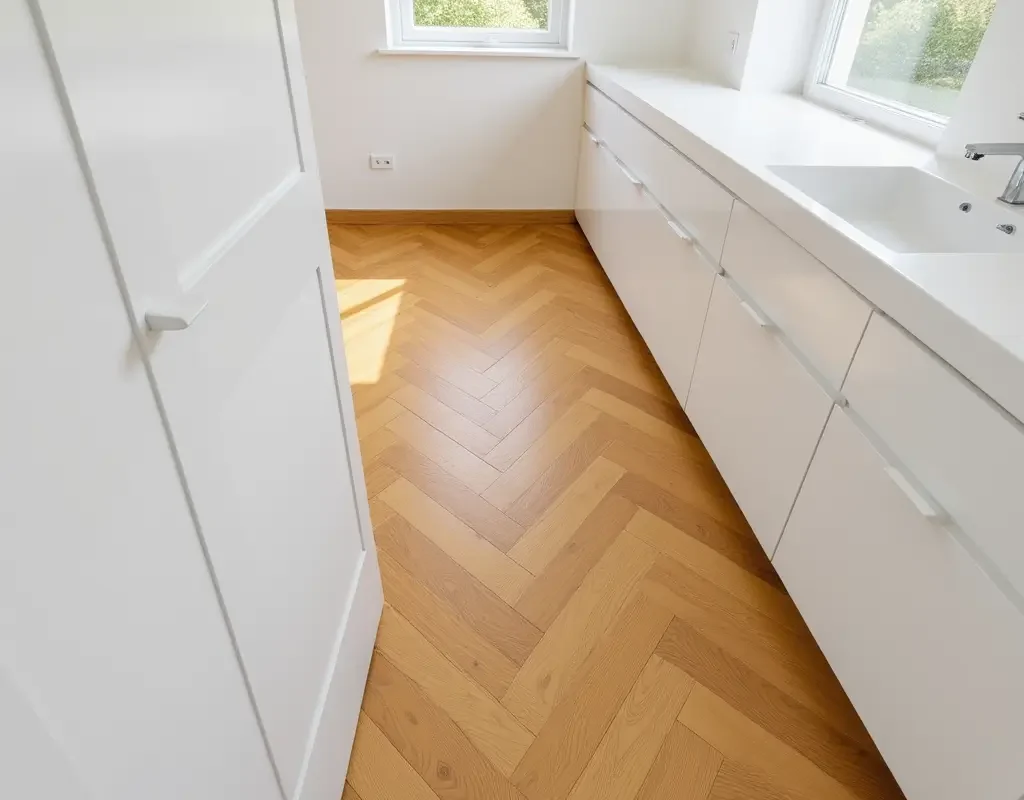
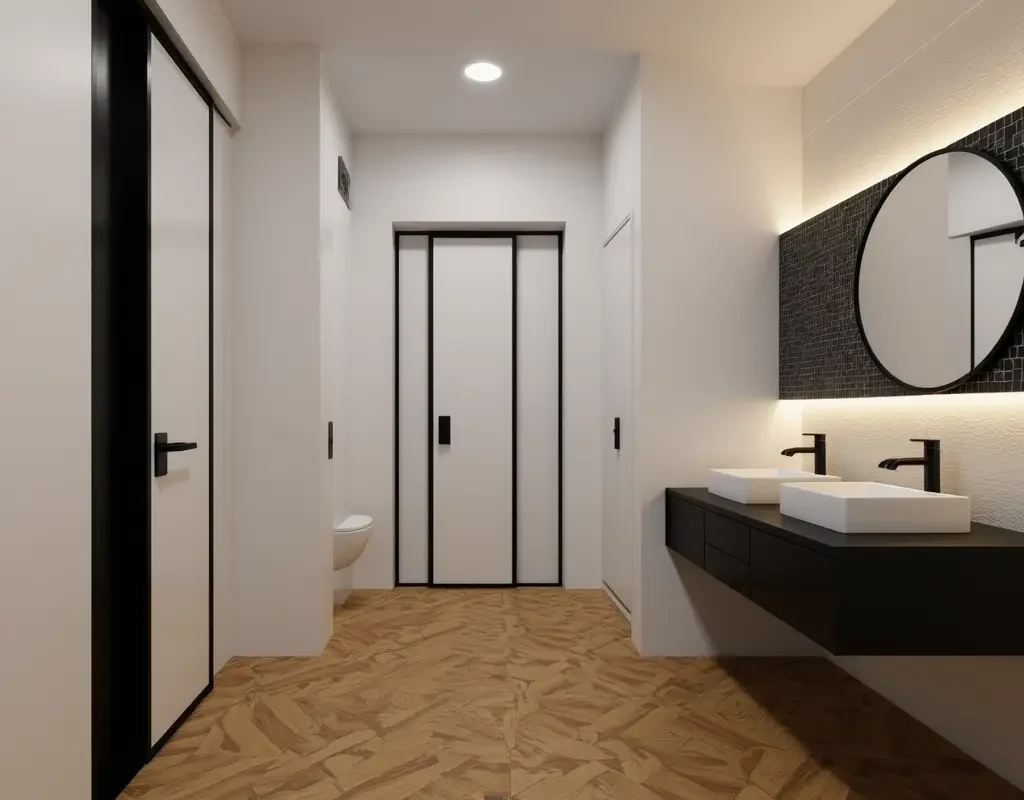
Herringbone Wood Tile Floor
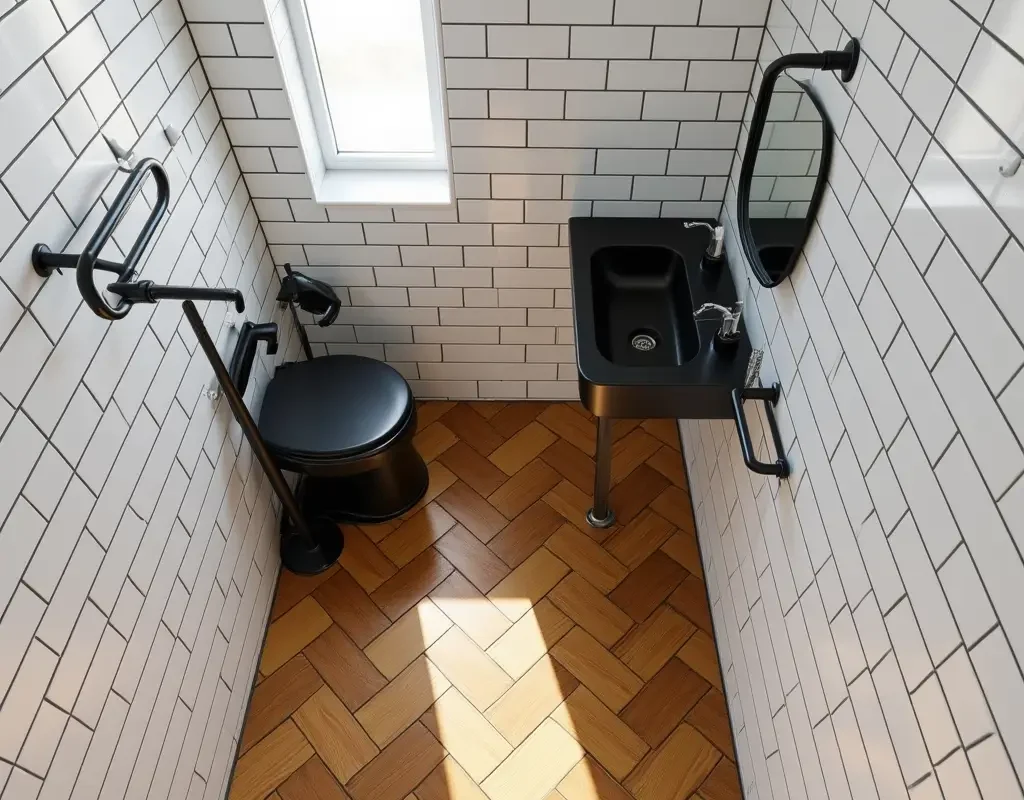
Oh man, herringbone patterns are having such a moment right now! Installing wood tiles in a herringbone pattern takes your bathroom floor from basic to absolutely stunning. Sure, it requires more cutting and planning than straight layouts, but the payoff is incredible.
The zigzag pattern naturally draws your eye through the space, making even tiny bathrooms feel more dynamic. I helped my sister install herringbone tiles in her powder room, and that 30-square-foot space now looks like it belongs in a design magazine.
Key benefits of herringbone floors:
- Creates visual movement that energizes the space
- Hides imperfections in uneven floors better than straight patterns
- Works with both traditional and modern bathroom styles
- Makes a small bathroom feel larger through optical illusion
Fair warning though – this pattern uses about 10% more material than standard layouts due to cutting waste. Budget accordingly!
Also Read: 9 Modern Brown Tile Bathroom Ideas and Smart Design Solutions
Two-Tone Wood and Marble Combo
Who says you have to choose between wood and marble? Combining these two materials creates this luxurious, high-end look that screams sophistication. I’ve seen bathrooms where wood tiles cover the floor while marble takes over the shower walls, and the contrast is chef’s kiss perfect.
The key to nailing this look? Balance and boundaries. You want clear definition between where the wood ends and marble begins. Transition strips or borders help create that clean separation while tying everything together.
Think about temperature contrast too. Warm wood tones paired with cool white marble create beautiful visual tension. Or flip it – use gray-toned wood tiles with warm beige marble for something unexpected.
Rustic Wood Tile Shower Niche
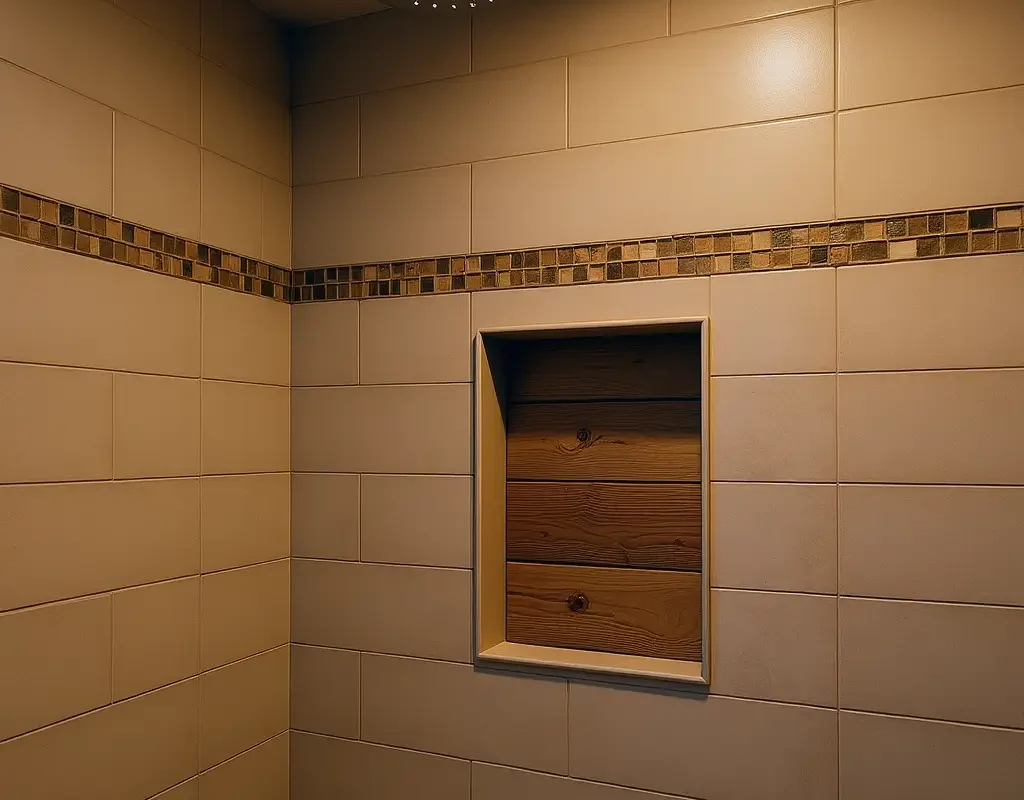
Ever notice how shower niches usually look pretty boring? Slap some rustic wood tiles in there, and suddenly you’ve got a design feature worth showing off. The contrast between smooth shower walls and textured wood tiles inside the niche creates this perfect little focal point.
I went with reclaimed barnwood-style tiles for my guest bathroom niche, and it’s honestly my favorite detail in the whole room. The rustic texture adds so much character, especially when you’ve got sleek, modern fixtures everywhere else.
Pro Tips for Niche Success
- Seal everything twice – water protection is crucial here
- Choose tiles with pronounced grain for maximum visual impact
- Consider adding LED strip lighting to highlight the texture
- Mix horizontal and vertical placement for added interest
Diagonal Pattern Wood Tile Layout
Want to make your bathroom feel bigger without knocking down walls? Install your wood tiles diagonally! This simple trick creates longer sight lines that trick your eye into seeing more space. Plus, it adds this subtle sophistication that straight layouts just can’t match.
The diagonal approach works especially well in narrow bathrooms. Instead of emphasizing the boxy shape, those angled lines break up the rigid geometry. I tried this in my hallway bathroom, and guests always comment on how spacious it feels now.
Here’s what you need to know:
- Start with a 45-degree angle from your main entrance
- Expect more cutting and waste (budget extra 15% for materials)
- Small tiles make installation easier than large planks
- Consider your grout lines – they’ll be more prominent with this pattern
Also Read: 15 Fresh White Subway Tile Bathroom Ideas for Bright Looks
Wood Tile Wainscoting for Bathroom
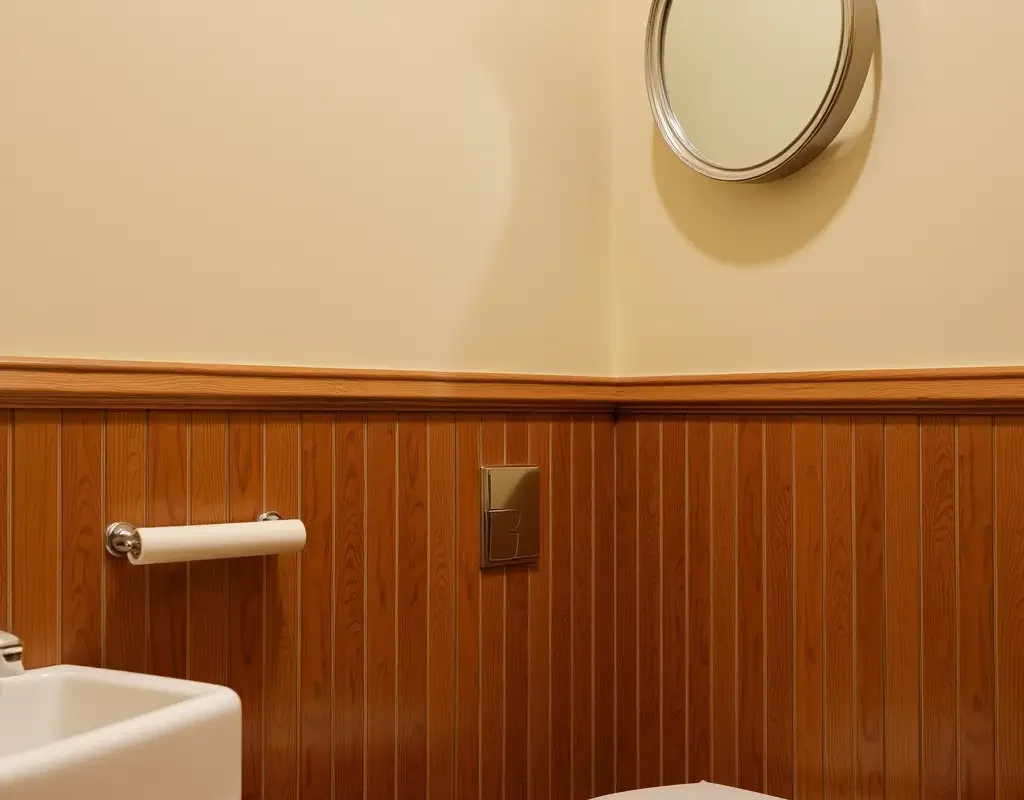
Wainscoting isn’t just for dining rooms anymore! Using wood tiles to create bathroom wainscoting gives you that classic, timeless look with way better water resistance than actual wood. The height typically sits around 36-48 inches, perfectly protecting your walls from splashes while adding serious style points.
This approach works brilliantly in bathrooms with pedestal sinks or wall-mounted toilets where you want to add visual weight to the lower portion of the room. Paint the upper walls in a complementary color, and boom – instant elegance.
Spa-Inspired Wood Tile Flooring
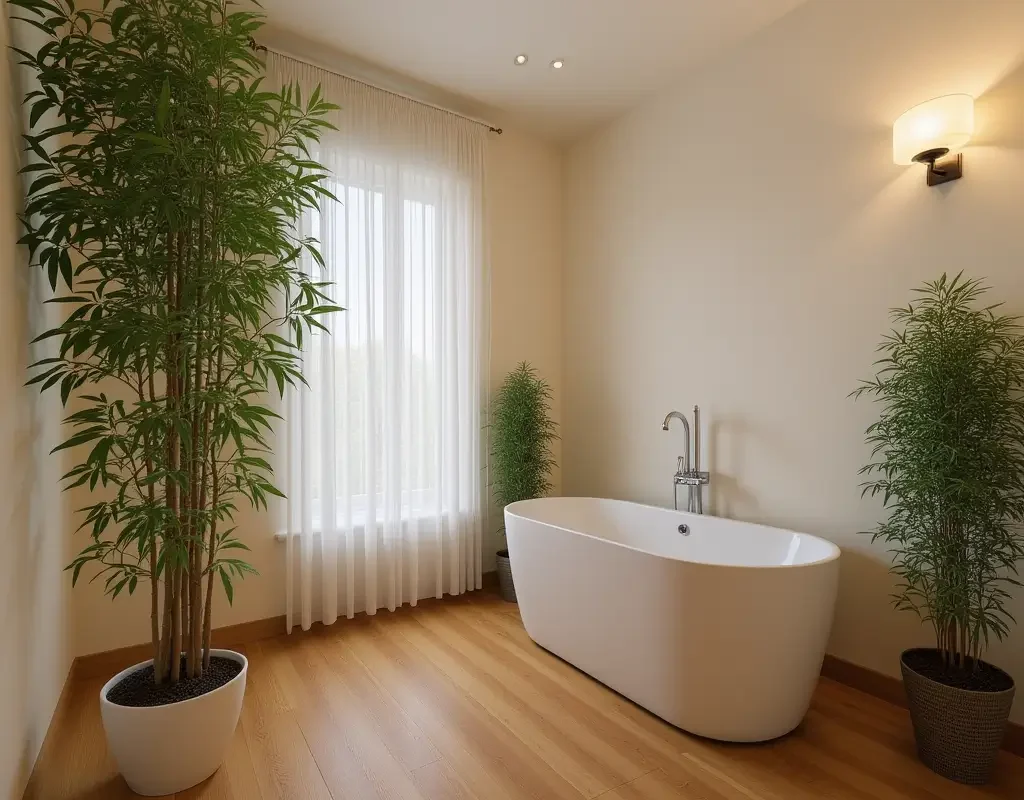
Transform your bathroom into a personal spa retreat with the right wood tile flooring. Think wide planks in honey or natural oak tones that immediately make you feel relaxed. The goal here? Creating that zen atmosphere you find at high-end spas.
Temperature matters more than you might think. Wood tiles stay warmer underfoot than ceramic or stone, making those middle-of-the-night bathroom trips way more pleasant. Add some radiant floor heating underneath, and you’ll never want to leave :
Creating the Full Spa Experience
- Choose matte finishes over glossy for authentic wood look
- Larger format tiles mean fewer grout lines and cleaner appearance
- Stick to natural, calming color palettes
- Consider continuing the same tiles into an adjacent bedroom for flow
Mixed Width Wood Tile Planks
Why stick to one size when you can mix it up? Using wood tiles in varying widths creates this organic, custom look that standard layouts can’t touch. Picture 4-inch, 6-inch, and 8-inch planks working together – the variation adds so much visual interest without being chaotic.
The random pattern mimics real hardwood flooring installations from historic homes. I’ve noticed this technique works especially well in larger bathrooms where you have the space to appreciate the pattern variation.
Installation tips for mixed widths:
- Plan your layout before starting (seriously, sketch it out)
- Maintain consistent spacing between planks
- Avoid clustering same-width tiles together
- Use the widest planks sparingly for best visual balance
Also Read: 15 Amazing Herringbone Tile Bathroom Ideas for Perfect Layouts
Wood Tile with Geometric Patterns
Geometric patterns mixed with wood tiles? Now you’re speaking my language! This trend combines the warmth of wood grain with bold geometric designs for something truly unique. Think hexagonal wood tiles or wood-look tiles cut into triangular shapes.
The contrast between organic wood texture and precise geometric forms creates this amazing visual tension. I’ve seen bathrooms where hexagonal wood tiles transition into regular rectangular tiles, and the effect is absolutely stunning.
Bathroom Shelf Backdrop with Wood Tiles
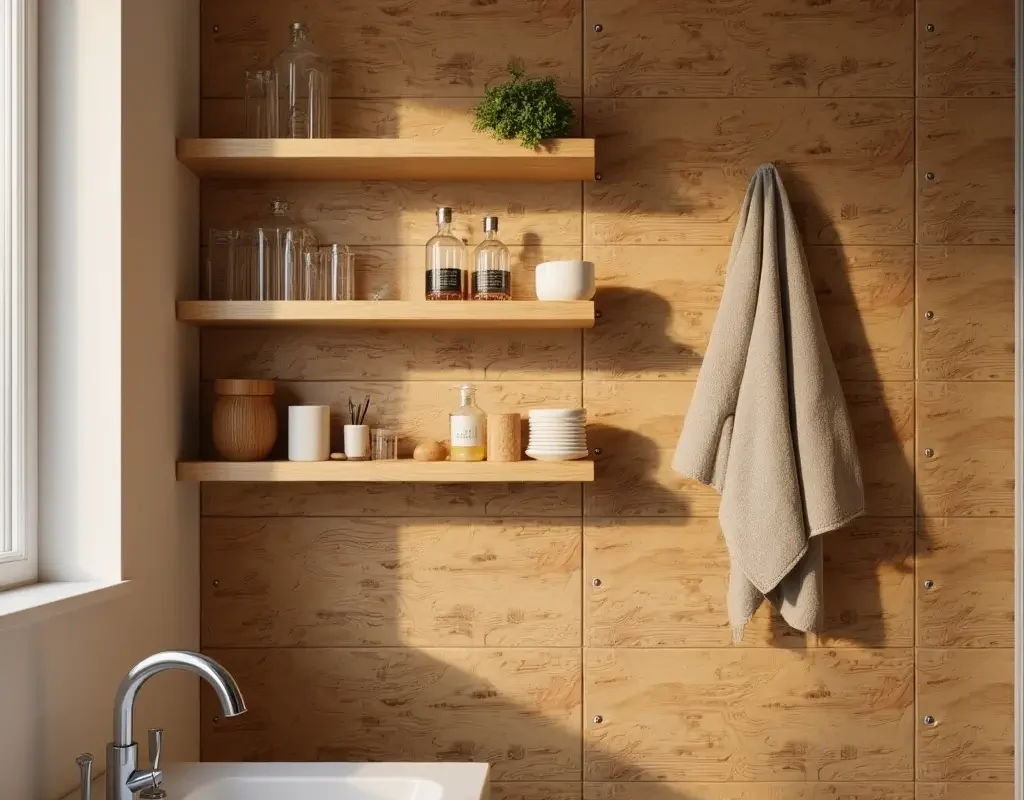
Here’s a simple upgrade that packs major punch – use wood tiles as a backdrop for open bathroom shelving. This creates a gorgeous display area for your fancy towels and bathroom accessories while adding textural interest to plain walls.
The wood tiles provide warmth and contrast, especially if you’re using white or metal shelving. Plus, they’re way more water-resistant than painted drywall when those inevitable splashes happen.
Making Shelving Pop
- Run tiles vertically for a modern look
- Contrast light shelves with dark wood tiles for drama
- Extend tiles slightly beyond shelf edges for a finished look
- Consider LED under-shelf lighting to highlight the wood grain
Wood Tile Around Bathroom Mirror
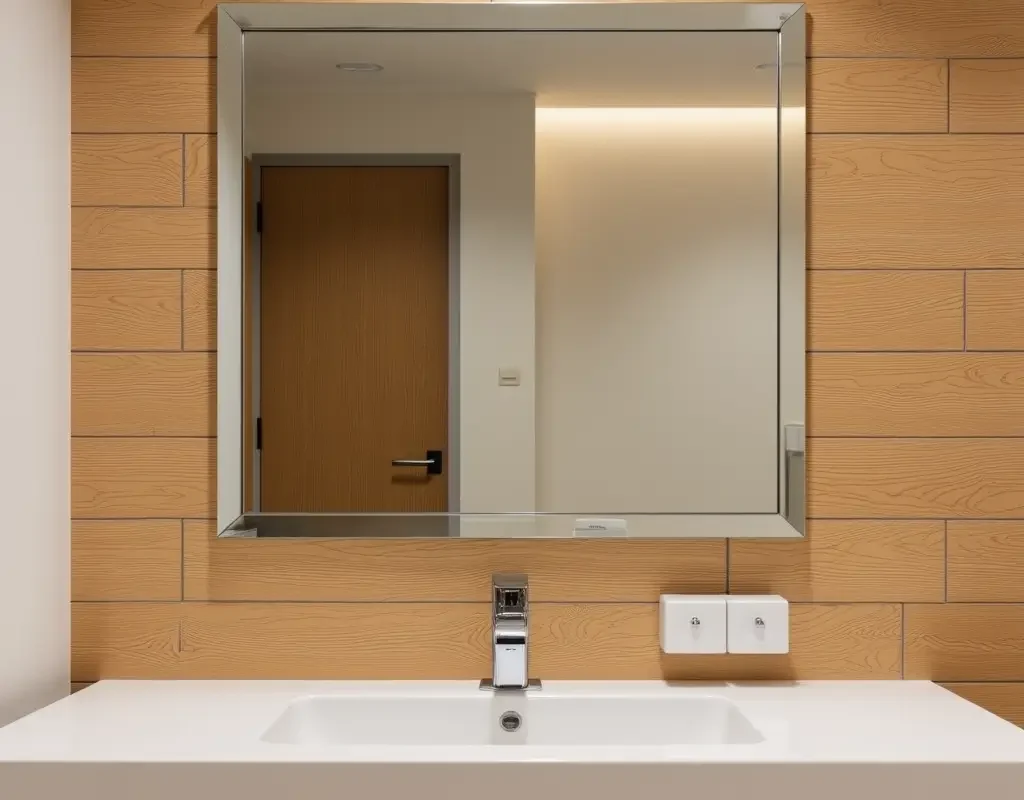
Framing your bathroom mirror with wood tiles creates an instant focal point that elevates the entire space. Forget those basic builder-grade mirrors – this approach gives you a custom, built-in look without the custom price tag.
You can go subtle with thin tile borders or make a statement with wide frames. I prefer the bold approach myself, using 6-inch tiles all around for maximum impact. The key is ensuring your tiles align perfectly – nothing ruins this look faster than wonky edges.
What works best:
- Miter corners for a professional finish
- Choose tiles that complement your vanity hardware
- Consider continuing the frame down to the vanity for cohesion
- Add accent lighting to highlight the texture
Minimalist White and Wood Tile Blend
The Scandinavian-inspired combination of white and wood never goes out of style. Using crisp white tiles for walls and warm wood tiles for floors creates this perfectly balanced, minimalist aesthetic that feels both modern and timeless.
This combo works because it plays with contrast without overwhelming the space. The white keeps things bright and clean, while the wood adds just enough warmth to prevent that clinical feeling some all-white bathrooms have.
Vintage Wood Tile Inspired by Barnwood
Barnwood-inspired tiles bring that rustic, farmhouse charm without the maintenance headaches of actual reclaimed wood. These tiles typically feature weathered textures, nail holes, and saw marks that tell a story – even though that story is completely manufactured.
What makes these tiles special is their imperfection. Each one looks slightly different, with varying degrees of “weathering” that creates an authentic vintage vibe. FYI, darker barnwood tiles hide water spots better than lighter ones – practical and stylish!
Getting the Vintage Look Right
- Mix multiple tile variations for authenticity
- Don’t over-coordinate – real barnwood is random
- Pair with black or oil-rubbed bronze fixtures
- Keep other elements simple to let the tiles shine
Mosaic Wood Tile for Small Bathrooms
Think mosaics are just for traditional tiles? Think again! Wood tile mosaics create these incredible textural statements perfect for small bathrooms where every detail counts. The smaller scale prevents overwhelming tight spaces while still adding major personality.
I’ve seen wood mosaics used everywhere from shower floors to accent strips, and they always steal the show. The variety in grain direction and tone within each mosaic sheet creates natural movement that larger tiles can’t replicate.
Best applications for wood mosaics:
- Shower floors where slip resistance matters
- Accent borders between larger tiles
- Behind floating shelves or mirrors
- Transitional areas between different tile styles
Making Your Wood Tile Dreams Reality
So there you have it – fifteen ways to completely transform your bathroom with wood tiles. Whether you’re going for rustic charm or modern minimalism, there’s a wood tile solution that’ll work for your space and style.
Remember, the best bathroom design is one that makes YOU happy every single morning. Don’t get too caught up in trends or what everyone else is doing. Pick the ideas that speak to you, maybe combine a few, and create something uniquely yours.
The beauty of wood tiles is their versatility. You can install them yourself over a weekend (though maybe start with something simple like a straight floor pattern before attempting herringbone), and they’ll look amazing for years with minimal maintenance. Just seal them properly, keep up with regular cleaning, and enjoy your gorgeous new bathroom!
What’s stopping you from starting your wood tile transformation today?