
Plastic pumpkins are one of those seasonal decorations I never like throwing away. They are inexpensive, lightweight, easy to store, and surprisingly versatile. The only problem is that many plastic pumpkins look exactly like what they are—plastic. Bright orange surfaces, obvious seams, shiny finishes, and basic molded details can make them feel more like Halloween party supplies than decorations you would proudly display around your home.
The good news is that a little creativity can completely change them.
Over the years, I have learned that decorating plastic pumpkins is much easier than working with real pumpkins. There is no rushing to finish before they rot, no messy pumpkin guts, and no worrying about your design lasting only a few days. You can paint them, wrap them, glue decorations onto them, cut openings into them, stack them, or completely transform their original appearance.
If you have old faux pumpkins sitting in a storage bin, or you have spotted inexpensive ones at a craft, discount, or thrift store, these plastic pumpkin decorating ideas can turn them into beautiful decorations you will want to reuse every fall.
Below are 12 detailed ideas ranging from elegant farmhouse pumpkins to spooky Halloween designs, along with practical tips for getting a cleaner and more professional-looking result.
1. Create Elegant Matte Painted Plastic Pumpkins
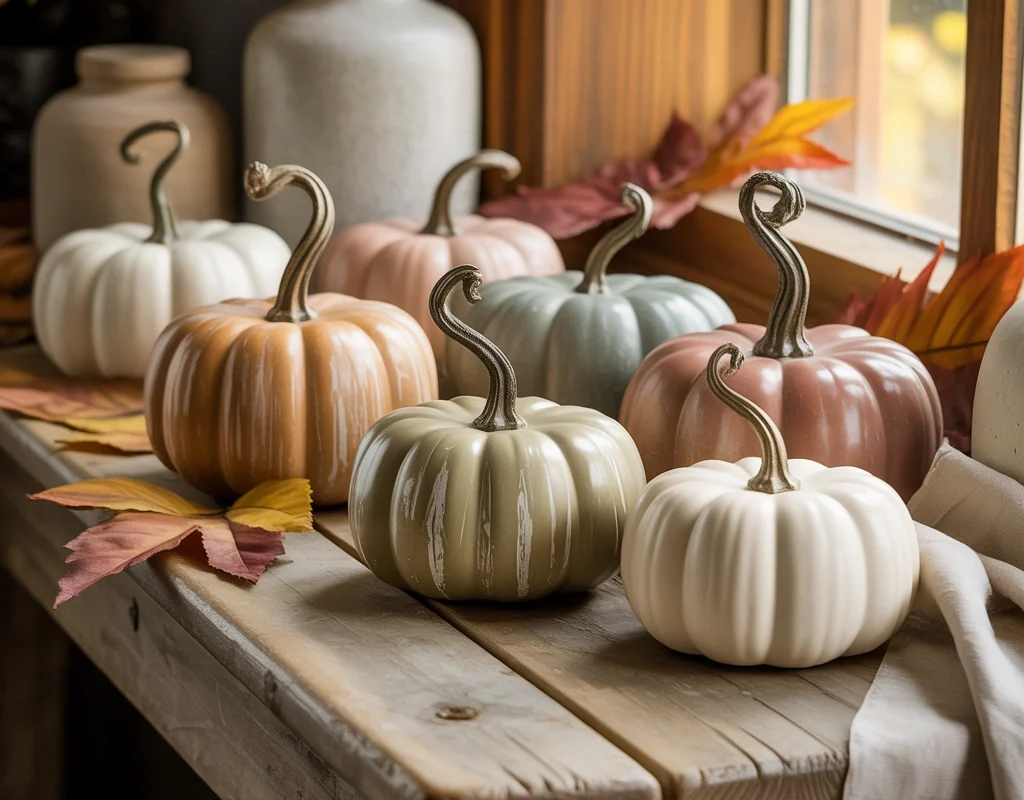
Painting is probably the easiest place to start when giving plastic pumpkins a makeover, but the secret is choosing colors and finishes that make the pumpkin look less artificial.
Instead of using bright traditional orange, I love painting plastic pumpkins in softer colors such as cream, warm white, sage green, muted terracotta, dusty blue, charcoal, or beige. These shades instantly make inexpensive pumpkins feel more intentional and decorative.
Before painting, wash the pumpkin with mild soap and water to remove dust, grease, or residue. Once it is completely dry, lightly sanding very glossy plastic can help the paint grip better.
A plastic-friendly primer is also worth using if you want the finish to last for several seasons.
For the paint itself, matte or chalk-style paint usually gives the most convincing finish because it eliminates the plastic shine.
Apply two or three light coats rather than one heavy coat. Let each layer dry completely before adding the next.
You can also create more depth by brushing a slightly darker shade into the pumpkin grooves. For example, if you paint your pumpkin cream, lightly add tan or taupe inside the recessed areas. Then wipe away the excess before it dries.
This simple shading technique makes the pumpkin look much more dimensional.
Do not forget the stem either. Paint it dark brown, wrap it with jute, or attach a small real twig over the original stem. Small details like this can make the finished pumpkin look much more expensive.
These matte-painted pumpkins work beautifully on mantels, dining tables, bookshelves, porch displays, and entryway consoles.
2. Make Vintage Decoupage Pumpkins
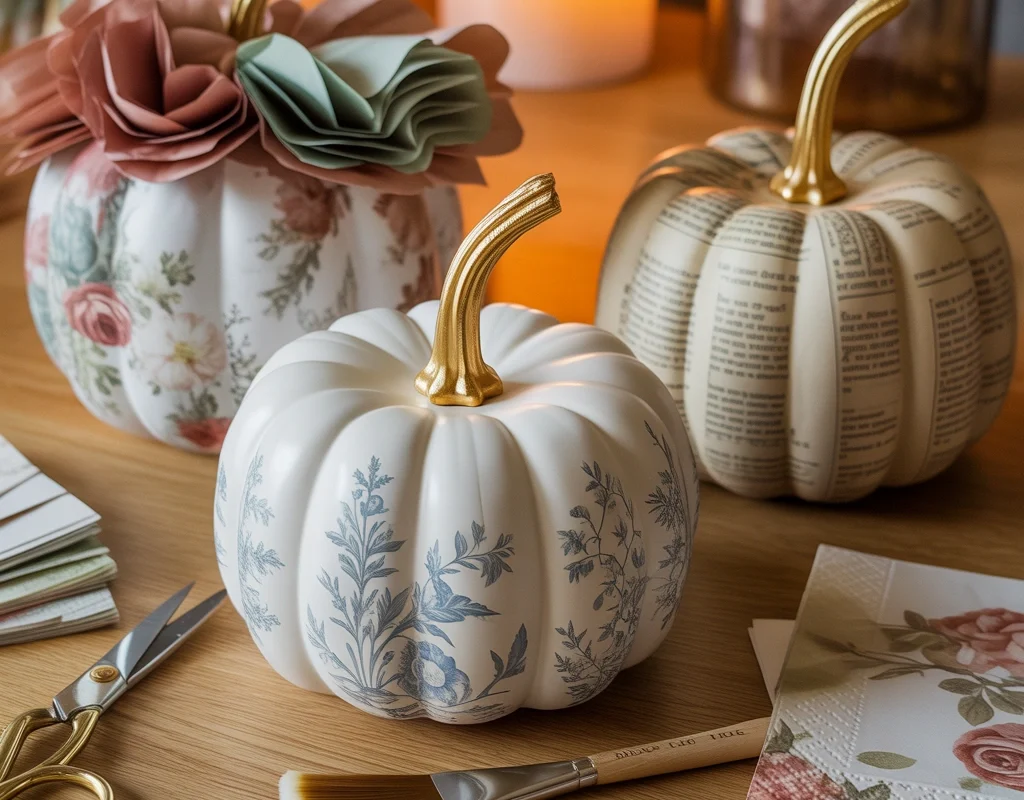
Decoupage is one of my favorite plastic pumpkin decorating ideas because there are almost endless design possibilities.
Instead of trying to make the pumpkin look realistic, this technique turns it into a decorative art piece.
You can use floral napkins, botanical paper, vintage book pages, maps, music sheets, patterned tissue paper, toile prints, or scrapbook paper.
Start by painting the pumpkin in a light background color. White, ivory, cream, or pale beige works particularly well because decorative patterns show clearly against it.
If you are using a printed napkin, separate the top printed layer from the plain layers underneath. Tear the edges rather than cutting them if you want a softer transition.
Apply a thin layer of decoupage adhesive to a small section of the pumpkin, position the paper carefully, and gently smooth it down.
Because pumpkins are rounded and heavily grooved, working with smaller pieces is usually easier than trying to wrap the whole pumpkin at once.
One of my favorite versions is a blue-and-white chinoiserie-style pumpkin. Use blue floral napkins over a white pumpkin and finish it with a metallic gold stem.
This combination has the look of decorative porcelain and works beautifully in elegant autumn interiors.
You can also use pages from damaged old books or printed reproductions to create a vintage literary pumpkin. Add slightly distressed edges and an aged bronze stem for a cozy antique feel.
Place several decoupage pumpkins in different sizes together for a layered and collected look.
3. Turn Plastic Pumpkins Into Luxurious Velvet Pumpkins
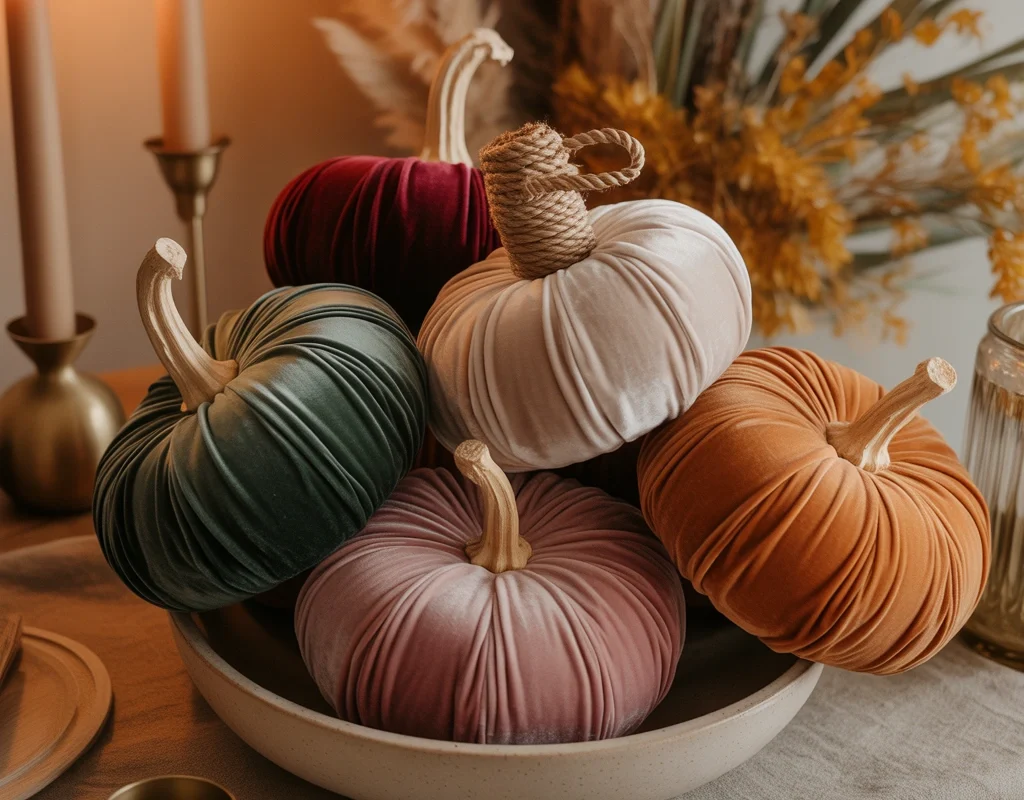
There is something about velvet that immediately makes fall decor feel warmer, softer, and more luxurious.
While fabric pumpkins are commonly made from scratch, you can also use an existing plastic pumpkin as the base.
Choose stretchy velvet or another flexible fabric that can comfortably wrap around the curves of the pumpkin.
Cut enough fabric to cover the pumpkin with a little extra material at the top. Stretch the fabric tightly around the pumpkin and gather it near the stem.
Secure the material using hot glue in small sections. Work slowly around the grooves so the original pumpkin shape remains visible underneath.
Deep emerald, burgundy, navy, mustard, plum, rust, and chocolate brown all work beautifully for rich autumn decor.
If you prefer a softer interior, try ivory, dusty pink, taupe, champagne, or sage green.
The stem is an important finishing detail. You could use a cinnamon stick, small natural branch, twisted rope, painted faux stem, or decorative wooden piece.
I especially like displaying three or four velvet pumpkins of different sizes together inside a decorative bowl or basket. The mix of height and texture instantly creates a cozy seasonal centerpiece.
Velvet pumpkins are perfect if you want fall decor that feels less Halloween-specific and can stay on display through Thanksgiving.
4. Make Metallic Gold or Copper Pumpkins
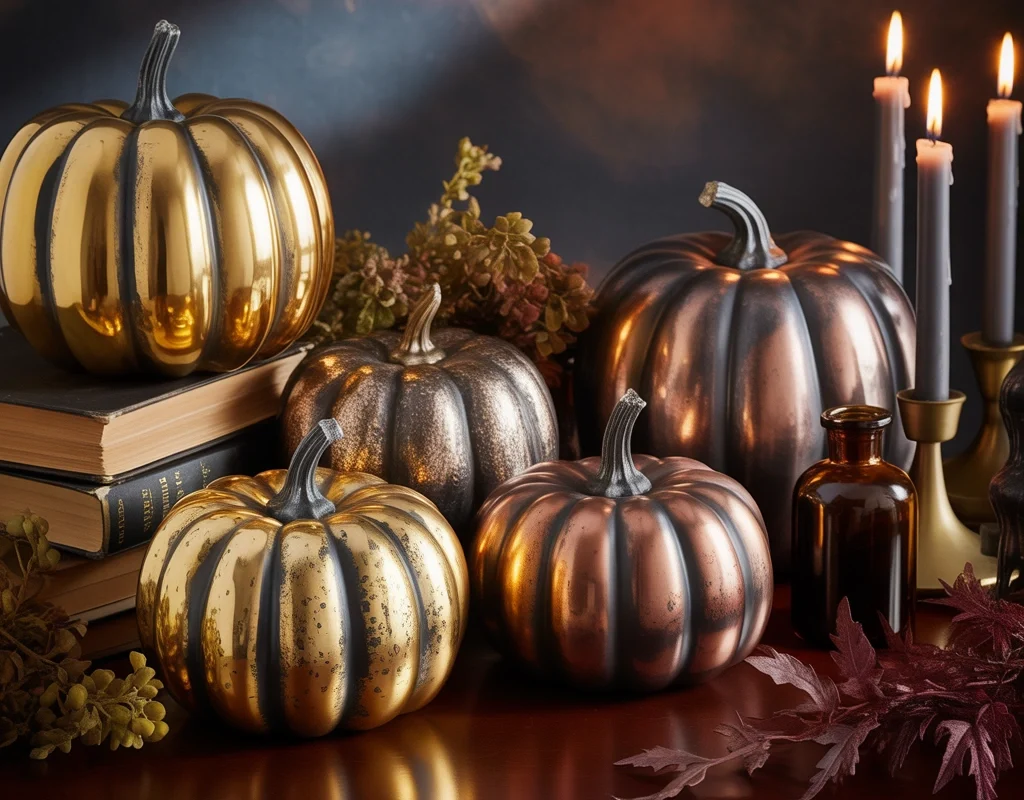
Metallic plastic pumpkins can look surprisingly expensive when they are done carefully.
Instead of covering the entire pumpkin with extremely shiny metallic spray paint, I prefer combining metallic finishes with subtle aging.
Start with a black, charcoal, dark brown, deep green, or burgundy base.
Once the base paint is dry, lightly brush metallic gold, bronze, copper, or antique brass paint across the raised portions of the pumpkin.
Do not completely cover the darker color.
Leaving the darker paint visible inside the grooves creates the appearance of aged metal and gives the pumpkin much more character.
If you want to create an antique patina, add tiny touches of black, dark brown, green, or turquoise using a nearly dry brush or sponge.
Keep the application uneven. Slight imperfections actually make the surface look more believable.
Metallic pumpkins work especially well in sophisticated Halloween displays. Pair them with black taper candles, amber glass, old books, dark foliage, and dried branches.
For a softer fall arrangement, combine antique gold pumpkins with cream candles and neutral dried flowers.
A few carefully finished metallic pumpkins can create a dramatic focal point without requiring many other decorations.
5. Create Beautiful Floral Pumpkins
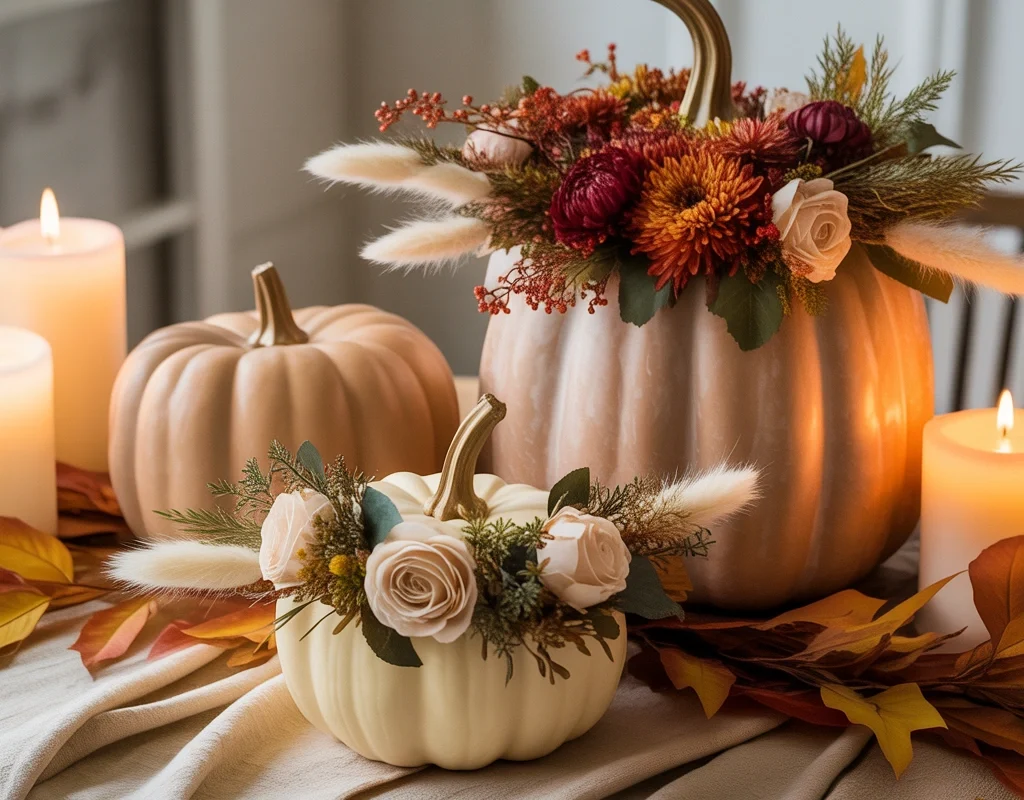
If you prefer pretty autumn decorations instead of spooky Halloween decor, floral pumpkins are an easy and beautiful choice.
Start with a plastic pumpkin in a soft neutral color, or paint one in cream, white, sage, dusty rose, or muted beige.
Then choose artificial flowers that match your overall fall color scheme.
I love combinations such as cream roses with eucalyptus, rust chrysanthemums with dried grasses, burgundy flowers with berries, white flowers with sage greenery, or sunflowers with warm brown foliage.
Remove bulky plastic stems from the flowers so they can sit closely against the pumpkin.
Arrange your largest flowers first, then fill the gaps with smaller blooms, berries, leaves, greenery, and dried elements.
One of the prettiest ways to decorate the pumpkin is by creating a flower crown around the stem.
This leaves most of the pumpkin visible while still adding a strong decorative detail.
You could also attach a soft ribbon bow behind the flowers for a more romantic finish.
Floral plastic pumpkins are especially useful for Thanksgiving tables, fall weddings, entryway decor, seasonal parties, or feminine Halloween displays.
Because everything is artificial, you can store the arrangement carefully and reuse it next year.
6. Make Cute Ghost Pumpkins
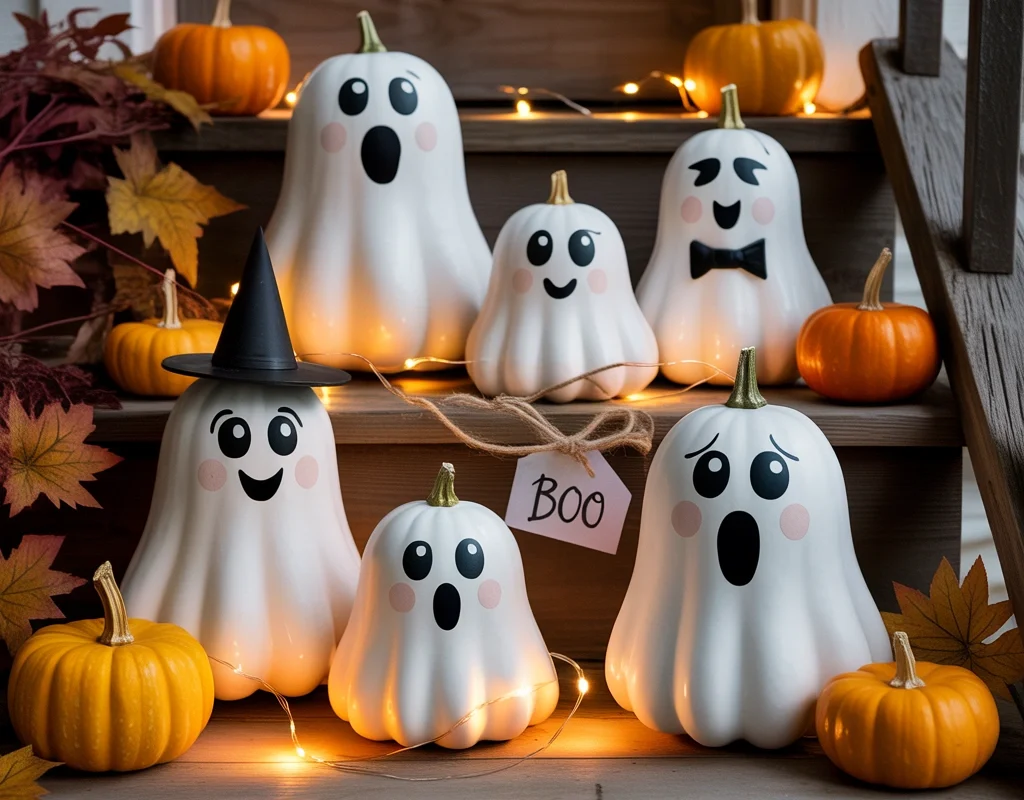
Not every Halloween pumpkin has to look frightening.
For something playful and family-friendly, turn your plastic pumpkins into adorable ghost decorations.
Paint the entire pumpkin matte white and allow it to dry completely.
Then add simple black oval eyes and a small mouth. You can hand-paint the face or use adhesive vinyl if you want cleaner edges.
Each pumpkin can have a different expression.
Create one happy ghost, one sleepy ghost, one surprised ghost, and one slightly mischievous ghost.
Adding small accessories can make them even more charming.
Try a miniature witch hat, a black bow tie, rosy pink cheeks, a small fabric cape, a tiny bat, or a ribbon around the stem.
You could also create an entire ghost pumpkin family using several different pumpkin sizes.
I particularly like this idea for homes with young children because it gives you a classic Halloween look without making the room feel scary.
These ghost pumpkins are perfect for staircases, kitchen counters, bookshelves, children’s Halloween parties, and covered porches.
7. Create a Woodland Mushroom Pumpkin
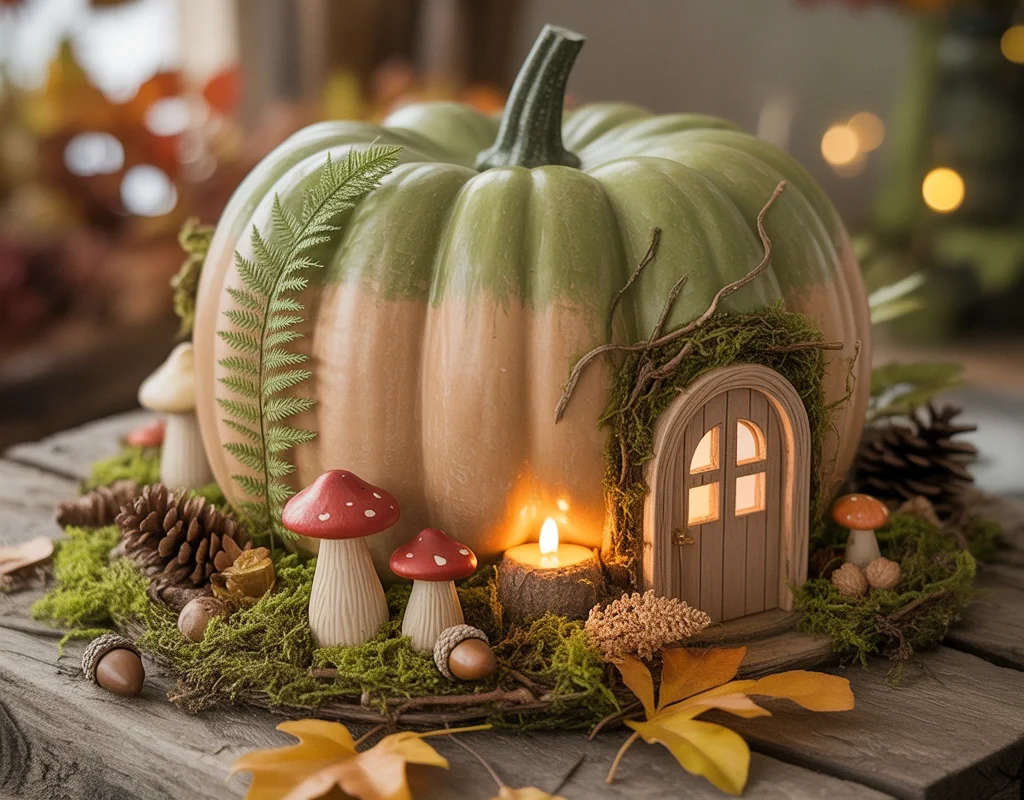
This plastic pumpkin decorating idea is perfect if you enjoy cottagecore, woodland, fairy garden, or storybook-style decor.
Start by painting the pumpkin in earthy colors such as moss green, mushroom beige, soft brown, or muted orange.
Next, attach tiny decorative mushrooms around the bottom of the pumpkin.
You can use miniature mushroom picks, clay mushrooms, wooden craft mushrooms, or handmade air-dry clay pieces.
Add artificial moss around the mushroom bases to make them look as though they are naturally growing from the pumpkin.
From there, build a miniature forest scene using pinecones, acorns, ferns, twigs, faux leaves, tiny flowers, and berries.
You do not need to cover the whole pumpkin.
A small woodland scene wrapping around one side often looks much more artistic.
If you want to take the project further, add a tiny fairy door and little windows. Suddenly, the pumpkin becomes a miniature fairy cottage instead of just a seasonal decoration.
This is also a wonderful project to personalize because no two woodland pumpkins need to look exactly alike.
8. Transform a Plastic Pumpkin Bucket Into Stylish Decor
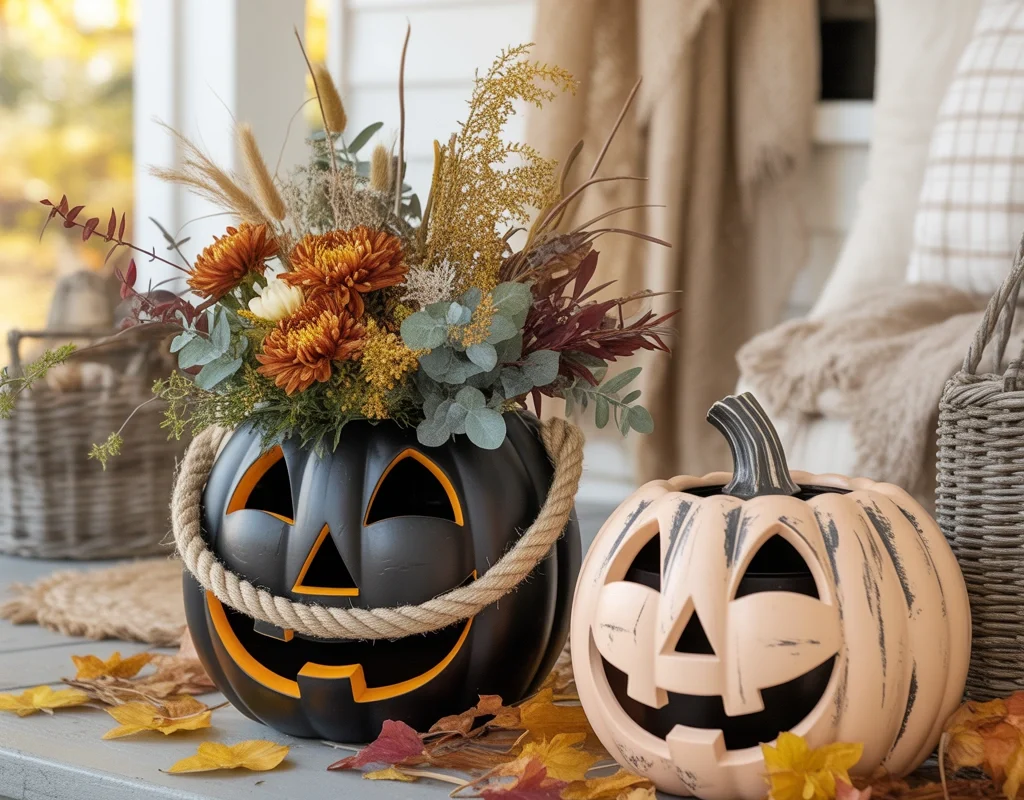
Those classic plastic jack-o’-lantern candy buckets are inexpensive, easy to find, and perfect for DIY makeovers.
The molded face may seem limiting at first, but it can actually become part of the finished design.
One of the easiest transformations is painting the entire bucket matte black.
Once painted, use it as a Halloween planter filled with artificial branches, black roses, dried grasses, orange mums, or burgundy foliage.
Another option is painting the bucket cream, beige, or stone gray and adding darker paint around the molded features for a weathered vintage look.
Since pumpkin buckets already have an open top, they are naturally suited to flower arrangements.
Replace the original plastic handle with rope, ribbon, or twisted jute for a more decorative finish.
If you are placing the bucket outside, add stones or another weight inside the base so it does not blow over.
A pair of matching pumpkin bucket planters beside the front door can look surprisingly stylish and costs much less than many ready-made seasonal planters.
9. Make a Stacked Pumpkin Topiary
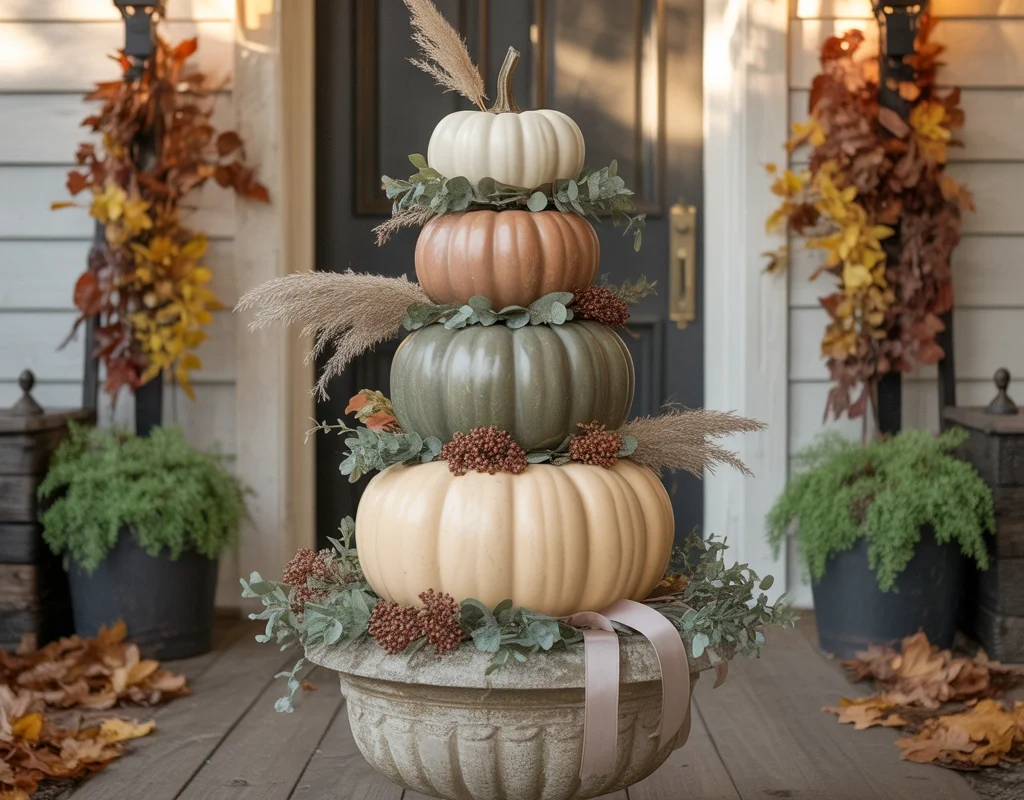
If you want a larger fall decoration, several plastic pumpkins can be combined into a stacked pumpkin topiary.
Choose three pumpkins in decreasing sizes.
Remove or trim the stems from the lower pumpkins so they can stack securely.
You can paint all three pumpkins the same color or use coordinated shades.
Some combinations I really like include cream, sage, and terracotta; black, white, and metallic gold; or beige, ivory, and muted orange.
Once the paint is completely dry, stack the pumpkins and secure them using strong adhesive.
For extra stability, you can run a wooden dowel through the center if the pumpkin structure allows it.
Decorate between the layers with artificial greenery, autumn leaves, berries, dried flowers, moss, or ribbon.
These details help hide gaps and make the overall topiary look more finished.
Place the stacked pumpkins inside an urn, planter, large basket, or galvanized container.
Pumpkin topiaries look especially impressive near a front door, fireplace, porch entrance, or event display.
10. Create Boho Rope and Macramé Pumpkins
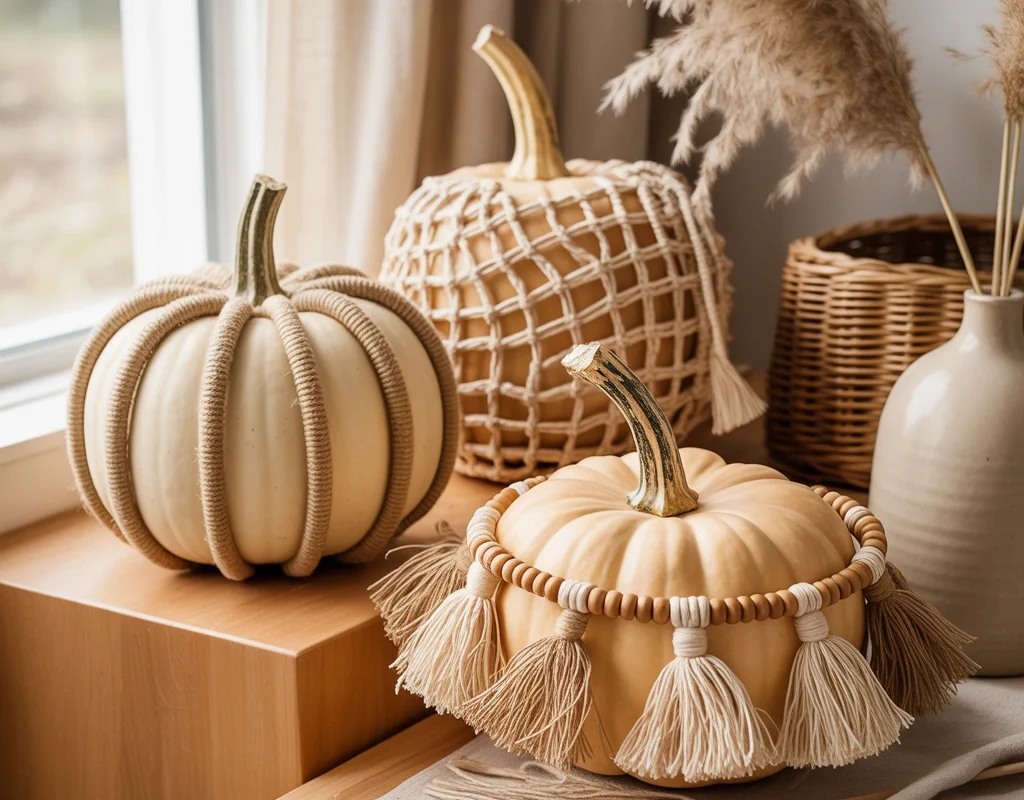
If your home has a farmhouse, bohemian, coastal, rustic, or neutral decorating style, rope and macramé can completely change the appearance of a plastic pumpkin.
Start by painting the pumpkin white, cream, beige, or another soft neutral color.
Once dry, add jute rope, cotton cord, or macramé string.
You could wrap the rope vertically inside selected grooves, spiral it around the entire pumpkin, or create a loose net-style macramé covering.
Natural materials work especially well with this look.
Add wooden beads, raffia, cotton fringe, dried grasses, jute bows, or a natural wood stem.
Try not to add too many details at once.
The beauty of boho pumpkins usually comes from their simple texture and neutral palette.
Arrange them beside woven baskets, pampas grass, wooden trays, or ceramic vases for a warm and relaxed autumn display.
These pumpkins also transition nicely from early fall into Thanksgiving decor.
11. Make a Mosaic or Jeweled Pumpkin
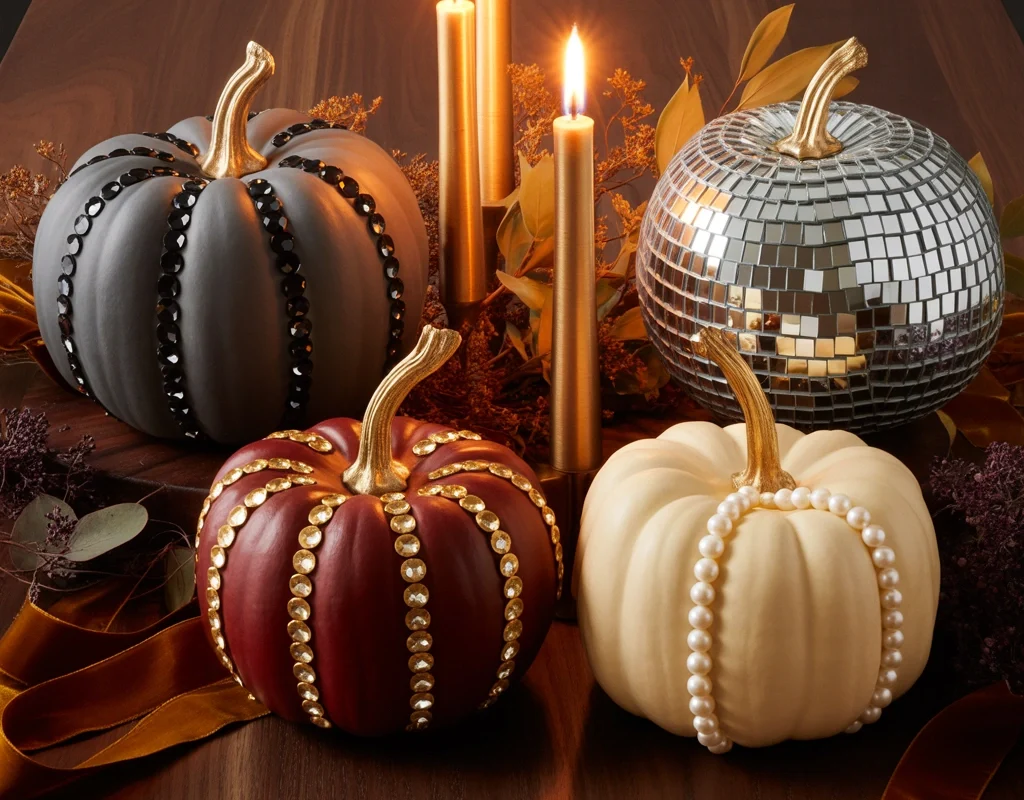
For something more glamorous, decorate your plastic pumpkins with mosaic pieces, flat-back gems, rhinestones, pearl beads, sequins, or mirrored tiles.
You do not necessarily need to cover the entire pumpkin.
In fact, decorating only selected sections often looks more elegant.
You could create jeweled stripes along the natural grooves, decorate the upper third of the pumpkin, or add a geometric pattern around the center.
Paint the pumpkin first so the exposed surface coordinates with your embellishments.
A matte black pumpkin with black rhinestones creates subtle sparkle, while burgundy with gold gems feels rich and dramatic.
Cream pumpkins decorated with pearls can work beautifully for elegant fall events or weddings.
Small mirrored tiles can create a disco-ball-inspired pumpkin that reflects nearby candlelight.
Before attaching anything, lay out your pattern so you can check the spacing.
This project takes a little more patience, but the final result can look very high-end.
12. Turn Plastic Pumpkins Into Glowing Lanterns
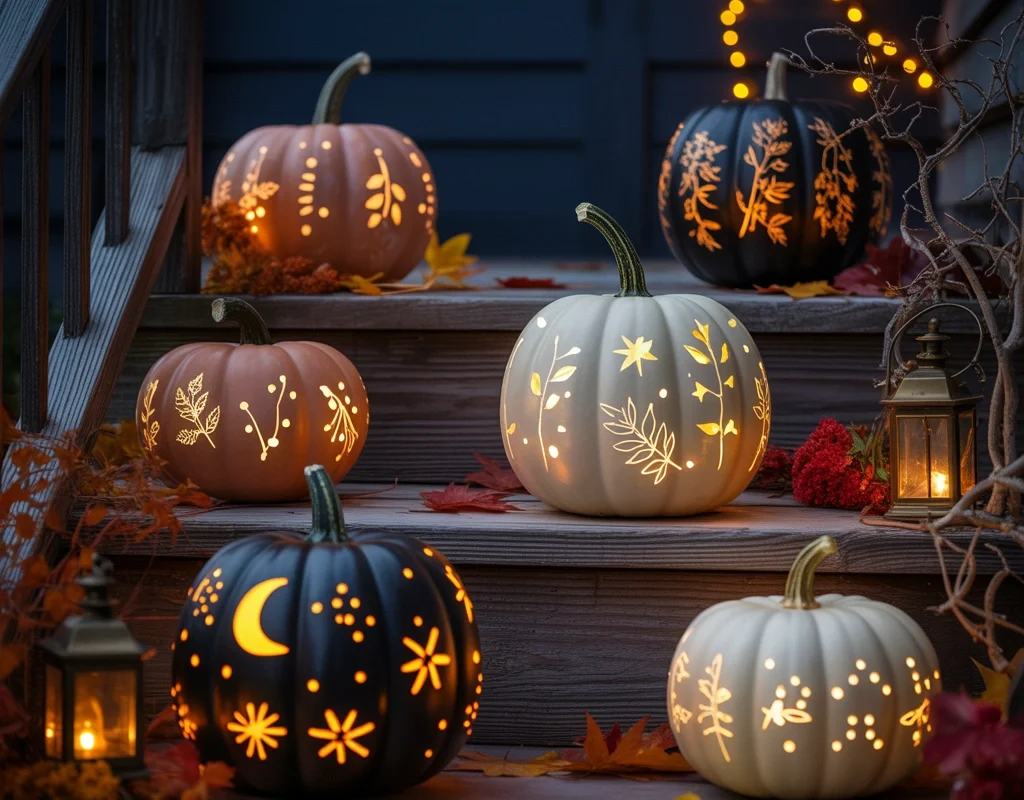
My final idea combines decoration with functional seasonal lighting.
Many hollow plastic pumpkins can be transformed into glowing lanterns using battery-powered LED lights.
If your pumpkin already has a jack-o’-lantern face, the project is very easy.
Simply paint or decorate the exterior, then place a battery-operated LED candle or fairy light inside.
If your pumpkin has no openings, you can carefully create decorative cutouts using tools that are appropriate for the thickness and type of plastic.
Simple stars, crescent moons, leaves, circles, dots, and geometric patterns all work well.
I prefer warm white fairy lights because they create a softer, more magical effect than extremely bright lighting.
Paint the outside black if you want the illuminated patterns to stand out strongly at night.
You can also use cream, muted orange, dark green, or burgundy for a softer fall appearance.
Arrange several lantern pumpkins together along porch steps or on a covered patio for a beautiful nighttime display.
Always use battery-powered LED lights rather than real candles or open flames inside plastic decorations.
How to Make Plastic Pumpkins Look More Expensive
After trying several pumpkin makeover projects, I have found that the difference between a craft that looks homemade and one that looks professionally styled often comes down to the finishing details.
The first thing I usually change is the shiny plastic surface.
Glossy finishes are one of the main reasons inexpensive pumpkins look artificial. Matte paint, chalk-style finishes, stone-effect paint, fabric, or textured coatings can instantly make them feel more sophisticated.
Another helpful trick is layering colors.
Real pumpkins rarely have perfectly flat coloring. Add a slightly darker shade inside the grooves and a lighter shade across raised areas to create realistic dimension.
The stem is another important detail.
If the original stem looks obviously molded from plastic, replace or disguise it using twigs, rope, clay, cinnamon sticks, or decorative wood.
I also recommend decorating pumpkins in groups.
Three pumpkins in different sizes often look more balanced and intentional than one pumpkin sitting alone.
Finally, avoid overdecorating.
Not every pumpkin needs ribbon, glitter, flowers, beads, and leaves at the same time. Choosing one or two strong design elements usually creates a cleaner result.
What Paint Works Best on Plastic Pumpkins?
One of the most common problems when decorating faux pumpkins is paint that scratches, cracks, or peels.
Plastic surfaces can be very smooth, so preparation matters.
Start by washing the pumpkin and allowing it to dry completely.
If the plastic is especially glossy, lightly sanding the surface can help create better adhesion.
For very slick pumpkins, use a bonding primer designed for plastic.
Depending on the finish you want, acrylic craft paint, chalk-style paint, plastic-compatible spray paint, multi-surface paint, and metallic craft paint can all work.
Several thin layers are usually better than one heavy coat because thick paint can drip, pool inside the grooves, or take much longer to dry.
If you plan to reuse the pumpkin year after year, consider applying an appropriate clear protective finish after the paint has fully cured.
Always check the instructions on the paint and sealer you choose, especially if the pumpkin will be displayed outdoors.
Indoor vs. Outdoor Plastic Pumpkin Decorations
Plastic pumpkins are convenient for outdoor decorating because they do not rot like real pumpkins.
However, that does not mean every material you add to them is weatherproof.
Paper, fabric, hot glue, dried flowers, moss, and certain craft paints may become damaged by rain, humidity, or prolonged sunlight.
If you want to display your decorated pumpkins outside, use weather-resistant materials whenever possible.
A covered porch is usually a better location for delicate DIY pumpkins than an exposed walkway.
Lightweight plastic pumpkins should also be weighted down so they do not blow over in windy weather.
You can place stones, sand, or another heavy material inside hollow pumpkins.
Indoor decorations give you more freedom because you can safely use decoupage paper, velvet, beads, dried materials, and delicate floral accents.
Personally, I keep my most detailed pumpkins indoors and use simpler painted or stacked pumpkins outdoors.
Where to Display Decorated Plastic Pumpkins
Once you start making these pumpkins, you may quickly discover that one is not enough.
Fortunately, decorated plastic pumpkins can be used almost anywhere during fall.
Entryway tables are one of my favorite places because the pumpkins immediately set the seasonal mood when someone walks into the home.
Mantels also work well, especially when pumpkins are mixed with candles, dried branches, leaves, or garlands.
On dining tables, smaller pumpkins can be grouped around a centerpiece without taking up too much room.
You can also place them on bookshelves, kitchen islands, coffee tables, fireplace hearths, staircases, office desks, porch steps, baskets, and seasonal party tables.
For a more natural look, combine your DIY pumpkins with wood, pinecones, branches, dried leaves, baskets, and autumn flowers.
Mixing artificial pumpkins with real natural textures often makes the overall arrangement feel warmer and more realistic.
Frequently Asked Questions About Plastic Pumpkin Decorating
Can You Paint Plastic Halloween Pumpkins?
Yes, plastic Halloween pumpkins can be painted successfully. The most important step is preparing the surface properly. Clean the pumpkin, lightly sand very glossy plastic if needed, and use a primer or paint designed to adhere to plastic.
How Do You Make Plastic Pumpkins Look Realistic?
The easiest way is to remove the glossy finish and use layered colors. Add darker tones inside the grooves, lighter highlights on raised areas, and replace the plastic-looking stem with something more natural.
Can Plastic Pumpkins Be Used Outdoors?
Yes, but the materials you add may not be weather-resistant. Painted plastic pumpkins usually work better outdoors than pumpkins covered with paper, velvet, dried flowers, or other delicate materials.
What Can I Use to Decorate a Plastic Pumpkin?
You can use paint, fabric, jute, rope, ribbons, artificial flowers, moss, paper, vinyl, beads, rhinestones, mirrored tiles, clay pieces, leaves, twigs, and battery-powered lights.
Can Old Plastic Pumpkin Buckets Be Reused?
Absolutely. Plastic pumpkin candy buckets can be turned into planters, lanterns, centerpieces, flower containers, or painted Halloween decorations.
How Do You Glue Decorations Onto Plastic Pumpkins?
The best adhesive depends on the weight and material of the decoration. Hot glue can work well for lightweight items, while heavier embellishments may need a stronger adhesive specifically designed to bond with plastic.
Final Thoughts
Plastic pumpkins may start out as inexpensive seasonal decorations, but they are really blank canvases.
A little paint can turn one into sophisticated neutral fall decor. Velvet can make another look luxurious. Flowers can create a romantic centerpiece, while black paint, glowing lights, and unusual embellishments can completely transform a basic pumpkin into dramatic Halloween decor.
That is what I enjoy most about these plastic pumpkin decorating ideas. There is no single correct way to decorate them.
You can make your pumpkins cute, elegant, spooky, colorful, rustic, modern, vintage, bohemian, glamorous, or completely unexpected.
Before buying new fall decorations this year, check the boxes in your garage, attic, or seasonal storage.
That old orange plastic pumpkin you almost donated may only need a fresh coat of paint, a better stem, and an hour of creativity to become one of your favorite autumn decorations.
And because it is plastic, you can store it when the season ends, bring it back out next fall, and enjoy it all over again.
