Christmas decorating season hits different when you’re standing outside in the freezing cold, tangling yourself in lights while your neighbors judge your ladder-climbing skills.
Trust me, I’ve been there – last year I spent three hours untangling what I swear was only a 20-foot strand of lights. But here’s the thing: creating your own outdoor Christmas wonderland doesn’t have to be complicated or expensive.
You know what gets me excited every holiday season? Transforming my outdoor space into something magical without breaking the bank. I’m talking about DIY projects that’ll make your house the talk of the neighborhood – in a good way, not the “why is there a deflated Santa on their lawn in February” way.
Let’s get real for a second. Store-bought decorations cost a fortune, and half the time they break before New Year’s.
That’s why I’ve gathered these 12 stunning DIY outdoor Christmas decoration ideas that’ll give your home that perfect holiday glow. Each one’s tested, neighbor-approved, and won’t require an engineering degree to pull off.
Table of Contents
- 1 Festive Pinecone Pathway
- 2 Glittering Mason Jar Lanterns
- 3 Rustic Wooden Sleigh Display
- 4 Candy Cane Fence Decor
- 5 Snowy Evergreen Wreaths
- 6 Twinkling Outdoor Fairy Lights
- 7 DIY Reindeer Sculptures
- 8 Holiday-Themed Garden Stakes
- 9 Christmas Lighted Topiaries
- 10 Snow Globe Porch Display
- 11 Handmade Wooden Ornaments
- 12 Cozy Outdoor Fireplace Setup
- 13 Bringing It All Together
Festive Pinecone Pathway
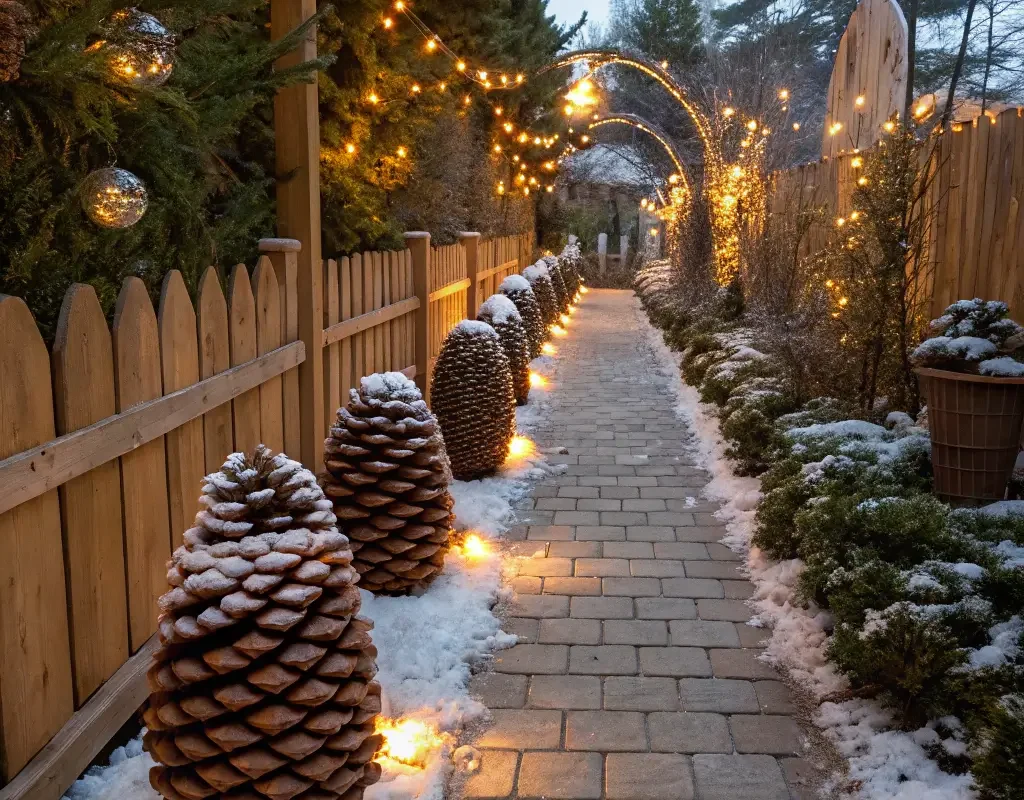
Ever walked up to someone’s house and thought, “Wow, they really nailed the entrance”? That’s exactly what a festive pinecone pathway does for your home. I discovered this trick accidentally when I dropped a bag of glittered pinecones on my walkway – best mistake ever.
Here’s what makes this decoration brilliant: pinecones are literally free if you’ve got trees nearby. I collect mine during fall walks (multitasking at its finest). You’ll need about 30-40 pinecones for a standard walkway, though honestly, the more the merrier.
The magic happens when you add these elements:
- White spray paint for that snowy effect
- Glitter spray (gold or silver works beautifully)
- Battery-operated fairy lights to weave between them
- Clear sealant spray to weatherproof everything
Start by cleaning your pinecones – nobody wants spider surprises. Spray paint them white, letting some brown peek through for that authentic snow-kissed look. While they’re still wet, hit them with glitter spray. Once dry, arrange them along your pathway edges, tucking fairy lights between them for that enchanting twilight glow.
Glittering Mason Jar Lanterns
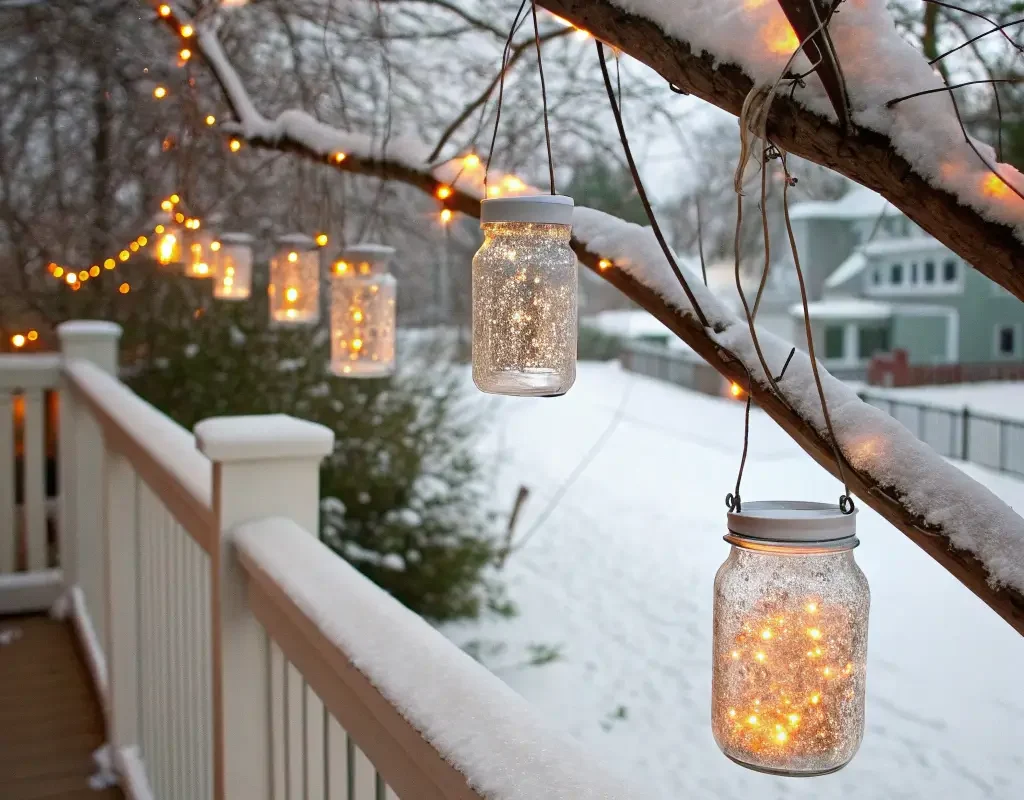
Mason jars – is there anything they can’t do? My grandmother would probably roll her eyes at how we’ve turned her canning jars into decor, but these glittering lanterns are absolutely gorgeous. Plus, they’re ridiculously easy to make, which IMO is half the battle with holiday decorating.
You’ll transform ordinary jars into magical light catchers with just a few supplies. I made twelve of these last year in under two hours while binge-watching holiday movies. The key is using frosted glass spray paint first – it creates this dreamy, diffused light effect that regular clear jars just can’t match.
Here’s your shopping list:
- Mason jars (various sizes look amazing together)
- Frosted glass spray paint
- Mod Podge and foam brushes
- Chunky glitter in holiday colors
- Wire for hanging
- Battery-operated tea lights or fairy lights
Apply Mod Podge in sections and roll the jar in glitter. Don’t be shy with it – this isn’t the time for subtlety. Wrap wire around the jar rim for hanging, creating little handles. Pop in your lights, and boom – instant winter wonderland vibes.
Rustic Wooden Sleigh Display
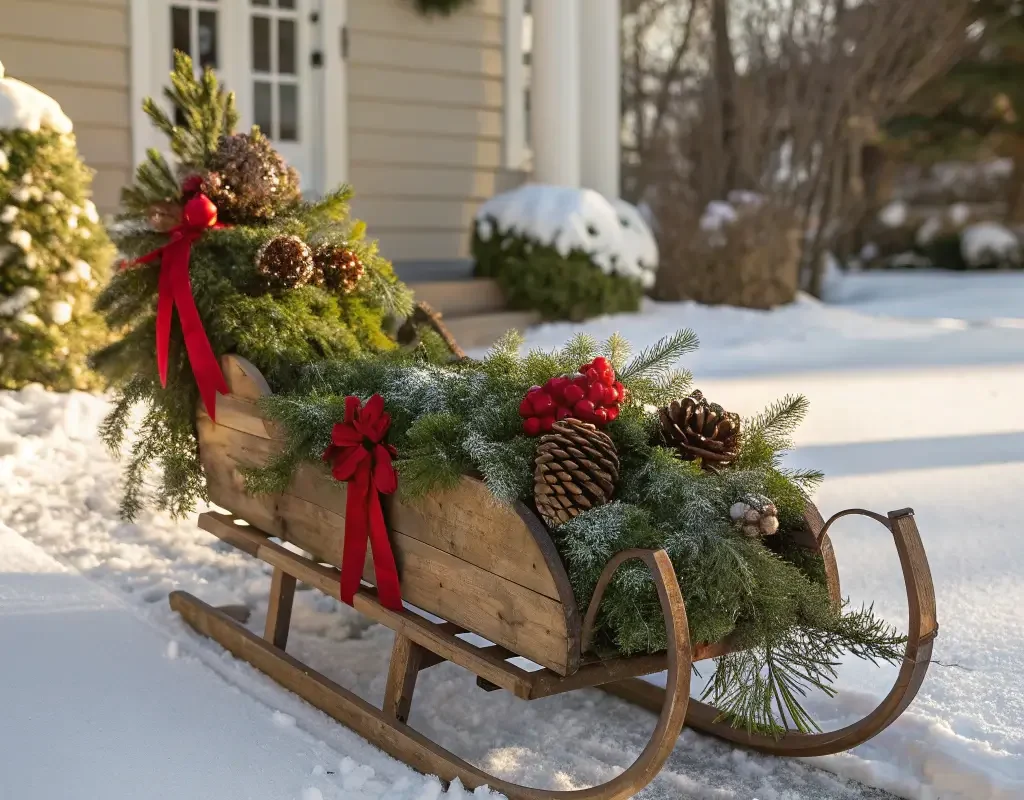
Remember those old wooden pallets everyone’s obsessed with? Well, they make incredible rustic sleighs with minimal effort. I built one after seeing a $300 version at a fancy garden center – mine cost about $25 and looks just as good.
The beauty of this project lies in its flexibility. You can go full Pinterest-perfect or embrace the “charmingly imperfect” aesthetic (which is code for “I messed up but it still looks cute”). My first attempt leaned heavily toward the latter, but guests still loved it.
Start with these basics:
- Two wooden pallets (free from most stores)
- Red spray paint (optional but classic)
- Wood screws and L-brackets
- Curved wood pieces for runners
- Sandpaper
Cut one pallet in half for the back support. Attach it perpendicular to the full pallet base using L-brackets. Add curved runners to the bottom – old skis work perfectly if you’ve got them lying around. Fill your sleigh with wrapped empty boxes, evergreen branches, and oversized ornaments for that picture-perfect display.
Also Read: 10 Joyful Front Porch Christmas Decor Ideas to Transform Your Space
Candy Cane Fence Decor
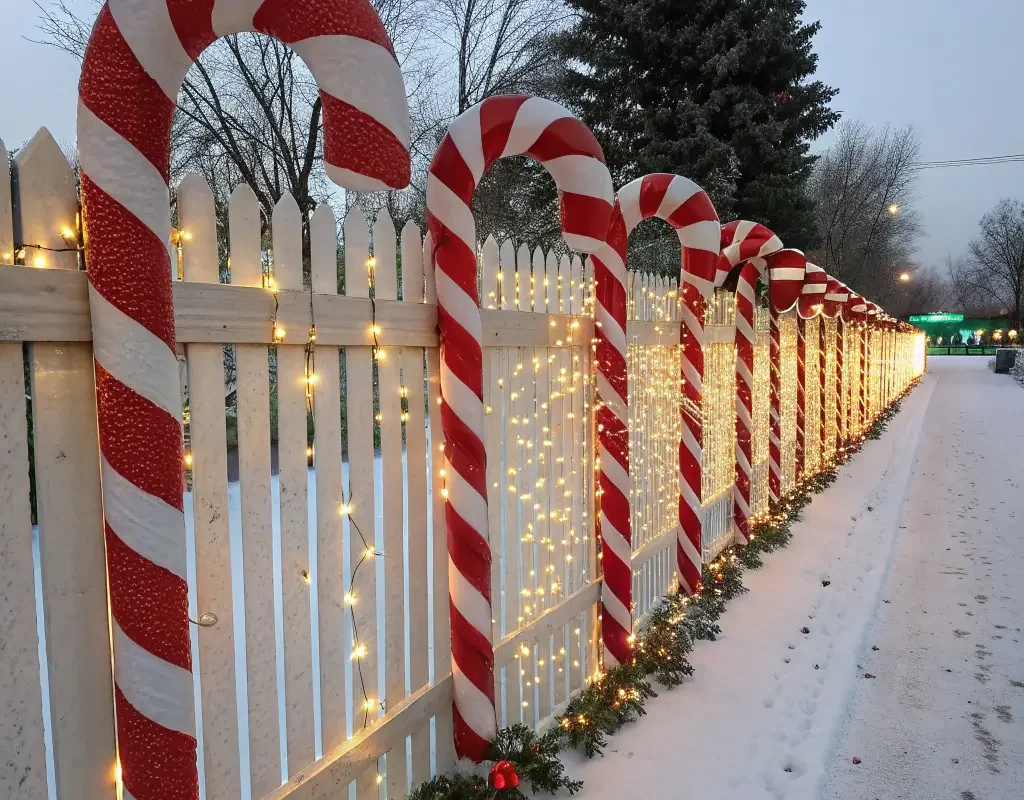
Who decided candy canes were just for eating? Whoever started using them as fence decorations deserves a medal. This idea transforms boring fence lines into festive peppermint borders that scream Christmas cheer.
I’ll be honest – the first time I tried this, I used actual candy canes. Rookie mistake. The squirrels had a field day, and I had sticky fence posts until spring. Now I’m smarter and use PVC pipe candy canes that last for years.
Creating weatherproof candy canes:
- White PVC pipes (½ inch diameter works great)
- Red electrical tape
- Clear sealant spray
- Zip ties for fence attachment
Cut pipes into 2-foot sections. Create the candy cane curve by heating the top with a heat gun (or very carefully over your stove). Wrap red tape in a spiral pattern, leaving white spaces between. Seal everything with weatherproof spray. Attach to your fence posts with zip ties, alternating heights for visual interest.
Snowy Evergreen Wreaths
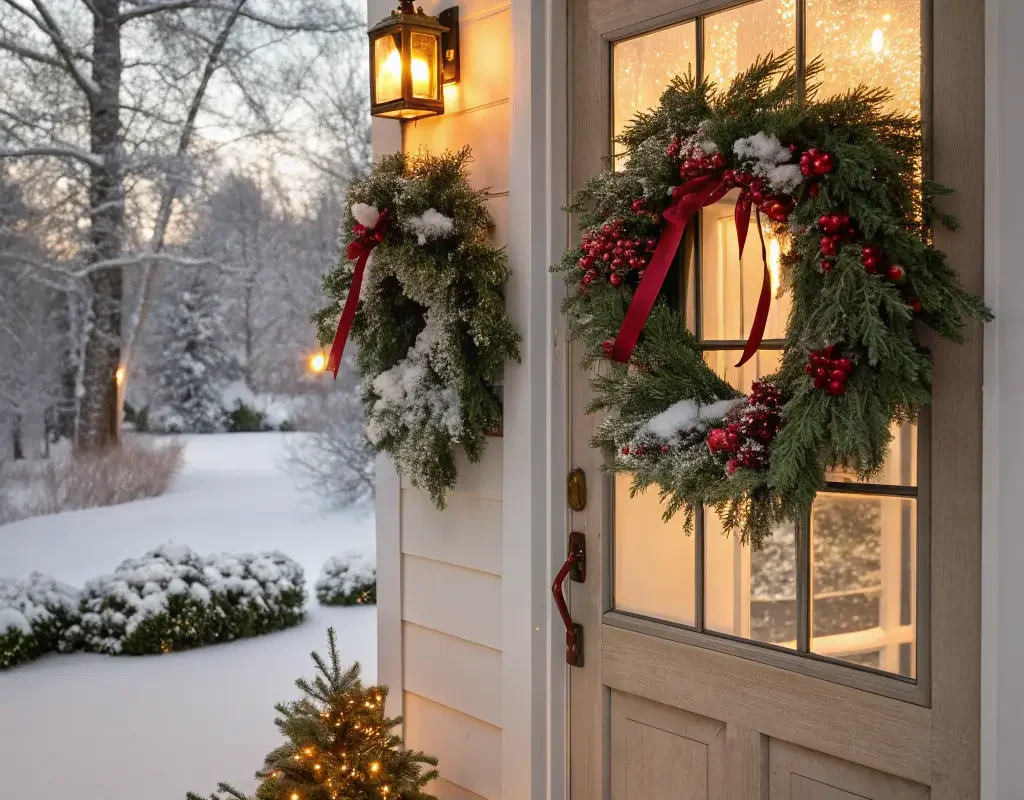
Store-bought wreaths are highway robbery – $80 for some greenery in a circle? I don’t think so. Making your own snowy evergreen wreaths costs a fraction and looks twice as impressive. Plus, that fresh pine smell beats artificial any day.
The secret to professional-looking wreaths? Layer different textures. I learned this from a florist friend who charged people hundreds for custom wreaths. Mix pine, cedar, and holly for depth. Add unexpected elements like cotton bolls or dried hydrangeas for that designer touch.
Your wreath-making arsenal:
- Wire wreath frame (14-16 inches diameter)
- Fresh evergreen branches (mixed varieties)
- Floral wire
- Artificial snow spray
- Battery-operated lights (optional but recommended)
- Decorative elements (pinecones, berries, ribbon)
Build your base by wiring evergreen bundles to the frame, overlapping as you go. Once covered, spray lightly with artificial snow – restraint is key here. Weave battery-operated lights through the greenery, then add your decorative elements. Position heavier items like pinecones first, then fill gaps with lighter berries and bows.
Twinkling Outdoor Fairy Lights
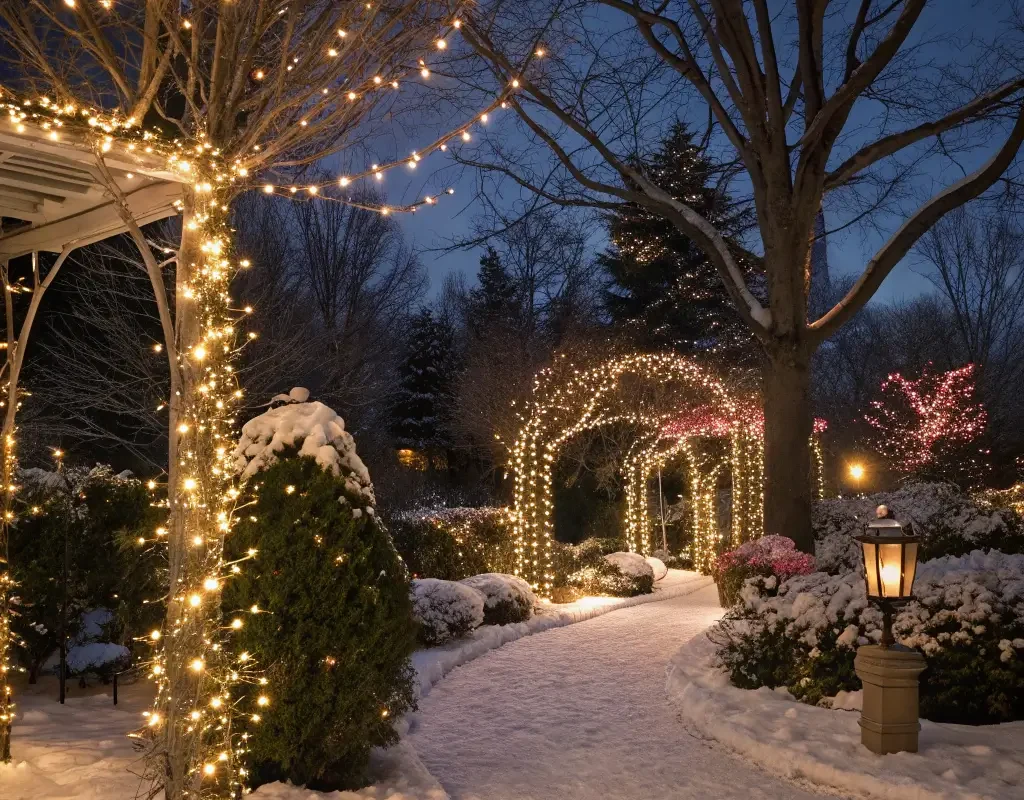
Can we talk about how fairy lights make everything better? They’re like Instagram filters for your yard :). But there’s an art to hanging them that separates the magical from the messy. I’ve seen too many houses looking like they sneezed lights everywhere.
The trick is creating intentional light patterns rather than random coverage. Think of your yard as a canvas and lights as your paint. Start with anchor points – trees, posts, architectural features – then connect them thoughtfully.
Smart fairy light strategies:
- Measure twice, buy once (seriously, measure everything)
- Use outdoor-rated lights only (learned this the hard way)
- Install timer outlets for automatic on/off
- Mix warm white with colored lights for depth
- Create vertical cascades from trees for a magical rain effect
My favorite technique? The canopy effect. String lights between tall points (trees, poles, house peaks) creating an overhead web. It transforms your entire yard into an enchanted space. Pro tip: use guide wires first, then attach lights to prevent sagging.
Also Read: 15 Fun Christmas Decor Bedroom Ideas to Wow Your Guests
DIY Reindeer Sculptures
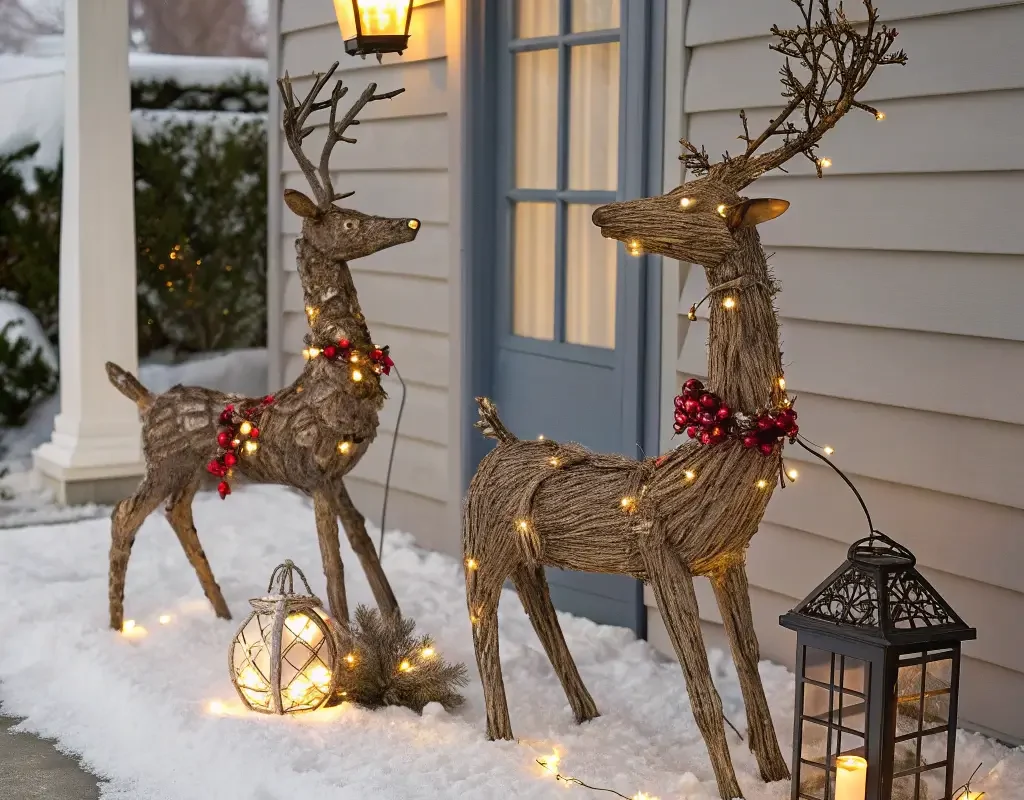
Those wire-frame reindeer at the store cost how much?! Making your own DIY reindeer from branches and logs gives you unique sculptures with serious rustic charm. My neighbor thought I’d lost it when she saw me dragging branches around the yard, but she changed her tune when she saw the finished product.
Nature provides the perfect reindeer-building materials. That fallen tree branch that’s been annoying you all summer? Perfect reindeer body. Those twigs you keep meaning to clear? Instant antlers. It’s upcycling at its festive finest.
Building your branch reindeer:
- One large log for the body (18-24 inches)
- Four sturdy branches for legs
- Smaller log for the neck/head
- Twigs for antlers
- Drill with spade bits
- Wood glue and screws
- Red ornament for the nose (obviously)
Drill holes in your body log for leg placement. Secure legs with wood glue and screws for stability. Attach the head piece at an angle, then go wild with twig antlers. Paint accents with white for snow effect, add a red nose, maybe a plaid bow. Position your reindeer family across the yard like they’re mid-prance.
Holiday-Themed Garden Stakes

Garden stakes aren’t just for tomatoes anymore. Holiday-themed stakes add vertical interest to snow-covered (or not) garden beds while being stupid-easy to make. I created a whole set during one particularly boring conference call – multitasking win!
The beauty of garden stakes? They work anywhere. Flower beds, pathway edges, even in large planters. They add height variation to your display, which is crucial for visual interest. Nobody wants a flat Christmas landscape.
Creating festive stakes:
- Wooden dowels or stakes (3-4 feet tall)
- Foam board or wood for toppers
- Weatherproof paint
- Glitter, sequins, or reflective tape
- Hot glue gun
- Clear sealant
Cut shapes from foam board – stars, trees, snowflakes, whatever speaks to you. Paint them in bold holiday colors. While paint’s wet, add glitter for sparkle. Once dry, hot glue to stakes. Seal everything thoroughly because weather is brutal. Space stakes 2-3 feet apart for best impact.
Christmas Lighted Topiaries
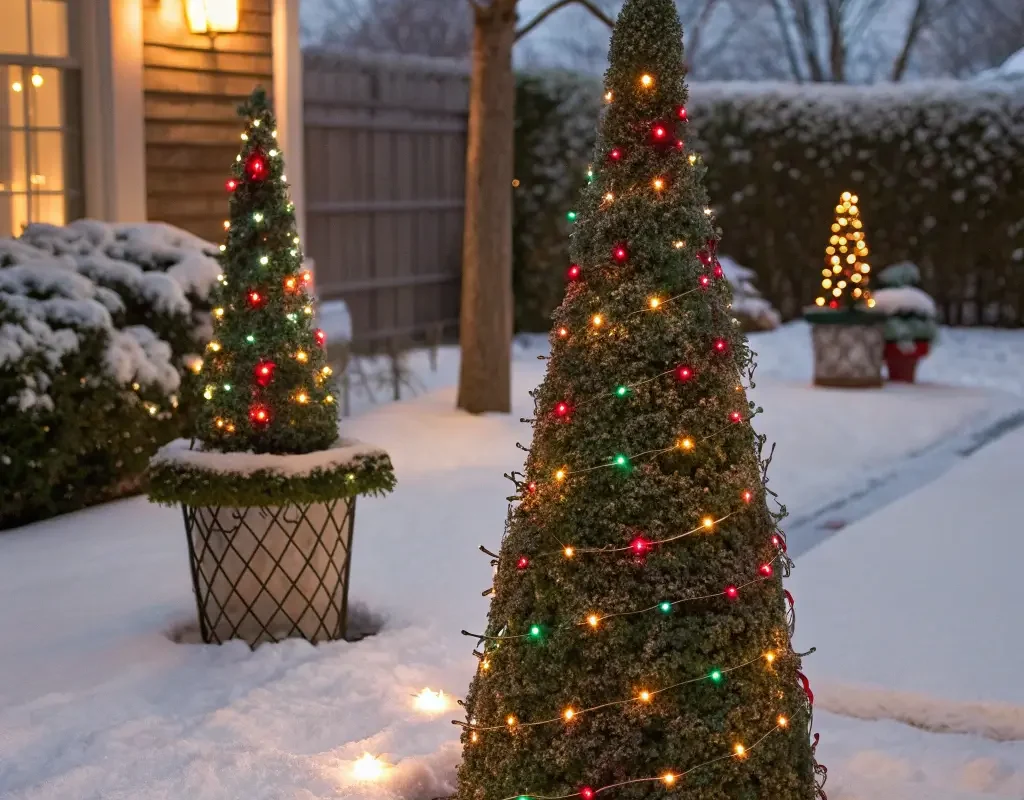
Topiaries scream elegance, but buying them pre-made screams expensive. Making lighted topiaries yourself? That screams genius. These add instant sophistication to any entrance, and people always assume they cost a fortune.
I discovered this trick when I needed something tall and elegant for my front porch but refused to pay boutique prices. Tomato cages and chicken wire became my best friends. The result? Gorgeous cone-shaped topiaries that fool everyone.
Your topiary toolkit:
- Tomato cages (turned upside down)
- Chicken wire
- Zip ties
- Fresh or artificial greenery
- String lights (net lights work amazingly)
- Large planters
- Foam blocks for stability
Flip tomato cages upside down in planters, securing with foam blocks. Wrap with chicken wire for structure. Weave greenery through the wire, creating full coverage. Wrap lights from bottom to top in a spiral pattern. Top with a star or large bow. Place flanking your door for maximum “wow” factor.
Also Read: 15 Magical Christmas Porch Decorating Ideas and Winter Wonder
Snow Globe Porch Display

Why limit snow globes to tabletops? Creating a life-sized snow globe scene on your porch brings childhood magic to adult decorating. FYI, this always gets the most comments from visitors – kids and adults alike lose their minds over it.
The concept sounds complicated but it’s surprisingly simple. You’re basically creating a vignette inside a clear structure. I use a large clear storage container flipped upside down, but you could get fancy with plexiglass if you’re feeling ambitious.
Building your giant snow globe:
- Large clear container or dome
- Circular platform (wood or sturdy cardboard)
- Miniature decorations (trees, figures, houses)
- Artificial snow
- Battery-operated lights
- Weatherproof adhesive
Create your scene on the platform first. Arrange miniature elements, leaving space for “snow drifts.” Secure everything with adhesive. Add battery-operated lights for glow. Sprinkle artificial snow generously. Cover with your clear dome, sealing edges with clear caulk. The effect at night? Pure magic.
Handmade Wooden Ornaments

Oversized ornaments make tiny ones jealous. These handmade wooden ornaments become statement pieces that tie your whole outdoor theme together. Plus, making them counts as family bonding time, right?
I started making these when I realized those huge commercial ornaments are basically hollow plastic nonsense. Wood gives you that substantial, quality feel that says “I put effort into this” without actually requiring much effort.
Crafting jumbo ornaments:
- Wood circles (12-18 inch diameter)
- Paint and brushes
- Stencils for designs
- Polyurethane sealant
- Heavy-duty hanging wire
- Drill for hanging holes
Sand wood circles smooth. Paint base colors, then add designs using stencils or freehand if you’re brave. Apply multiple coats of sealant – weather resistance is crucial. Drill holes and add wire for hanging. Group different sizes together for visual impact. Hang from shepherd’s hooks, trees, or porch beams.
Cozy Outdoor Fireplace Setup
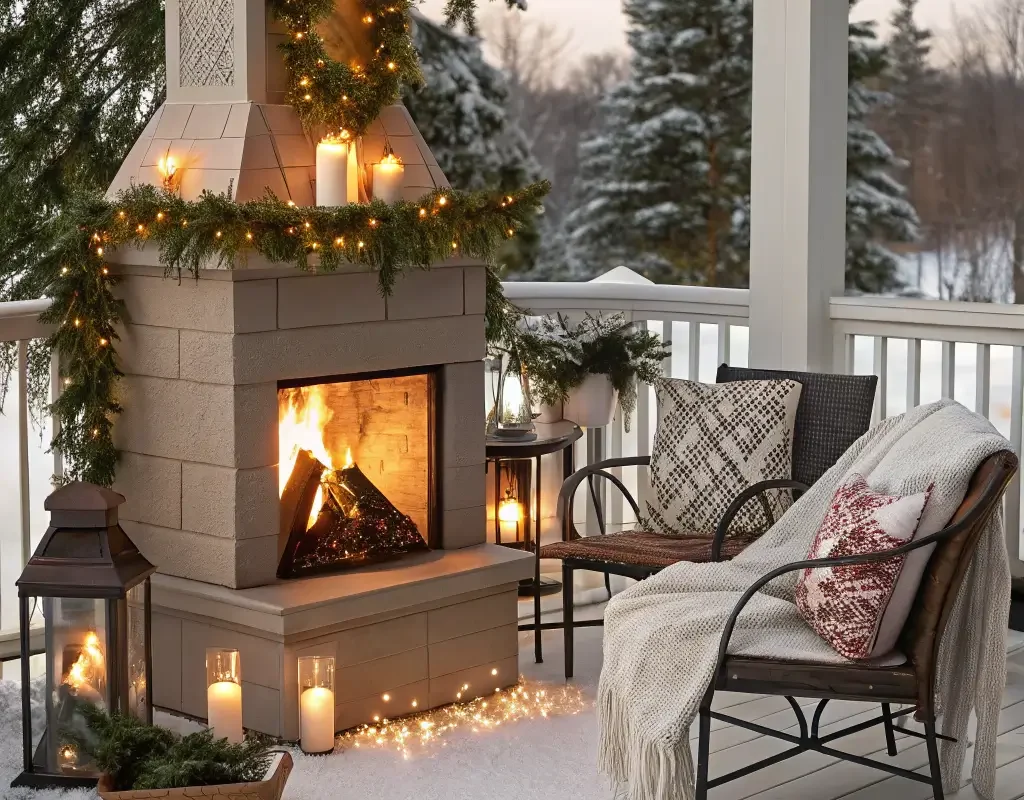
Nothing says “holiday warmth” like a decorated outdoor fireplace area. Even if you don’t have a built-in fireplace, portable fire pits work beautifully. This becomes your outdoor entertainment centerpiece – where the magic happens.
Transform your fire area into a festive gathering spot that beckons people outside despite the cold. I host an annual outdoor hot chocolate party around mine, and it’s become the neighborhood’s favorite tradition. The key is making it feel intentional, not like you just threw some decorations near your fire pit.
Creating the ultimate holiday fire setup:
- Garland for mantels or surrounding area
- Lanterns with battery candles
- Cozy blankets in baskets
- Outdoor cushions in holiday colors
- String lights overhead
- Heat-safe decorations only
Drape garland along any available edges, weaving in lights. Position lanterns at varying heights around the seating area. Keep blankets accessible but away from flames (safety first, people). Add cushions to seating in festive plaids or solid holiday colors. String lights overhead create a ceiling effect that defines the space.
Bringing It All Together
Here’s the thing about outdoor Christmas decorating – it’s not about perfection. It’s about creating that warm, welcoming glow that makes people smile when they drive by.
Every single one of these projects can be customized to your skill level, budget, and available time.
Start with one or two projects that excite you most. Build from there each year. My display started with just mason jar lanterns and now covers the entire front yard.
The beauty of DIY is that each piece tells a story, carries memories of creation, and costs way less than store-bought alternatives.
Remember, the best decorations are the ones that make you happy. Whether you go all-out with every single project or pick just a few favorites, you’re creating something special.
Your outdoor space becomes a gift to everyone who passes by – a little dose of holiday magic in an often chaotic season.
So grab your glue gun, raid your recycling bin, and start creating. Your neighbors might think you’re crazy at first (mine certainly did), but they’ll be asking for tutorials once they see the finished product.
The perfect outdoor Christmas display isn’t bought – it’s built with creativity, a dash of effort, and maybe a few choice words when the lights tangle.
But trust me, when you’re sitting by your decorated fireplace, sipping cocoa while your handmade reindeer stand guard and fairy lights twinkle overhead, you’ll know it was worth every minute.