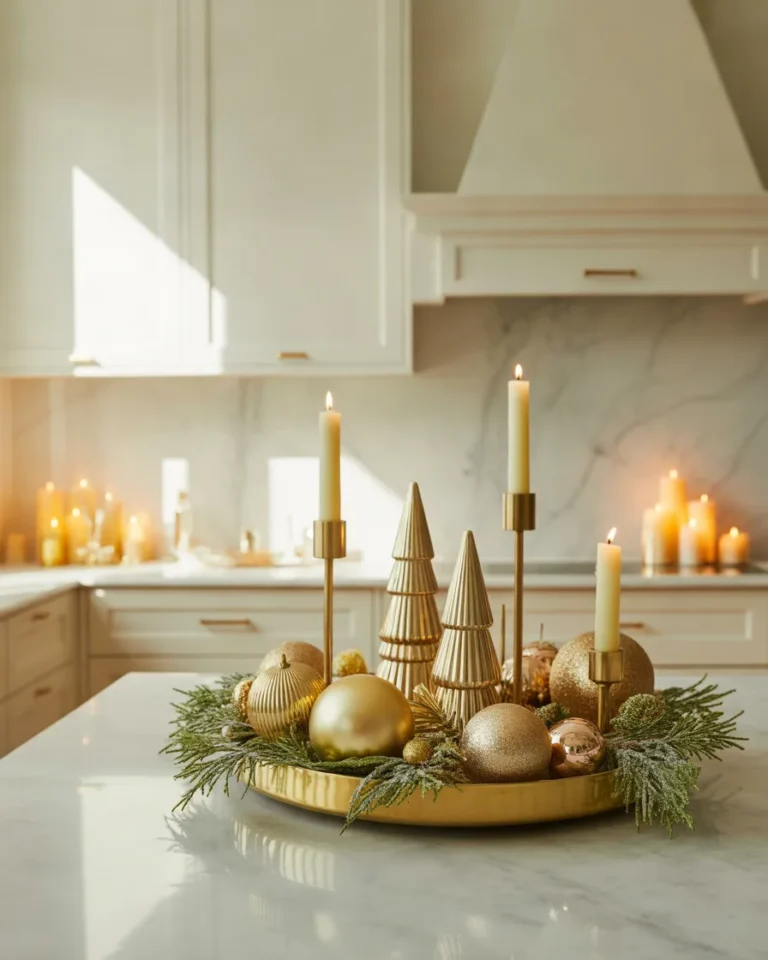
Christmas is one of those special times of the year when even the smallest decorations can make a home feel warm, welcoming, and full of joy. From sparkling lights and beautiful Christmas trees to handmade ornaments and cozy seasonal accents, decorating your home is a wonderful way to celebrate the holiday season. But creating a beautiful Christmas atmosphere doesn’t mean you have to spend a fortune on store-bought decorations.
With a little creativity and a few simple materials, you can make stunning decorations right at home. In fact, some of the most charming holiday decorations are the ones you create yourself. Whether you love rustic farmhouse details, elegant Christmas colors, minimalist styling, or traditional holiday crafts, there are plenty of ways to personalize your space.
These 15 DIY Christmas decoration ideas will help you transform ordinary household materials into festive decorations that look beautiful throughout the season. Many projects are affordable, beginner-friendly, and easy to customize according to your home’s style. You can also involve family members in the creative process and turn decorating into a fun holiday activity.
From handmade Christmas ornaments and glowing mason jar lanterns to festive wreaths and charming tabletop displays, let’s explore some creative ways to make your home feel extra special this Christmas.
1. Create a Beautiful DIY Christmas Mason Jar Lantern
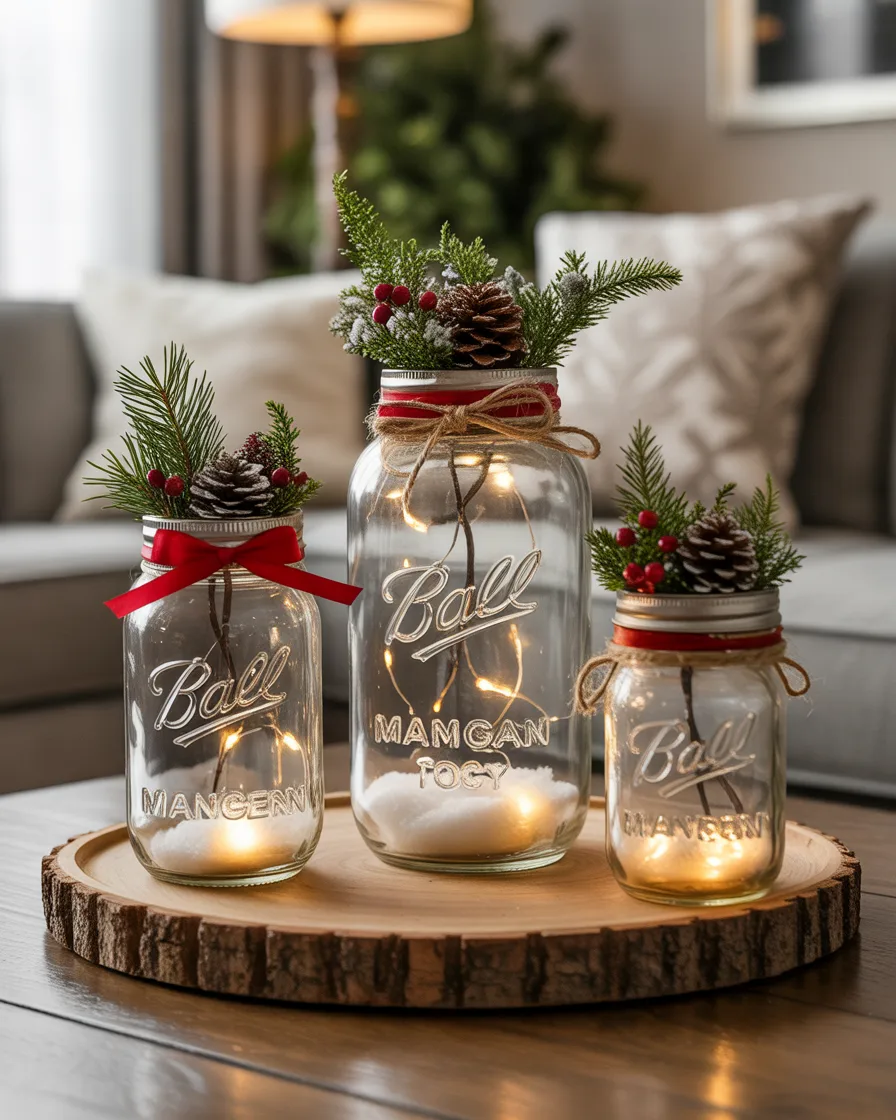
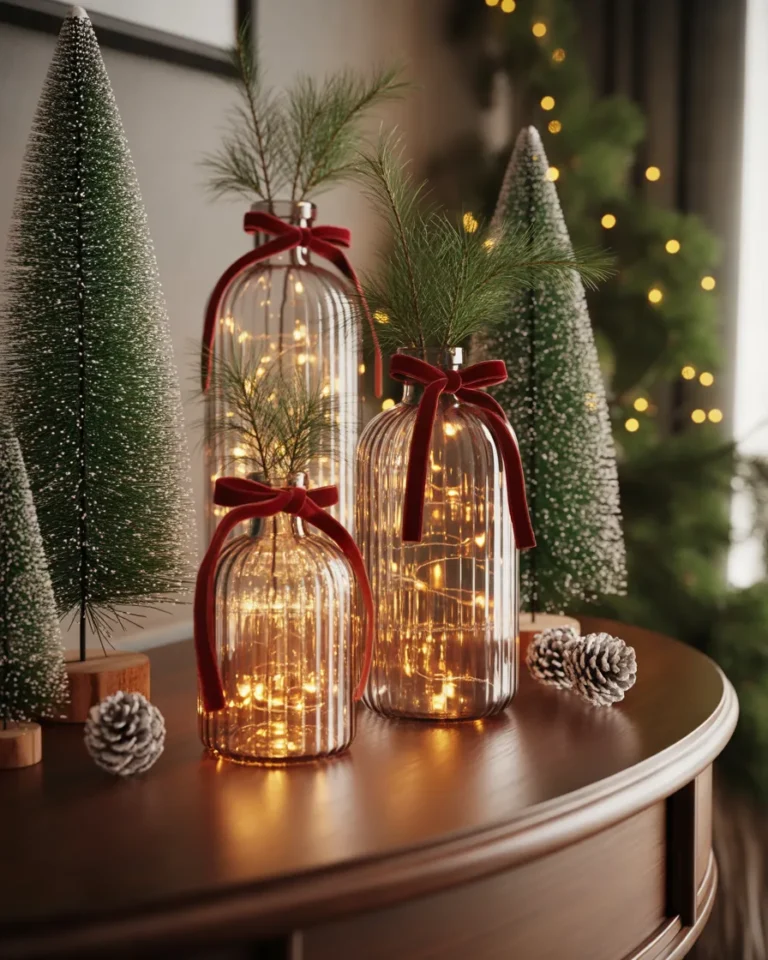
Mason jar lanterns are among the easiest DIY Christmas decorations for creating a cozy holiday atmosphere. Their soft, warm glow looks beautiful on dining tables, fireplace mantels, shelves, and windowsills. You can decorate ordinary glass jars with seasonal greenery, ribbons, artificial snow, and small decorative lights to create an elegant Christmas display.
The best part is that you don’t need expensive materials. Recycled jam jars or empty glass food containers work just as well as decorative mason jars. Choose clear glass for a traditional look or lightly frosted jars for a winter-inspired appearance.
Materials Needed:
- Three or four clean glass mason jars
- Battery-operated LED fairy lights
- White artificial snow or Epsom salt
- Red or green ribbon
- Small pinecones
- Artificial evergreen branches
- Twine or decorative string
Step-by-Step Instructions:
- Clean and completely dry your glass jars before decorating them.
- Add a small layer of artificial snow or Epsom salt to the bottom of each jar.
- Place a few small pinecones or artificial evergreen branches inside.
- Carefully arrange battery-operated fairy lights around the decorative materials.
- Wrap red ribbon or rustic twine around the neck of each jar.
- Add a small decorative bow or miniature Christmas ornament.
- Switch on the lights and arrange the lanterns together for a beautiful festive display.
Styling and Decorating Tips:
Place three lanterns of different heights together on a wooden tray to create an attractive centerpiece. You can also position them along a fireplace mantel or beside your Christmas tree. Warm-white fairy lights work especially well with natural greenery, wooden accents, and traditional red ribbons.
Budget-Friendly Alternatives:
Instead of purchasing mason jars, reuse empty jam, sauce, or pickle jars. Homemade salt decorations can replace artificial snow, while leftover Christmas ribbon can add a finishing touch.
Creative Variations:
For a farmhouse appearance, use burlap ribbon and natural pinecones. For a more elegant look, add champagne-colored ribbon, silver ornaments, and frosted glass effects.
2. Make Handmade Rustic Pinecone Christmas Ornaments
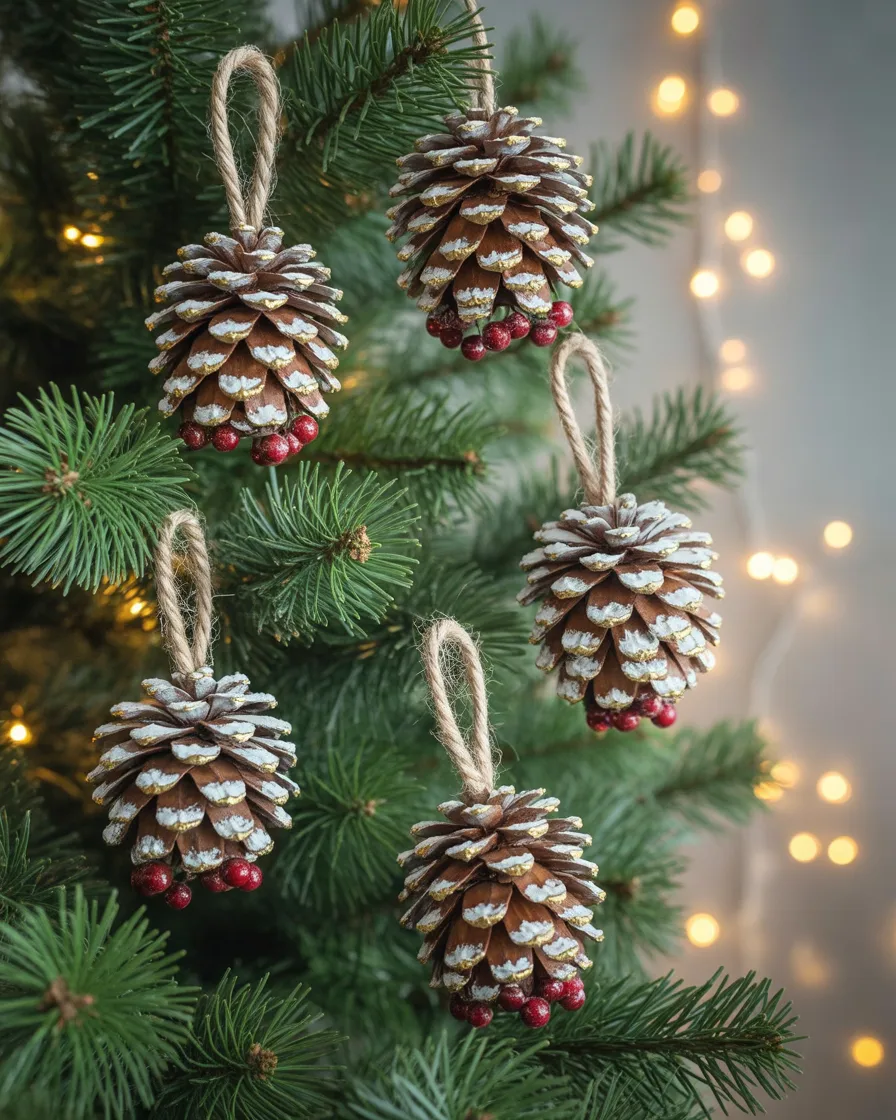
Natural decorations are perfect for anyone who loves a warm, rustic Christmas atmosphere. Pinecones are inexpensive, easy to find in many outdoor areas, and naturally shaped like miniature Christmas trees. With a little paint, ribbon, and decorative string, you can transform them into beautiful handmade ornaments.
These ornaments look especially attractive when displayed on a Christmas tree decorated with wooden beads, natural greenery, warm lights, and neutral-colored decorations. You can also use them to decorate gift packages or create a festive bowl arrangement.
Materials Needed:
- Clean, dry pinecones
- White, gold, or silver acrylic paint
- Small paintbrush
- Decorative ribbon
- Twine or thin hanging string
- Hot glue
- Small artificial berries or beads
Step-by-Step Instructions:
- Collect pinecones and remove any loose dirt or debris.
- Allow them to dry completely before decorating.
- Lightly brush white paint onto the edges of the pinecone scales to create a snowy effect.
- If you prefer a glamorous appearance, add small touches of gold or silver paint.
- Cut a small piece of twine and form a hanging loop.
- Attach the loop securely to the top of the pinecone using hot glue.
- Finish with a small ribbon bow or decorative berry.
- Allow the paint and glue to dry before hanging the ornaments.
Styling and Decorating Tips:
Hang these ornaments throughout your Christmas tree, especially between larger baubles. Their natural texture adds depth and prevents the tree from looking overly shiny or artificial. You can also place several pinecones in a decorative wooden bowl with fairy lights.
Budget-Friendly Alternatives:
Collect fallen pinecones instead of purchasing decorative ones. Use leftover craft paint and ribbon from previous projects. If you don’t have artificial berries, small red beads can provide a similar festive effect.
Creative Variations:
Make an all-white collection for a snowy winter theme, or combine metallic gold and natural brown for a sophisticated rustic look. You can even attach miniature wooden stars to create personalized ornaments.
3. Design a Festive DIY Christmas Wreath for Your Front Door
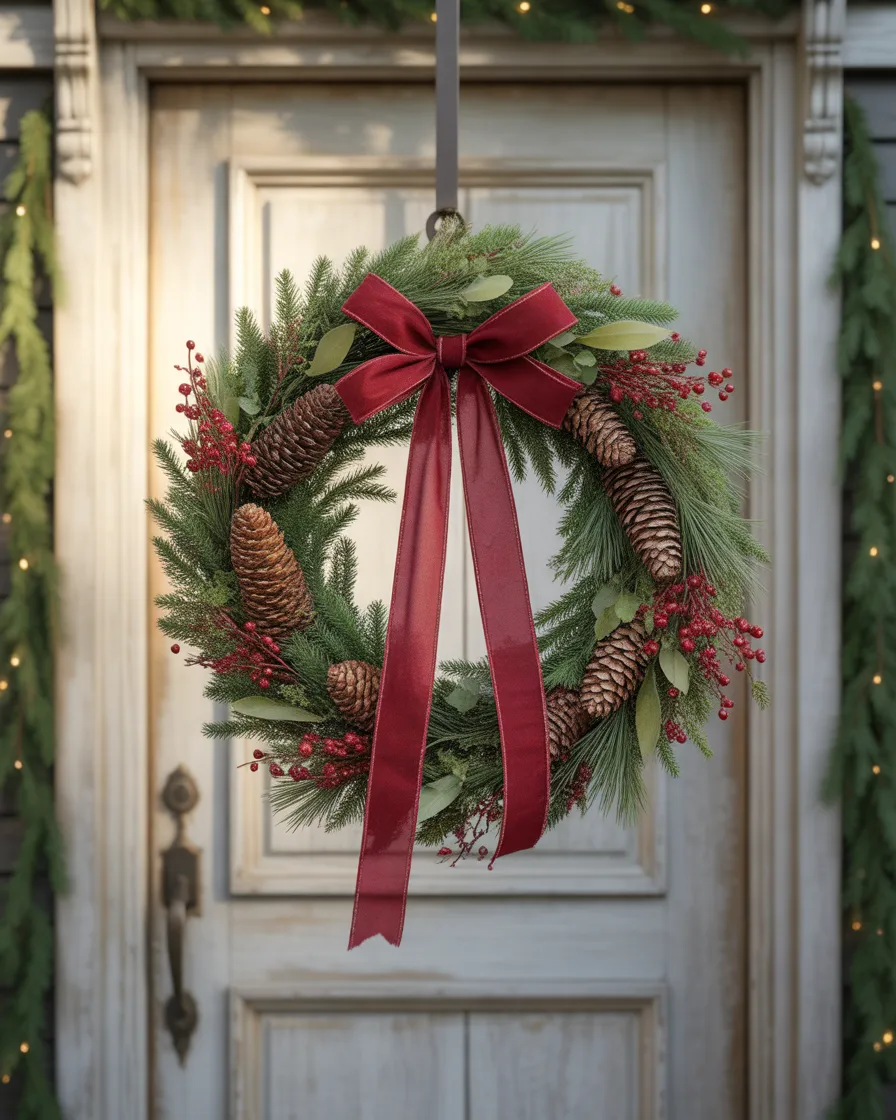
A Christmas wreath is one of the first decorations guests notice when they arrive at your home. Hanging a beautiful handmade wreath on your front door instantly creates a festive welcome. Instead of buying an expensive ready-made wreath, you can create your own using artificial greenery, ribbons, pinecones, and seasonal decorations.
You can choose a traditional evergreen wreath with red accents or create a minimalist version using neutral colors and natural materials. The design can be as simple or decorative as you like.
Materials Needed:
- Wire wreath frame or circular cardboard base
- Artificial evergreen branches
- Green floral wire
- Red or velvet ribbon
- Pinecones
- Artificial berries
- Hot glue gun
- Scissors
Step-by-Step Instructions:
- Prepare your circular wreath frame and check that it is strong enough to hold the decorations.
- Cut the artificial evergreen branches into smaller sections.
- Arrange the branches around the frame, keeping their tips pointing in the same direction.
- Secure each section with floral wire until the base is completely covered.
- Attach pinecones and artificial berries in small groups.
- Make a large decorative bow using velvet or satin ribbon.
- Position the bow near the bottom or top of the wreath.
- Check the wreath from different angles and fill any visible gaps.
- Attach a strong hanging loop to the back.
Styling and Decorating Tips:
A traditional green wreath with red velvet ribbon looks beautiful against white, black, or wooden doors. For a more modern appearance, choose cream ribbon, champagne-colored ornaments, and understated greenery.
Budget-Friendly Alternatives:
Use a cardboard circle from an old box as the wreath base. Reuse artificial branches from an older Christmas tree and decorate with leftover ribbon.
Creative Variations:
Create a farmhouse wreath using burlap, wooden stars, and pinecones. Alternatively, make a glamorous wreath with champagne ornaments and metallic accents. For a natural appearance, add dried orange slices and cinnamon sticks.
4. Make DIY Dried Orange Christmas Garlands
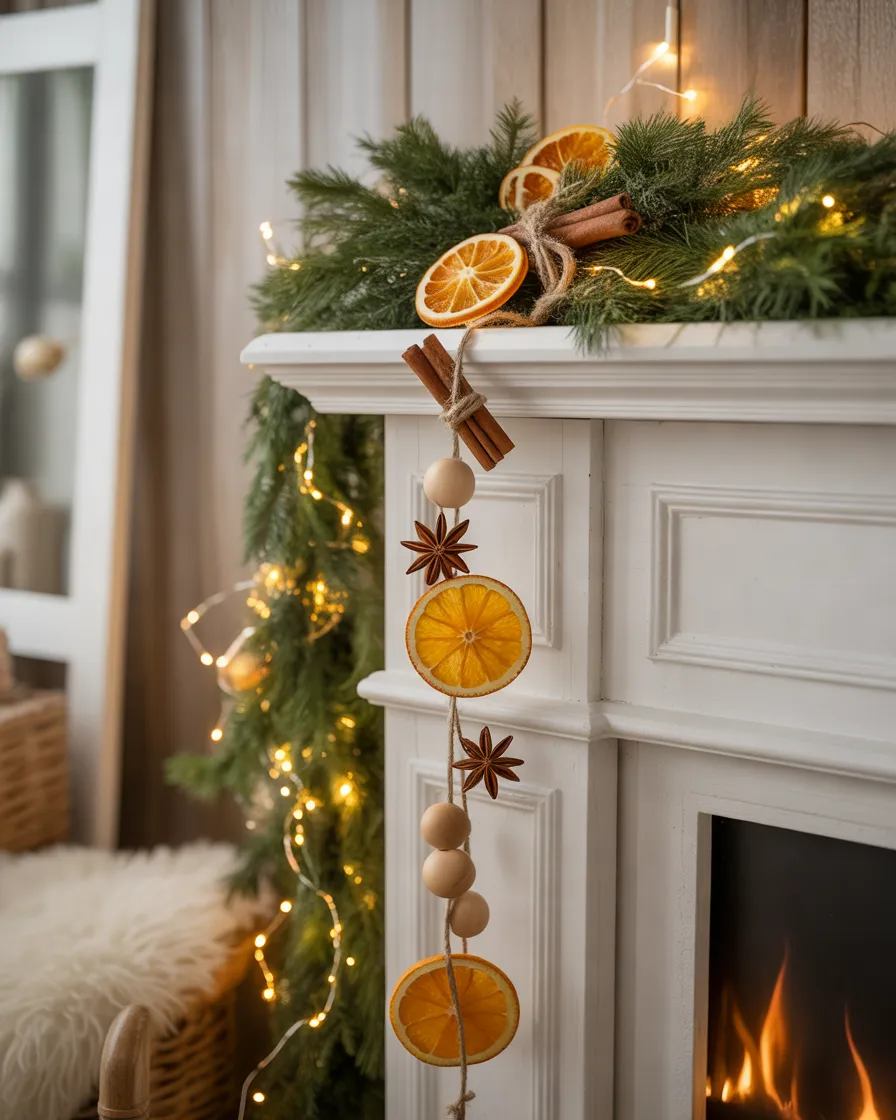
Dried orange garlands are a beautiful way to bring natural colors and a subtle seasonal feeling into your home. Their warm orange tones look lovely against green Christmas greenery, wooden furniture, and neutral holiday decorations.
This is also a wonderful project if you prefer natural Christmas crafts instead of plastic decorations. Dried orange slices can be used in several ways, including garlands, tree ornaments, gift wrapping, and decorative bowls.
Materials Needed:
- Three or four fresh oranges
- Sharp knife
- Baking tray
- Baking paper
- Natural twine
- Wooden beads
- Cinnamon sticks
- Needle or small skewer
Step-by-Step Instructions:
- Wash the oranges and cut them into thin, even slices.
- Pat the slices dry using a clean kitchen towel.
- Arrange them in a single layer on a baking tray lined with baking paper.
- Dry them in an oven at approximately 200°F (95°C), turning occasionally, until most of the moisture has evaporated. This may take several hours depending on thickness.
- Allow the slices to cool completely.
- Carefully make small holes near the top of each slice.
- Thread the slices onto natural twine, leaving a little space between them.
- Add wooden beads or small cinnamon sticks for additional texture.
- Tie loops at both ends of the garland for hanging.
Styling and Decorating Tips:
Drape your orange garland across a fireplace mantel, around a window frame, or along open shelving. Pair it with evergreen branches and warm-white lights for a beautiful natural Christmas display.
Budget-Friendly Alternatives:
Use oranges that are already available in your kitchen. Replace wooden beads with leftover ribbon knots or small pieces of twine.
Creative Variations:
Mix dried orange slices with star anise, cinnamon sticks, and dried apple slices. You can also make individual orange ornaments by attaching twine loops to the slices.
5. Create a DIY Christmas Tree Centerpiece for Your Dining Table
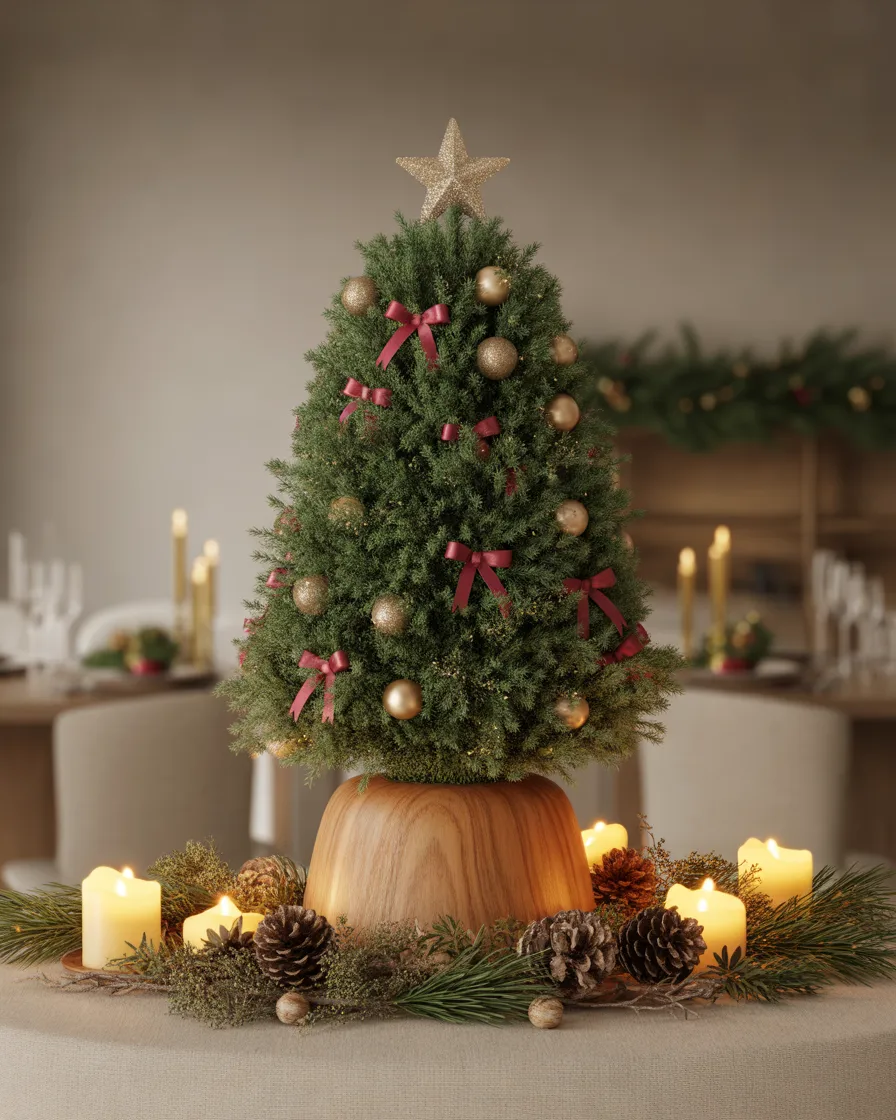
Your dining table deserves a little Christmas magic too. A handmade miniature Christmas tree centerpiece is an excellent way to decorate the table without taking up too much space. It also creates a beautiful focal point for holiday dinners, family gatherings, and festive celebrations.
Instead of purchasing a decorative tabletop tree, you can create one using a cone-shaped base and simple craft materials. Choose decorations that coordinate with your dining room’s existing colors.
Materials Needed:
- Cardboard or foam cone
- Green artificial garland or felt
- Hot glue
- Small decorative ornaments
- Miniature stars
- Ribbon
- Wooden or ceramic base
Step-by-Step Instructions:
- Prepare a cone-shaped cardboard or foam base.
- Cut artificial greenery or felt into small sections.
- Starting from the bottom, attach the material around the cone.
- Continue working upward until the entire base is covered.
- Add miniature baubles, tiny bows, and small decorative berries.
- Attach a star to the top of the tree.
- Secure the tree to a wooden or ceramic base.
- Place the finished centerpiece on a decorative tray.
Styling and Decorating Tips:
Create a balanced display by placing your miniature tree in the center of the dining table. Surround it with a few pinecones, small candles, or evergreen branches. Keep the centerpiece low enough that guests can comfortably see one another across the table.
Budget-Friendly Alternatives:
Use recycled cardboard instead of a foam cone. Cut green paper or reuse old artificial garland to cover the base.
Creative Variations:
Make a collection of three miniature trees in different heights. Decorate one in traditional red and green, another in white and silver, and the third in natural brown and gold.
6. Make Charming DIY Christmas Window Decorations
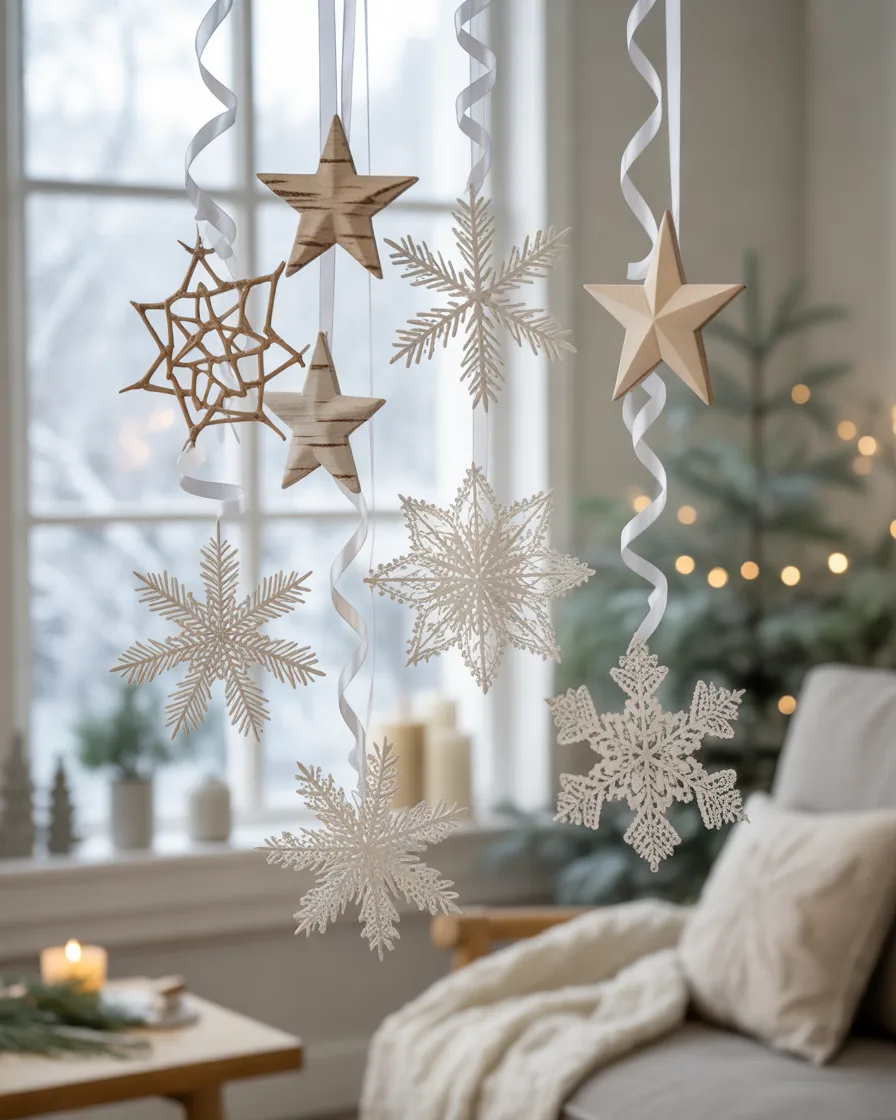
Christmas windows are often overlooked when decorating a home, but they offer a wonderful opportunity to add festive charm. A few handmade hanging decorations can make your windows look beautiful from both inside and outside.
Paper snowflakes, hanging stars, miniature wreaths, and delicate ribbon ornaments are simple options that don’t require expensive materials. You can create an elegant winter display using just a few supplies.
Materials Needed:
- White cardstock or craft paper
- Scissors
- White or silver ribbon
- Clear fishing line
- Wooden stars
- Small decorative snowflakes
- Removable window hooks
Step-by-Step Instructions:
- Fold white paper into several layers and cut different snowflake patterns.
- Carefully unfold the paper to reveal the snowflake designs.
- Cut ribbon into different lengths.
- Attach paper snowflakes and wooden stars to the ribbons.
- Tie the decorations securely to clear fishing line.
- Install removable hooks along the top of the window frame.
- Hang the decorations at different heights.
- Adjust the spacing until the arrangement looks balanced.
Styling and Decorating Tips:
Use different snowflake sizes to create a natural falling-snow effect. Keep the colors mostly white and silver for an elegant winter theme. If you prefer a warmer look, add a few wooden stars and champagne-colored ribbons.
Budget-Friendly Alternatives:
Use ordinary white printer paper instead of specialty craft paper. Reuse ribbon from old gift packages and make your own paper stars.
Creative Variations:
Create a complete winter village silhouette using black cardstock, or hang miniature evergreen wreaths at different heights for a more traditional Christmas look.
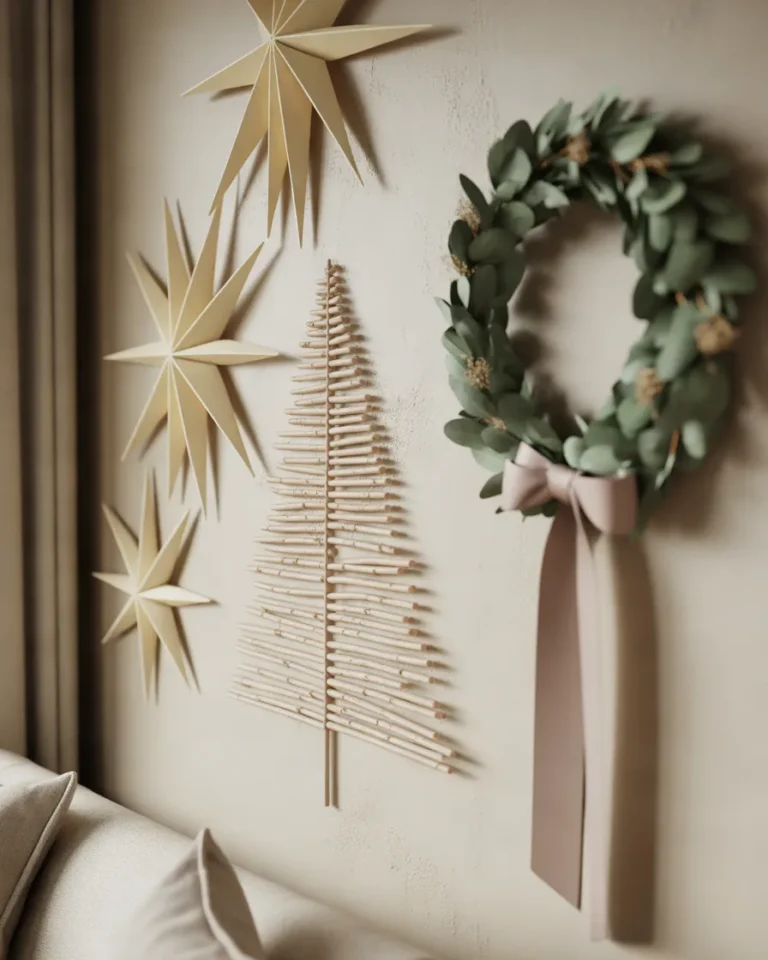
7. Design a DIY Christmas Wall Hanging with Wooden Sticks
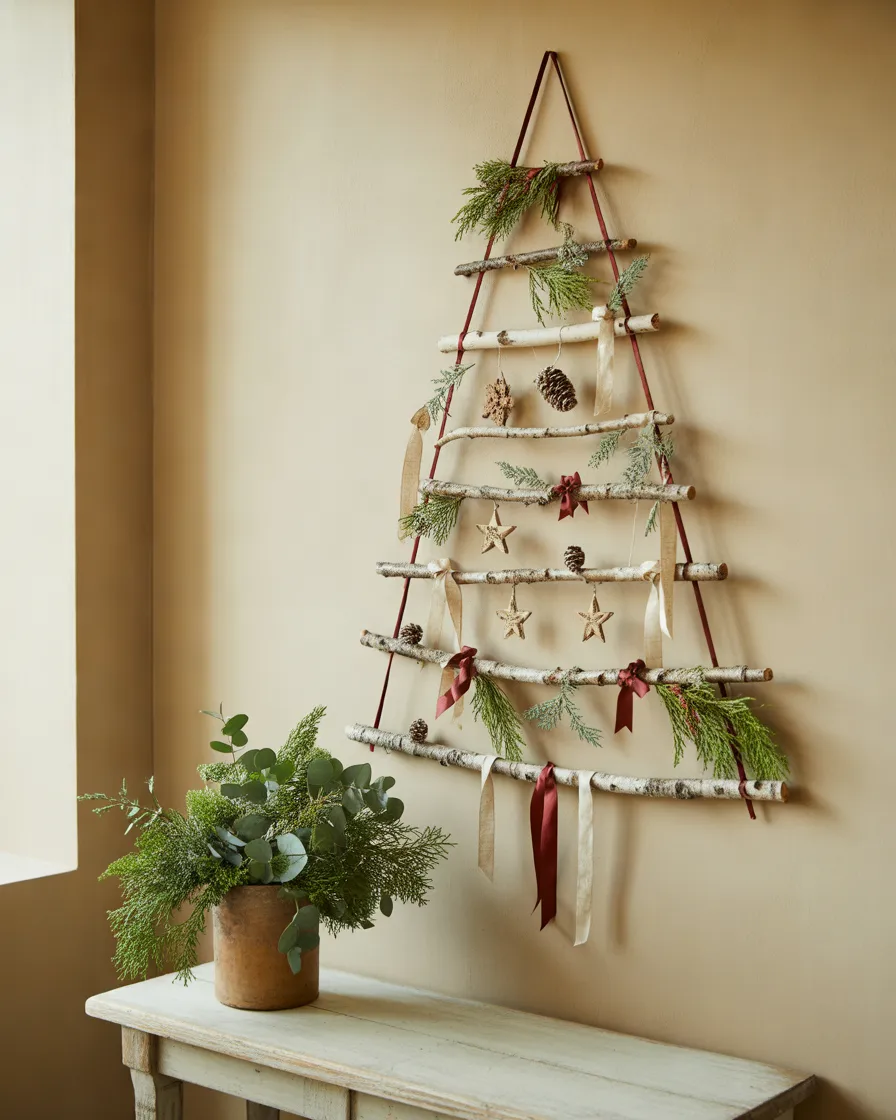
If you want something different from traditional Christmas decorations, try making a rustic wall hanging using wooden sticks and greenery. This simple project is perfect for empty walls, entryways, bedrooms, and small living spaces.
Its natural appearance works especially well with farmhouse, Scandinavian, and minimalist Christmas décor. You can customize the size and shape depending on the space available.
Materials Needed:
- Five or six wooden sticks
- Natural twine
- Artificial evergreen branches
- Red or white ribbon
- Small pinecones
- Wooden stars
- Hot glue
Step-by-Step Instructions:
- Collect wooden sticks of different lengths and remove loose dirt.
- Arrange them horizontally, with the longest stick at the bottom and shortest at the top, to create a tree shape.
- Tie the sticks together at both ends using natural twine.
- Add a hanging loop at the top.
- Attach small evergreen branches to selected areas.
- Decorate with pinecones, wooden stars, and miniature bows.
- Secure all decorations with hot glue.
- Hang the finished piece on a wall or door.
Styling and Decorating Tips:
Place the wall hanging above a console table or in an entryway. Combine it with a small vase of evergreen branches and a few candles to create a coordinated festive display.
Budget-Friendly Alternatives:
Collect fallen branches from your garden or nearby outdoor areas. Use recycled cardboard stars and leftover wrapping ribbon instead of purchasing new decorations.
Creative Variations:
Create a minimalist version using only wooden sticks and white ribbon. For a more traditional look, add red bows and small gold bells.
8. Turn Old Sweaters into Cozy DIY Christmas Stockings
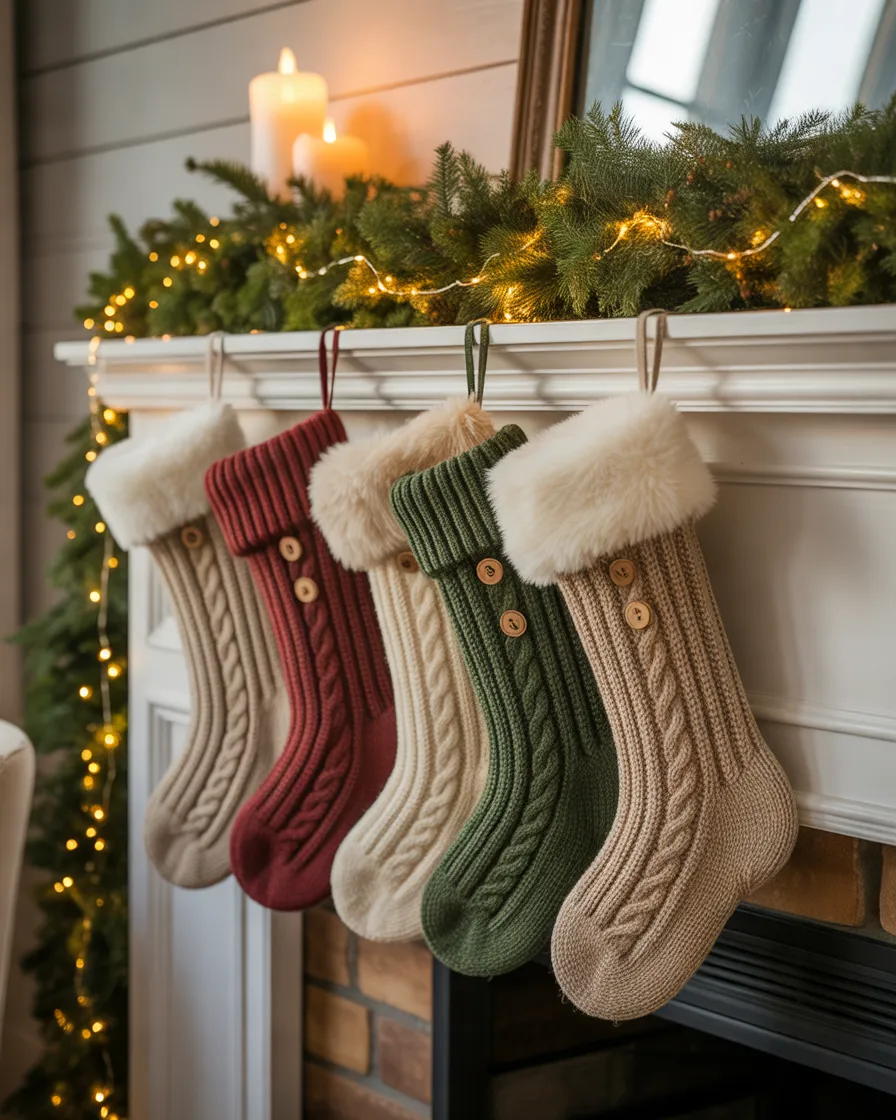
Old sweaters can become beautiful Christmas decorations with a little imagination. Instead of throwing away a sweater that is no longer wearable, turn its soft knitted fabric into a charming Christmas stocking.
Knitted stockings add warmth and texture to holiday décor. They look especially beautiful hanging above a fireplace or along a staircase railing.
Materials Needed:
- Old knitted sweater
- Christmas stocking template
- Fabric scissors
- Needle and thread or sewing machine
- Ribbon or twine
- Decorative buttons
- Faux fur trim
Step-by-Step Instructions:
- Choose a clean sweater with a festive color or attractive knitted texture.
- Draw a Christmas stocking shape on paper and cut it out.
- Place the template over the sweater fabric.
- Cut two matching stocking shapes, leaving a little extra fabric around the edges.
- Place the pieces together with the patterned sides facing inward.
- Sew around the edges, leaving the top open.
- Turn the stocking right-side out.
- Add a ribbon loop near the top for hanging.
- Decorate the cuff with faux fur, buttons, or small fabric bows.
Styling and Decorating Tips:
Hang several stockings together using a wooden rail or fireplace mantel. Choose complementary colors such as cream, burgundy, forest green, and beige. You can also personalize each stocking with a small name tag.
Budget-Friendly Alternatives:
Use old scarves, knitted blankets, or leftover fabric scraps. If you don’t have a sewing machine, hand-stitch the edges carefully.
Creative Variations:
Make miniature stockings from sweater sleeves and use them as Christmas tree ornaments or decorative cutlery holders for your holiday table.
9. Create a Beautiful DIY Christmas Candle Holder
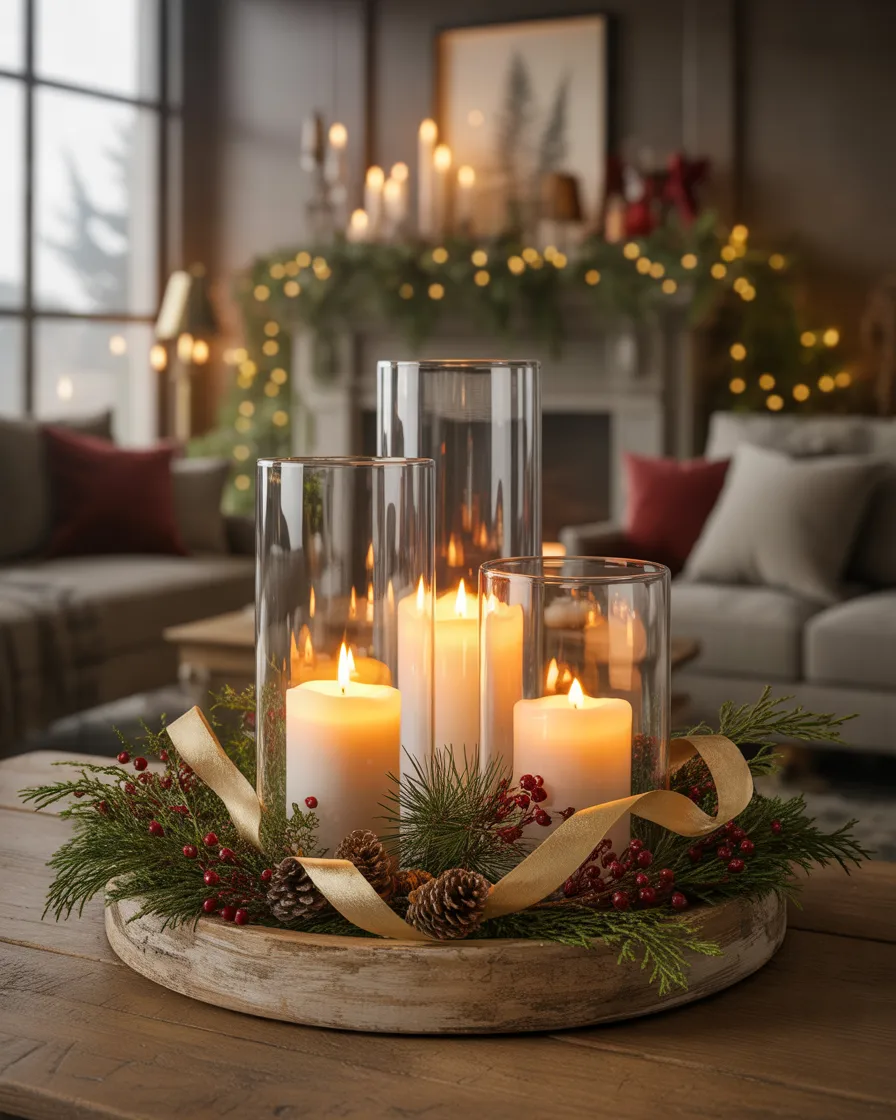
Candles can instantly make a room feel warmer and more inviting during the winter season. A handmade Christmas candle holder is a simple way to introduce soft lighting and festive details into your home.
You can make a beautiful decorative candle holder using glass containers, small pinecones, greenery, and ribbon. The finished piece works well on dining tables, coffee tables, and fireplace mantels.
Materials Needed:
- Small glass candle holders
- LED candles or suitable candles
- Evergreen branches
- Small pinecones
- Red or gold ribbon
- Decorative tray
- Artificial berries
Step-by-Step Instructions:
- Select glass candle holders that are stable and suitable for your chosen candles.
- Clean the glass surfaces and dry them completely.
- Arrange evergreen branches around the base of the candle holders.
- Add pinecones and small artificial berries to the arrangement.
- Tie a decorative ribbon around the outside of each holder if appropriate.
- Place the holders on a wooden or ceramic tray.
- Add additional greenery to create a fuller Christmas centerpiece.
- Arrange the candles at different heights for visual interest.
Styling and Decorating Tips:
Choose warm-white candles to complement traditional Christmas colors. A combination of greenery, gold accents, and natural wood creates a particularly elegant appearance.
Budget-Friendly Alternatives:
Reuse suitable glass candle holders or small glass containers. Artificial greenery from old Christmas decorations can also be repurposed.
Creative Variations:
Use frosted glass holders for a snowy winter theme or metallic gold holders for a glamorous holiday arrangement. Battery-operated LED candles are a convenient option, especially around greenery and fabric.
Safety Note: Never leave burning candles unattended. Keep real flames away from greenery, ribbons, curtains, and other flammable materials.
10. Make DIY Christmas Gift Boxes for Decorative Displays

Beautifully wrapped gifts are part of what makes Christmas decorating so special. Even when you don’t have actual presents ready, you can create decorative gift boxes to place under your Christmas tree or around your living room.
These handmade decorations are an affordable way to fill empty spaces and make your Christmas tree area look more complete. You can use empty cardboard boxes and wrap them in paper that matches your decorating theme.
Materials Needed:
- Empty cardboard boxes
- Christmas wrapping paper
- Scissors
- Double-sided tape
- Satin or velvet ribbon
- Decorative gift tags
- Small artificial greenery
- Pinecones
Step-by-Step Instructions:
- Collect empty cardboard boxes in different sizes.
- Remove old labels and make sure the boxes are clean.
- Measure the wrapping paper around each box.
- Cut the paper to the correct size and wrap each box neatly.
- Secure the paper with double-sided tape.
- Tie decorative ribbons around the boxes.
- Add gift tags, small pinecones, or artificial greenery.
- Arrange the finished boxes under your Christmas tree.
Styling and Decorating Tips:
Use two or three complementary wrapping paper designs instead of mixing too many patterns. Neutral paper with gold ribbons creates an elegant appearance, while traditional red and green wrapping paper gives a classic Christmas feeling.
Budget-Friendly Alternatives:
Reuse wrapping paper from previous celebrations if it is still in good condition. Newspaper or brown kraft paper can also look beautiful when decorated with natural twine.
Creative Variations:
Create a monochromatic display using different shades of white and gold. Alternatively, use plaid paper, burlap ribbons, and wooden tags for a rustic farmhouse look.
11. Create a DIY Mini Christmas Village Display
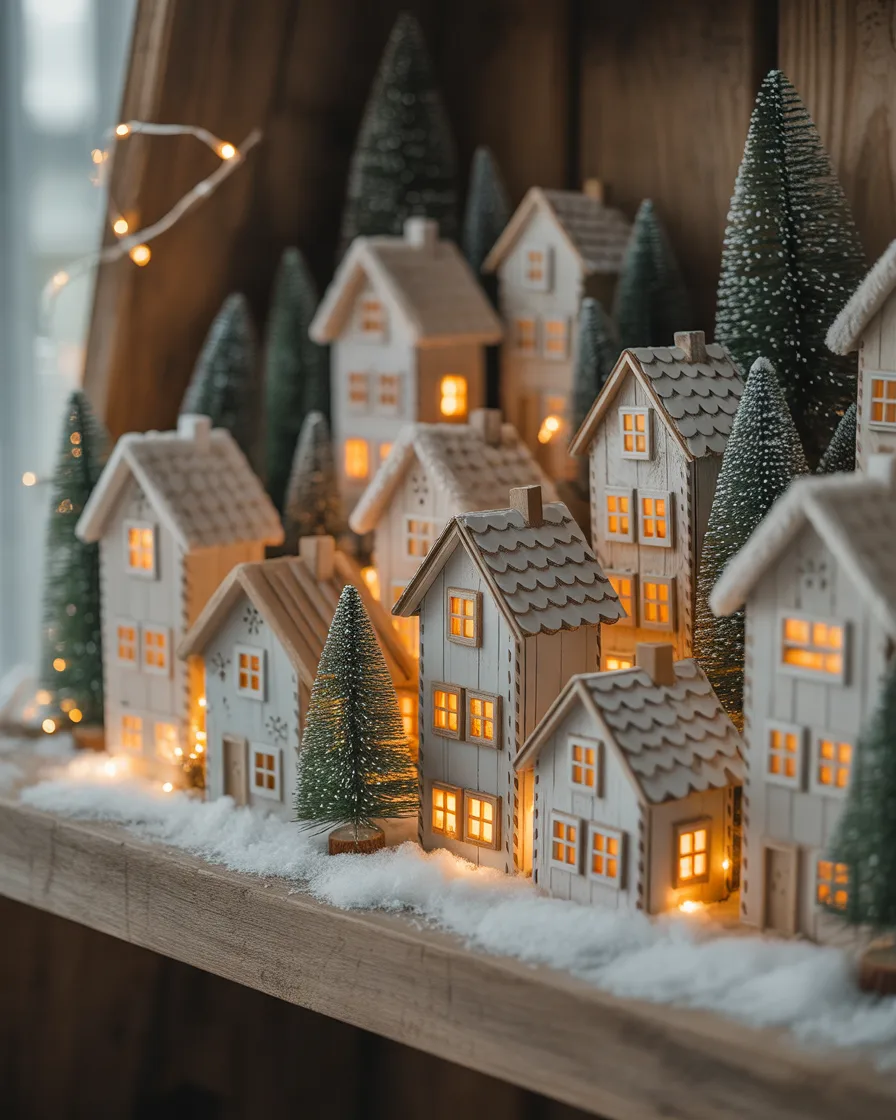
A miniature Christmas village can become one of the most charming decorations in your home. Small houses, snowy rooftops, miniature trees, and warm lights create the feeling of a peaceful winter town.
You don’t need expensive ceramic village pieces to enjoy this look. With cardboard, paint, and a few simple craft materials, you can build your own decorative village.
Materials Needed:
- Small cardboard boxes
- White and neutral acrylic paint
- Craft paper
- Scissors
- Glue
- Cotton batting or artificial snow
- Miniature bottle-brush trees
- Battery-operated LED lights
Step-by-Step Instructions:
- Collect small cardboard boxes in different sizes.
- Cut and fold additional cardboard pieces to create triangular rooftops.
- Attach the roofs securely to the boxes.
- Paint the houses in white, cream, soft gray, or pale beige.
- Draw or attach small window and door designs.
- Add a little artificial snow to the rooftops.
- Arrange the houses on a wooden tray or shelf.
- Place miniature trees between the buildings.
- Add battery-operated lights to create a warm village atmosphere.
Styling and Decorating Tips:
Place the village on a console table, fireplace mantel, or dedicated shelf. Use different building heights to create depth. A white base with soft greenery gives the display a beautiful snowy appearance.
Budget-Friendly Alternatives:
Use cereal boxes, packaging cardboard, and leftover paint. Cotton batting can replace more expensive decorative snow.
Creative Variations:
Create a traditional red-roof village, a minimalist all-white town, or a Scandinavian-style collection of simple wooden-looking houses.
12. Design Handmade Cinnamon Stick Christmas Stars
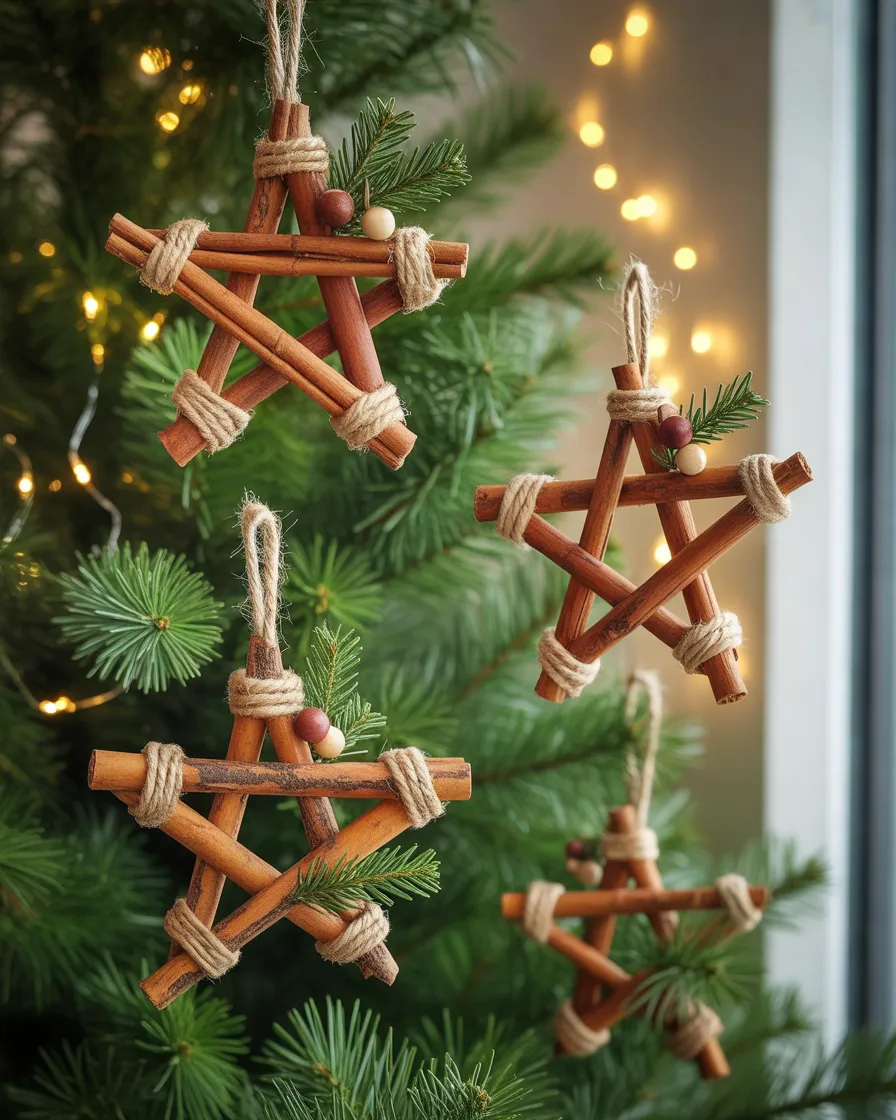
Cinnamon stick stars are simple, natural, and wonderfully festive. They bring rustic charm to Christmas decorating and can be used as tree ornaments, wall decorations, gift toppers, or part of a seasonal centerpiece.
Their natural brown color looks beautiful with greenery, white decorations, and warm metallic accents. They are also easy to customize with ribbons and small decorative details.
Materials Needed:
- Cinnamon sticks
- Natural twine
- Hot glue gun
- Red or cream ribbon
- Small pine sprigs
- Miniature wooden beads
- Scissors
Step-by-Step Instructions:
- Select cinnamon sticks of approximately equal length.
- Arrange five sticks into a simple star shape.
- Carefully adjust the corners until the shape looks balanced.
- Secure the connecting points using hot glue.
- Allow the glue to dry completely.
- Wrap a little twine around selected joints for additional decoration.
- Attach a small hanging loop at the top.
- Add a tiny evergreen sprig or ribbon bow to complete the ornament.
Styling and Decorating Tips:
Hang several stars on your Christmas tree or arrange them across a decorative garland. They also look beautiful when attached to kraft-paper gift packages.
Budget-Friendly Alternatives:
Use leftover cinnamon sticks from your kitchen if they are suitable for crafting. Reuse old string and ribbon to keep the project inexpensive.
Creative Variations:
Paint the edges white for a snowy effect or add small gold details for a more glamorous finish. You can also make larger stars for wall decorations.
13. Make a DIY Christmas Tree Skirt from Fabric
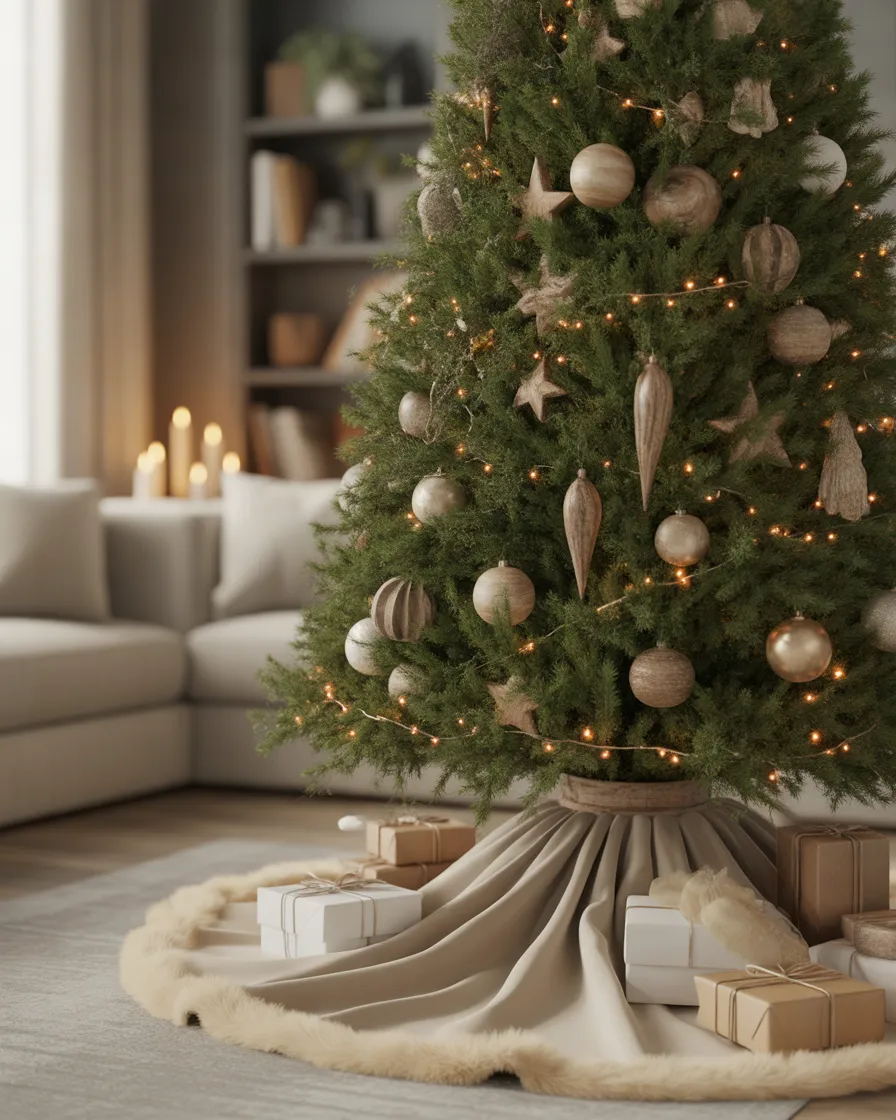
A Christmas tree skirt is a simple detail that can make your entire tree display look more polished. It hides the tree stand, creates a beautiful base for presents, and helps bring together the colors of your Christmas decorations.
Instead of buying a ready-made tree skirt, you can create one using leftover fabric, an old blanket, or a piece of inexpensive felt. Choose a material that complements your tree decorations and the surrounding furniture.
Materials Needed:
- Large piece of felt or cotton fabric
- Scissors
- Measuring tape
- Fabric glue or needle and thread
- Decorative ribbon
- Faux fur trim or pom-poms
- Fabric marker
Step-by-Step Instructions:
- Measure the area around the base of your Christmas tree.
- Fold the fabric in half and mark a large semicircular shape.
- Cut the fabric into a circular shape.
- Cut a small opening in the center to fit around the tree trunk.
- Make one straight cut from the outer edge to the center opening.
- Finish the edges using fabric glue or stitching.
- Add ribbon, faux fur, or decorative trim around the outer edge.
- Place the skirt around the tree stand and arrange the fabric evenly.
Styling and Decorating Tips:
Cream, beige, and white fabric creates a beautiful neutral Christmas look. If your tree has traditional red and green ornaments, a simple white tree skirt can help the decorations stand out.
Budget-Friendly Alternatives:
Repurpose an old blanket, bedsheet, or large piece of unused fabric. You can also use inexpensive felt instead of specialized Christmas fabric.
Creative Variations:
Create a farmhouse skirt using burlap and lace trim. For a luxurious appearance, choose deep red velvet or cream fabric with faux fur edging.
14. Create a Festive DIY Christmas Door Garland
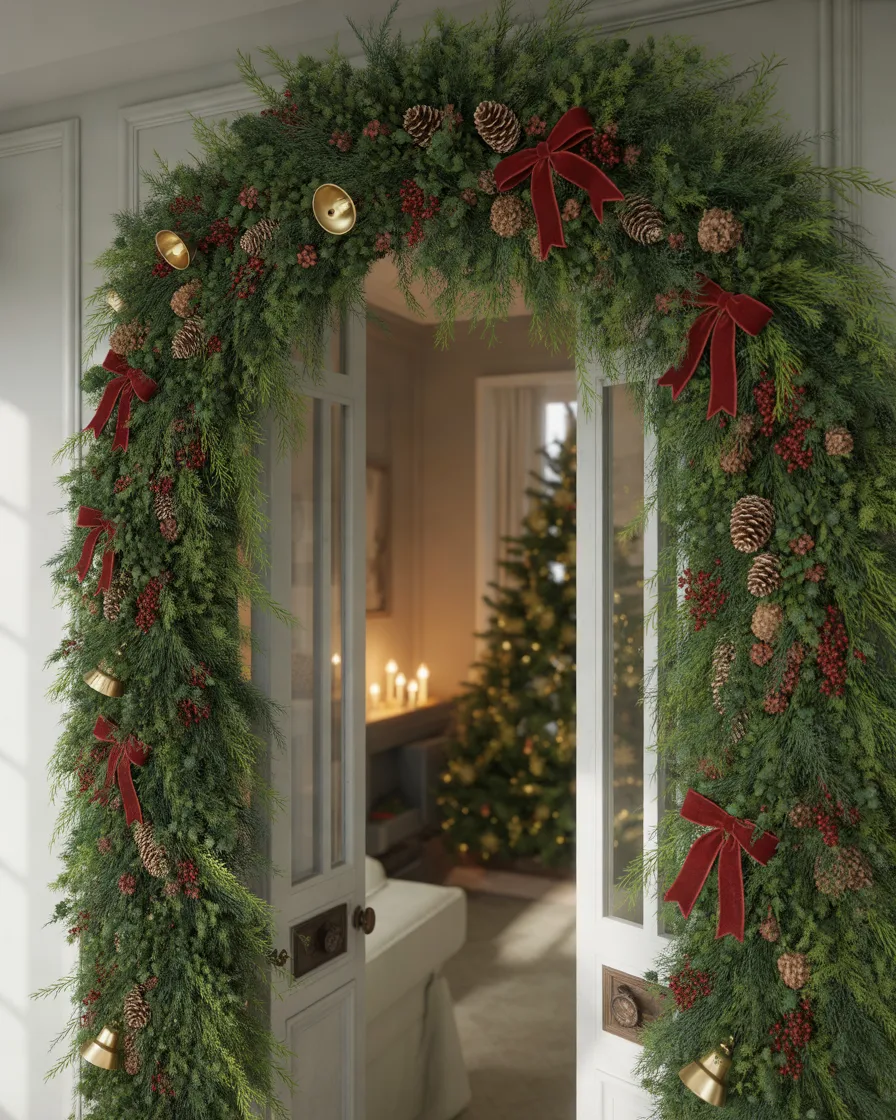
If you want your home to feel festive from the moment someone enters, decorating your doorway is a wonderful idea. A Christmas door garland adds greenery, texture, and color without requiring a large amount of space.
You can create a beautiful garland using artificial evergreen branches, ribbon, pinecones, and berries. It can be placed around the entrance door, along an interior doorway, or across a hallway opening.
Materials Needed:
- Artificial evergreen garland
- Green floral wire
- Red velvet ribbon
- Pinecones
- Artificial berries
- Decorative bells
- Removable hooks
- Scissors
Step-by-Step Instructions:
- Measure the doorway to determine the required garland length.
- Prepare the artificial evergreen garland and remove any loose pieces.
- Attach additional evergreen branches to make the arrangement fuller.
- Wrap floral wire around the garland to secure the branches.
- Add pinecones and decorative berries at regular intervals.
- Create several ribbon bows and attach them to the greenery.
- Position decorative bells near the center or bottom.
- Use suitable removable hooks to attach the garland around the doorway.
- Adjust the greenery so that the arrangement looks balanced.
Styling and Decorating Tips:
Keep the decoration symmetrical for a traditional appearance. A large bow at the top center creates an attractive focal point. For a modern look, use fewer decorations and allow the greenery to stand out.
Budget-Friendly Alternatives:
Reuse an older artificial garland and refresh it with new ribbon. You can also collect natural pinecones and use leftover ornaments.
Creative Variations:
Create a snowy garland with frosted branches and silver accents, or choose a traditional design with red berries and gold bells.
15. Make a DIY Christmas Table Runner with Natural Decorations
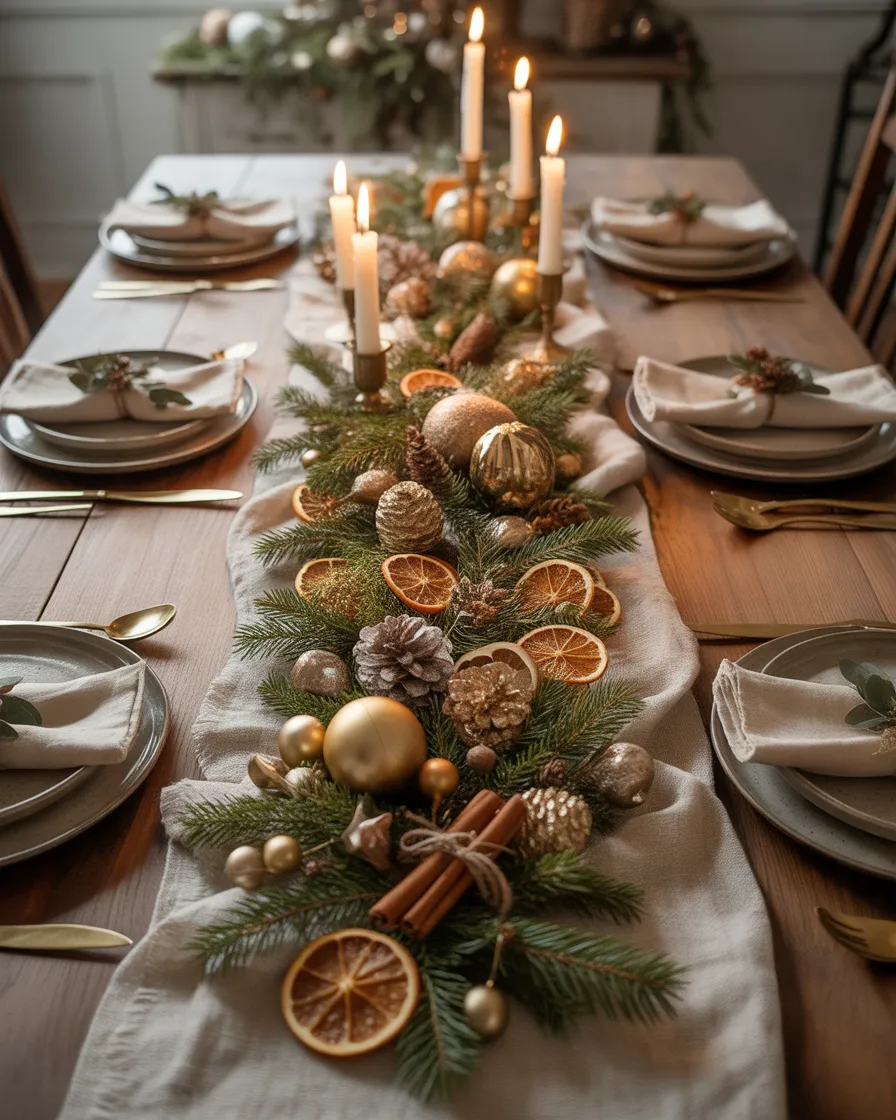
A beautifully decorated dining table can make holiday meals feel even more special. A handmade Christmas table runner is a simple project that adds color, texture, and personality to your dining space.
You can use natural fabric, evergreen branches, pinecones, dried oranges, and small decorative ornaments to create a centerpiece that feels both festive and elegant.
Materials Needed:
- Burlap, cotton, or linen fabric
- Scissors
- Needle and thread or fabric glue
- Evergreen branches
- Pinecones
- Dried orange slices
- Small decorative ornaments
- Ribbon or twine
Step-by-Step Instructions:
- Measure the length of your dining table.
- Cut a piece of fabric that fits the table, leaving some extra length at both ends.
- Finish the fabric edges using stitching or fabric glue.
- Place the runner down the center of your dining table.
- Arrange evergreen branches along the middle.
- Add pinecones and dried orange slices at regular intervals.
- Include a few small ornaments that match your Christmas color scheme.
- Finish the arrangement with natural twine or ribbon accents.
- Adjust the decorations to ensure there is enough space for plates and serving dishes.
Styling and Decorating Tips:
A neutral linen runner looks beautiful with natural greenery and warm wooden accessories. Add a few elegant place settings and coordinated napkins to complete the table.
Keep the centerpiece low and avoid placing decorations where they interfere with serving food. Use LED candles if you want additional lighting without an open flame near greenery.
Budget-Friendly Alternatives:
Use an old linen bedsheet or leftover cotton fabric. Collect pinecones outdoors and reuse ornaments from your existing Christmas collection.
Creative Variations:
For a glamorous table, add gold ornaments and champagne-colored ribbon. For a rustic look, use burlap, cinnamon sticks, dried orange slices, and natural greenery.
Helpful Tips for Creating Beautiful DIY Christmas Decorations on a Budget
Creating a festive home doesn’t require a large decorating budget. In fact, some of the most beautiful Christmas displays combine simple handmade pieces with decorations you already own. A little planning can help you achieve a coordinated look without unnecessary spending.
Reuse Materials You Already Have
Before purchasing new supplies, look around your home for materials that could be reused. Glass jars, old sweaters, cardboard boxes, unused ribbons, fabric scraps, and leftover wrapping paper can all become useful craft materials. Natural items such as pinecones and fallen branches can also add beautiful texture to Christmas decorations.
Choose a Consistent Christmas Color Scheme
A coordinated color palette makes handmade decorations look more professional. Traditional red, green, and gold create a classic Christmas atmosphere, while white, silver, and soft gray give your home a snowy winter appearance. If you prefer a natural look, try combining beige, brown, forest green, and cream.
Choose two or three main colors and repeat them throughout your home. This helps your decorations feel connected even when you use different materials and designs.
Combine Handmade and Store-Bought Decorations
You don’t have to make everything yourself. Handmade pinecone ornaments can look beautiful alongside store-bought baubles, while a homemade wreath can complement an existing artificial Christmas tree. Mixing different types of decorations creates depth and makes your home feel more personal.
Decorate Small Spaces Creatively
If you live in a smaller home or apartment, focus on decorations that use vertical space. Window ornaments, wall hangings, door garlands, and miniature tabletop trees are excellent options. You can also use shelves and console tables to create small festive displays without filling the floor with decorations.
Use Lighting to Create a Cozy Atmosphere
Lighting can make even simple Christmas decorations look special. Warm-white LED fairy lights work beautifully with glass jars, greenery, wreaths, and miniature village displays. Choose battery-operated lights for smaller decorative projects and use them according to the manufacturer’s instructions.
Plan Your Decorations Before Starting
Choose which areas of your home you want to decorate first. For example, you might focus on the living room, dining table, entrance, and Christmas tree area. Planning helps you avoid purchasing unnecessary supplies and makes it easier to create a consistent look.
Frequently Asked Questions About DIY Christmas Decoration Ideas
1. What are some easy DIY Christmas decoration ideas for beginners?
Some of the easiest projects include mason jar lanterns, paper snowflakes, pinecone ornaments, dried orange garlands, and handmade gift boxes. These decorations require simple materials and basic crafting skills, making them ideal for beginners.
2. How can I make Christmas decorations at home without spending much money?
Start by reusing materials you already have, such as cardboard, glass jars, old sweaters, fabric scraps, and leftover ribbon. Natural materials like pinecones and branches can also help you create beautiful decorations without spending much.
3. What materials are best for homemade Christmas decorations?
Popular materials include felt, cardboard, glass jars, wooden sticks, pinecones, natural twine, ribbon, fabric, artificial greenery, and craft paper. These supplies are versatile and can be used for many different Christmas crafts.
4. How can I decorate my home for Christmas with a rustic theme?
Use natural materials such as pinecones, wooden ornaments, burlap, cinnamon sticks, dried orange slices, and evergreen branches. Combine them with warm lighting and neutral colors to create a cozy farmhouse-inspired Christmas atmosphere.
5. What are some DIY Christmas decorations for small apartments?
Wall hangings, hanging window ornaments, miniature Christmas trees, mason jar lanterns, small wreaths, and decorative gift boxes are excellent choices. They add festive details without taking up too much floor space.
6. How can I make my DIY Christmas decorations look expensive?
Choose a coordinated color palette, use quality-looking materials, and avoid overcrowding your displays. Velvet ribbon, natural greenery, metallic accents, glass containers, and warm lighting can make simple homemade decorations look elegant and professionally styled.
7. When should I start making DIY Christmas decorations?
Starting in November gives you plenty of time to prepare decorations without feeling rushed. You can begin with smaller projects such as ornaments and garlands, then work on larger decorations like wreaths, table runners, and Christmas centerpieces.
Conclusion
Decorating your home for Christmas is about more than simply adding ornaments and festive colors. It’s about creating a welcoming atmosphere where family and friends can enjoy the holiday season together. And you don’t need expensive store-bought decorations to achieve that feeling.
These 15 DIY Christmas decoration ideas offer plenty of inspiration for transforming simple household materials into beautiful holiday accents. From glowing mason jar lanterns and rustic pinecone ornaments to handmade wreaths, miniature Christmas villages, and natural table runners, every project gives you an opportunity to add something personal to your home.
Start with the projects that match your decorating style, experiment with different colors and materials, and don’t be afraid to make each decoration your own. Even a small handmade ornament or a simple festive centerpiece can make a meaningful difference.
This Christmas, enjoy the creative process, involve your loved ones, and make your home feel warm, beautiful, and full of holiday magic. After all, the most memorable decorations are often the ones made with a little creativity and a lot of love.