Let’s face it – your front door is basically your home’s handshake during the holidays. You know that feeling when you drive through the neighborhood and spot that one house with the absolutely stunning entrance? Yeah, that’s what we’re going for here.
I’ve spent years perfecting my holiday curb appeal game (and making plenty of mistakes along the way), so trust me when I say these ideas will transform your entrance from “meh” to “magical.”
Remember that time I tried to hang a 50-pound wreath without proper support? Let’s just say my doorframe still hasn’t forgiven me.
But hey, we learn from our disasters, right? Through trial, error, and probably too much hot glue, I’ve discovered what actually works when decorating your front door for Christmas.
Table of Contents
- 1 Evergreen Wreath with Twinkling Lights
- 2 Candy Cane Door Frame Decor
- 3 Rustic Pinecone Garland Accent
- 4 Snowflake Hanging Ornaments Display
- 5 Red Ribbon and Bow Statement
- 6 Mini Christmas Tree Door Planters
- 7 Festive Lanterns with Candle Glow
- 8 Santa Welcome Mat and Accents
- 9 Glittery Starburst Door Hanging
- 10 Holiday-Themed Door Signboard
- 11 Bringing It All Together
Evergreen Wreath with Twinkling Lights
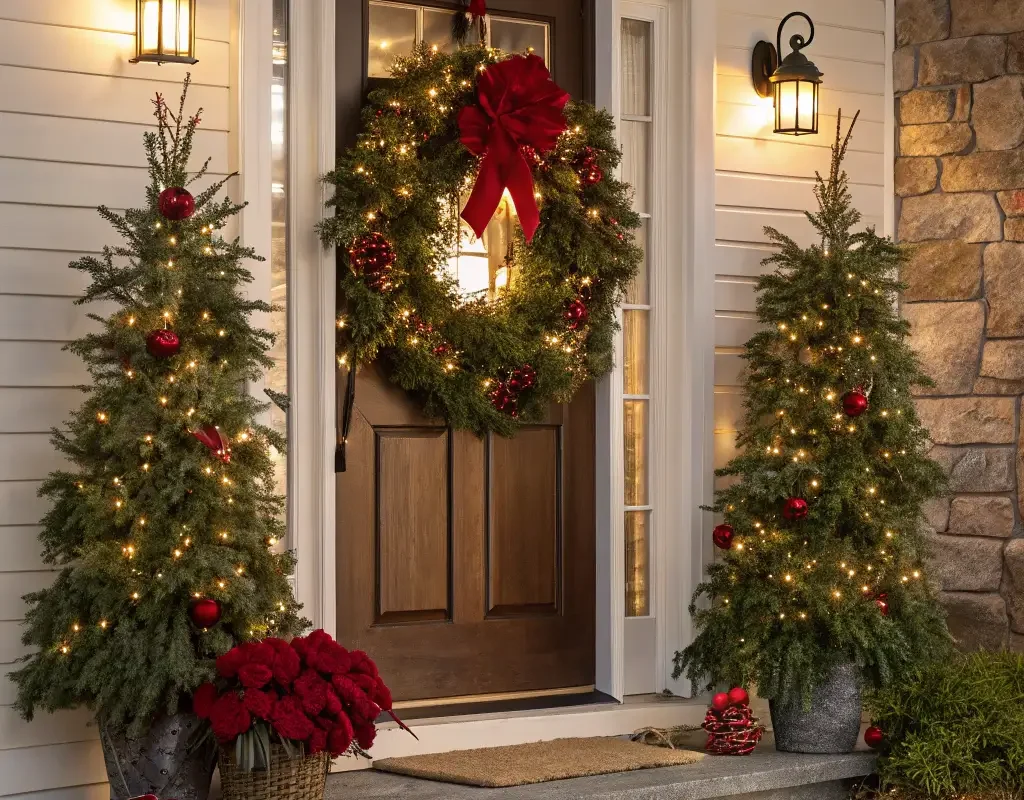
Nothing says “Christmas magic” quite like a classic evergreen wreath illuminated with warm, twinkling lights. I’m talking about that perfect combo of traditional charm and modern sparkle that makes people stop mid-step on your porch.
When selecting your wreath, size matters more than you’d think. Go big or go home – seriously! A dinky 18-inch wreath on a standard door looks like you’re decorating for elves. I learned this the hard way after my first attempt looked more like a Christmas donut than festive decor. Aim for at least 24-30 inches for standard doors, and if you’ve got double doors, consider going even larger or using two matching wreaths.
Choosing Your Lights
Here’s where things get interesting. You’ve got options, and each brings its own vibe:
• Warm white LED lights – Classic, elegant, and they won’t turn your electricity bill into a horror story
• Multi-colored lights – Perfect if you’re going for that nostalgic, childhood Christmas feel
• Battery-operated lights with timers – Game-changer for those without outdoor outlets (FYI, these have saved my sanity)
• Solar-powered options – Great for eco-conscious decorators, though they can be temperamental in cloudy weather
The trick to making your wreath lights look professional? Weave them deep into the greenery, not just wrapped around the surface. I spend a good hour threading lights through branches, making sure they peek out naturally. Want to know my secret weapon? Zip ties. They’re practically invisible and keep everything secure even in winter winds.
Personal Touch Elements
Why settle for store-bought when you can make it uniquely yours? I add pinecones I’ve collected from weekend hikes (spray them with metallic paint for extra pizzazz), dried orange slices for that amazing scent, and sometimes even small ornaments that match my indoor tree. Last year, I tucked in some cinnamon sticks – talk about instant holiday aromatherapy!
Candy Cane Door Frame Decor
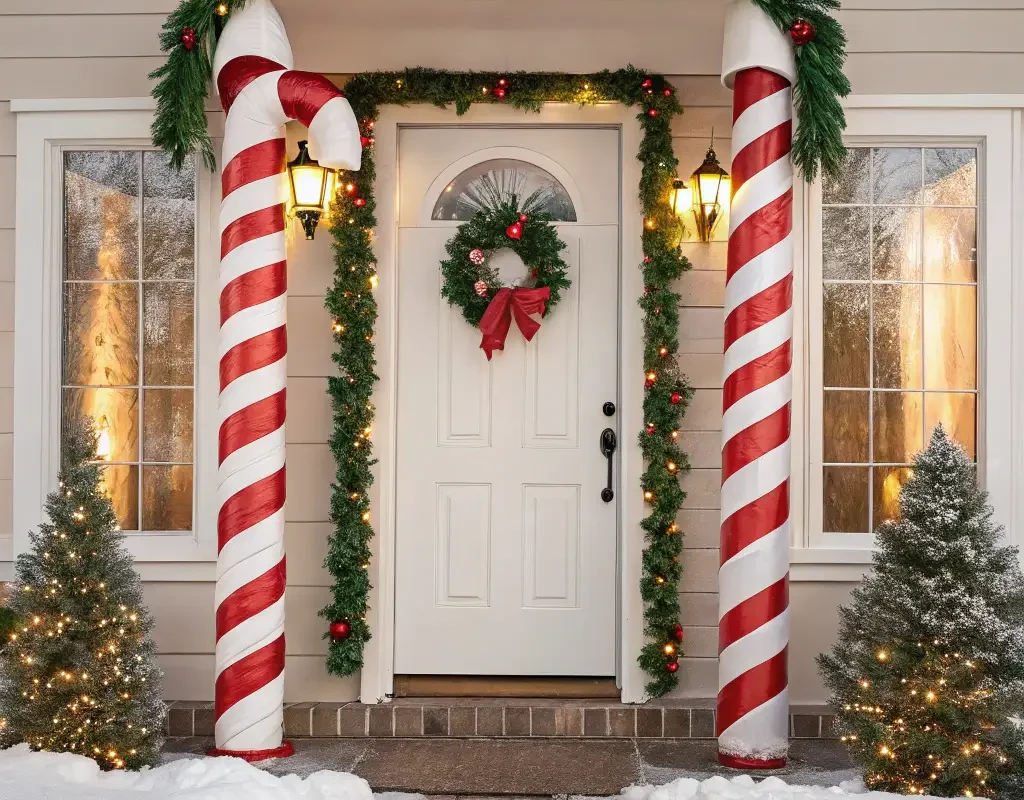
Who says candy canes are just for eating? Transform your doorframe into a peppermint wonderland that screams holiday cheer louder than your uncle at Christmas dinner.
Creating candy cane door frames takes me back to my childhood obsession with Hansel and Gretel’s candy house. Except this version won’t attract witch problems – just compliments from neighbors. The key lies in strategic placement and proper proportions.
Installation Methods That Actually Work
Let me save you from the heartbreak of falling candy canes:
• Command strips – Your doorframe’s best friend during the holidays
• Magnetic hooks – Perfect for metal doors and frames
• Velcro strips – Reusable year after year (economical win!)
• Clear fishing line – Creates that “floating” effect for lightweight decorations
I typically start at the corners and work my way in, alternating red and white candy canes for that classic barber pole effect. Space them about 6-8 inches apart for the best visual impact. Too close and it looks cluttered; too far and you lose the effect entirely.
Beyond Basic Candy Canes
Here’s where creativity kicks in. Mix different sizes – jumbo canes at the corners, standard ones along the sides, and mini canes as filler. Ever tried metallic candy canes? Gold and silver versions add unexpected elegance to the traditional red-and-white scheme.
For extra durability (because weather happens), I coat outdoor candy cane decorations with clear acrylic spray. This protects them from moisture and keeps colors vibrant throughout the season. learned this after watching my first attempt melt into sad, striped puddles during an unexpected December rain.
Rustic Pinecone Garland Accent
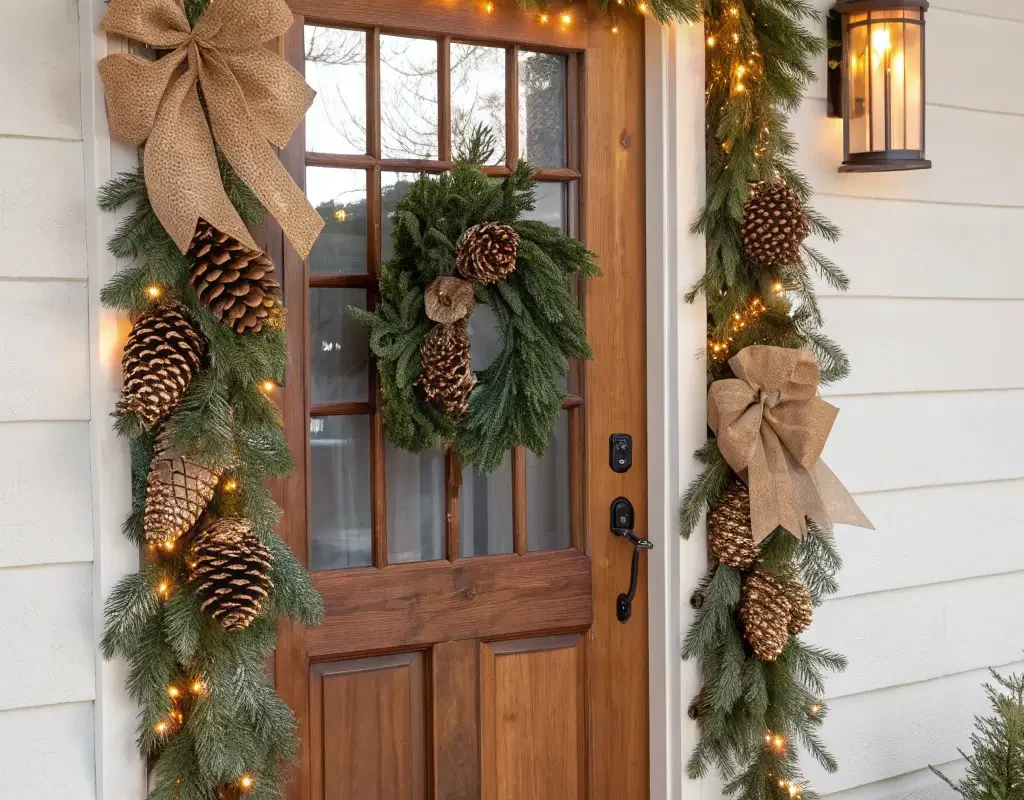
There’s something incredibly satisfying about creating decorations from nature’s own ornaments. Pinecone garlands bring that cozy, cabin-in-the-woods vibe right to your front door, and honestly? They’re addictively fun to make.
My obsession with pinecones started during a particularly broke December when store-bought decorations weren’t in the budget. Armed with a basket and determination, I collected enough pinecones to decorate three houses. Now it’s become an annual tradition – even though I can afford fancier options.
Crafting Your Perfect Garland
The beauty of pinecone garlands lies in their versatility. Here’s my go-to process:
Start by selecting pinecones of varying sizes – diversity creates visual interest. Bake them at 200°F for about an hour to kill any bugs (trust me on this one) and open them fully. Once cooled, the fun begins.
Painting techniques that never fail:
• White tips for snow effect (use a dry brush technique)
• Metallic edges for glamour
• Natural with clear glitter spray for subtle sparkle
• Colored tips matching your overall theme
String them together using sturdy twine or ribbon, leaving about 3-4 inches between each cone. I alternate sizes and occasionally add dried orange slices, cinnamon sticks, or small bells between pinecones. The result? A garland that looks like you paid serious money at a boutique.
Placement Strategies
Draping techniques make or break your garland game. Create gentle swoops rather than letting it hang straight – this adds movement and elegance. Secure at three points minimum: both ends and the center peak of your door frame.
Also Read: 12 Fun Kitchen Christmas Decorations Ideas to Try This Year
Snowflake Hanging Ornaments Display

Can we talk about how snowflakes turn any entrance into a winter wonderland? Even if you live where snow only exists in movies, strategically placed snowflake ornaments create that magical frozen feeling without the actual frostbite.
I discovered the power of snowflakes during a particularly warm December in Texas. No white Christmas in sight, but my door? Pure Frozen vibes. The trick isn’t just hanging random snowflakes – it’s creating a cohesive display that looks intentional, not like craft store explosion.
Creating Depth and Dimension
Here’s what most people get wrong: hanging everything at the same height. Vary your lengths dramatically to create visual interest:
• Longest strands (3-4 feet) on the outer edges
• Medium lengths (2-3 feet) filling the middle space
• Short accent pieces (1-2 feet) clustered near the center
• Mix materials – combine paper, metal, plastic, and fabric snowflakes
My personal favorite combo? Large glittery acrylic snowflakes mixed with delicate paper ones. The contrast between substantial and ethereal creates this amazing layered effect that photographs beautifully (hello, Instagram!).
Suspension Solutions
Fishing line remains the MVP for snowflake displays. It’s virtually invisible and strong enough to handle wind. Create a grid system using small hooks or Command strips across your door frame or porch ceiling. This lets you adjust placement without committing to permanent holes.
Pro tip: Add battery-operated LED lights behind translucent snowflakes. When lit from behind at dusk, they create the most gorgeous shadows and patterns on your door. Discovered this accidentally when my porch light hit them just right – now I do it on purpose.
Red Ribbon and Bow Statement
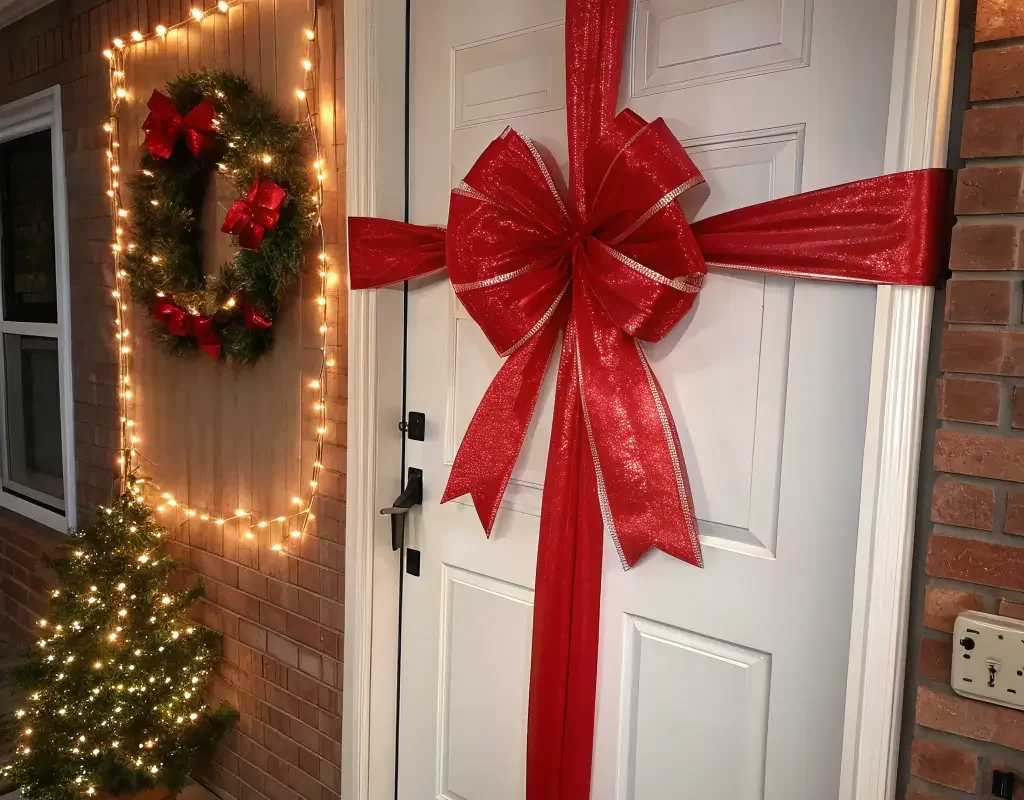
Let’s transform your door into a giant gift that nobody can resist! A bold red velvet bow makes the ultimate statement piece, and IMO, bigger really is better here.
Remember those tiny, sad bows that come with pre-made wreaths? Yeah, we’re not doing that. I’m talking about bows so magnificent that delivery drivers take selfies with your door. My record? A 24-inch wide bow that required two people to hang. Was it extra? Absolutely. Did I love every minute of it? You bet.
Bow Construction Mastery
Creating the perfect bow requires patience and the right materials:
Ribbon selection matters:
• Wired ribbon holds shape better than regular ribbon
• Velvet provides luxury and photographs beautifully
• Burlap offers rustic charm
• Satin reflects light gorgeously but shows every imperfection
Start with at least 10 yards of 4-inch wide ribbon for a substantial bow. The trick I learned from a florist friend? Create loops separately, then wire them together. This gives you more control over the final shape and lets you adjust without starting over.
Strategic Placement Options
The classic center-door placement works, but why stop there? Try these alternatives:
• Corner cascade – Position bow at upper corner with ribbons flowing diagonally
• Double bow system – Matching bows on either side of double doors
• Layered approach – Multiple smaller bows creating a cluster effect
• Integration technique – Weave ribbon through your wreath before creating the bow
Weather-proof your masterpiece with fabric protector spray. Nothing ruins holiday magic faster than a soggy, drooping bow :/
Mini Christmas Tree Door Planters
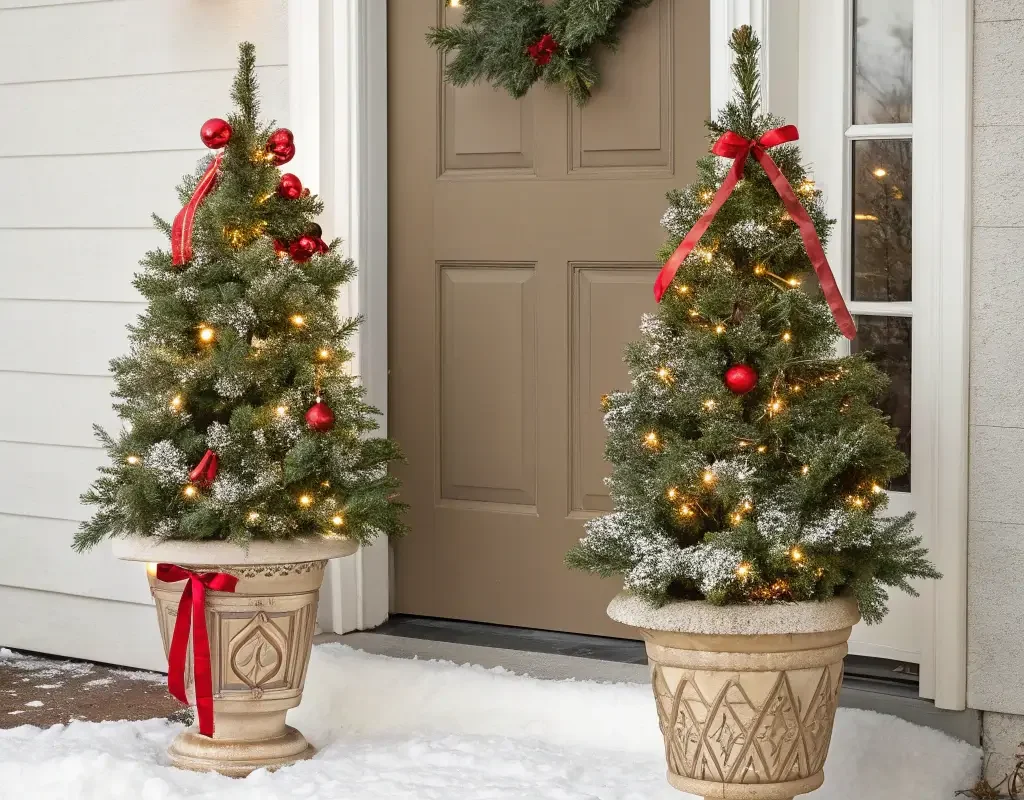
Why should indoor trees have all the fun? Flanking your door with mini Christmas trees in festive planters creates an entrance that rivals any winter resort.
I stumbled into this decoration style after inheriting two small potted evergreens from a neighbor who was moving. Instead of planting them immediately, I decorated them for Christmas. Three years later, those same trees (now slightly bigger) still guard my entrance each December.
Container Selection and Styling
Your planter choice sets the entire tone:
• Galvanized metal buckets – Farmhouse chic that handles weather like a champ
• Red ceramic pots – Classic Christmas colors that pop against greenery
• Wooden crates – Rustic appeal with excellent drainage
• Decorative urns – Elegant option for formal entrances
Size your containers appropriately – they should be at least one-third the height of your tree for proper proportion. I learned this after my first attempt looked like trees wearing pants that were way too big.
Decorating Your Mini Trees
Less really is more with small trees. Focus on one or two decoration types to avoid overwhelming their delicate branches:
Lighting options:
• Battery-operated string lights (50-100 count max for 3-foot trees)
• LED light stakes pushed into soil for bottom-up illumination
• Projected lights from nearby fixtures for subtle glow
Ornament strategies:
• Miniature ornaments scaled to tree size
• Natural elements like pinecones and berries
• Simple ribbon wound through branches
• Star or angel toppers (secured with floral wire)
Keep decorations lightweight – these branches can’t support your grandmother’s vintage glass ornaments. Save those beauties for inside!
Also Read: 15 Amazing Christmas Room Decor Ideas and Decorative Magic
Festive Lanterns with Candle Glow
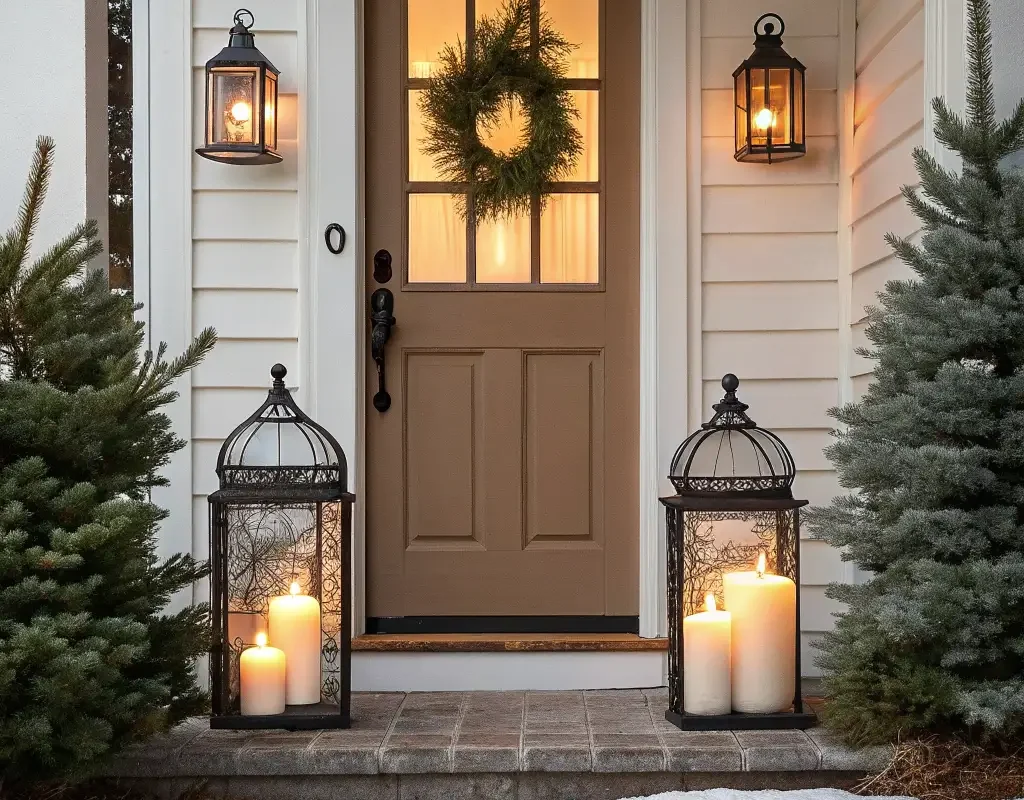
Nothing creates ambiance quite like the warm, flickering glow of candles nestled inside decorative lanterns. It’s that magical lighting that makes everyone look good in photos and creates instant hygge vibes.
My lantern obsession started with one clearance find that transformed my entire porch atmosphere. Now I own approximately 47 lanterns (yes, I counted), and each December they all come out to play.
Lantern Arrangement Strategies
Creating visual impact requires thoughtful placement:
• Staggered heights – Mix floor lanterns, hanging versions, and tabletop sizes
• Odd numbers – Groups of three or five look more natural than pairs
• Leading lines – Create a path from sidewalk to door
• Layered lighting – Combine with other light sources for depth
The golden rule of lantern placement: never line them up like soldiers. Cluster them organically, like they naturally gathered there for warmth. I arrange mine while slightly tipsy on eggnog – somehow creates the perfect “casual yet intentional” vibe.
Candle Alternatives and Safety
Real candles create unmatched ambiance, but let’s be practical:
LED candles have seriously evolved:
• Remote-controlled options with dimmer settings
• Timer functions for automatic on/off
• Realistic flicker technology that fools everyone
• Color-changing varieties for different moods
If you insist on real candles (I get it), use enclosed lanterns only and never leave them unattended. Place lanterns on stable, non-flammable surfaces away from decorations and foot traffic.
My favorite hack? Mix real candles for special occasions with LED for everyday display. Guests get the authentic experience, but you maintain sanity and safety throughout the season.
Santa Welcome Mat and Accents
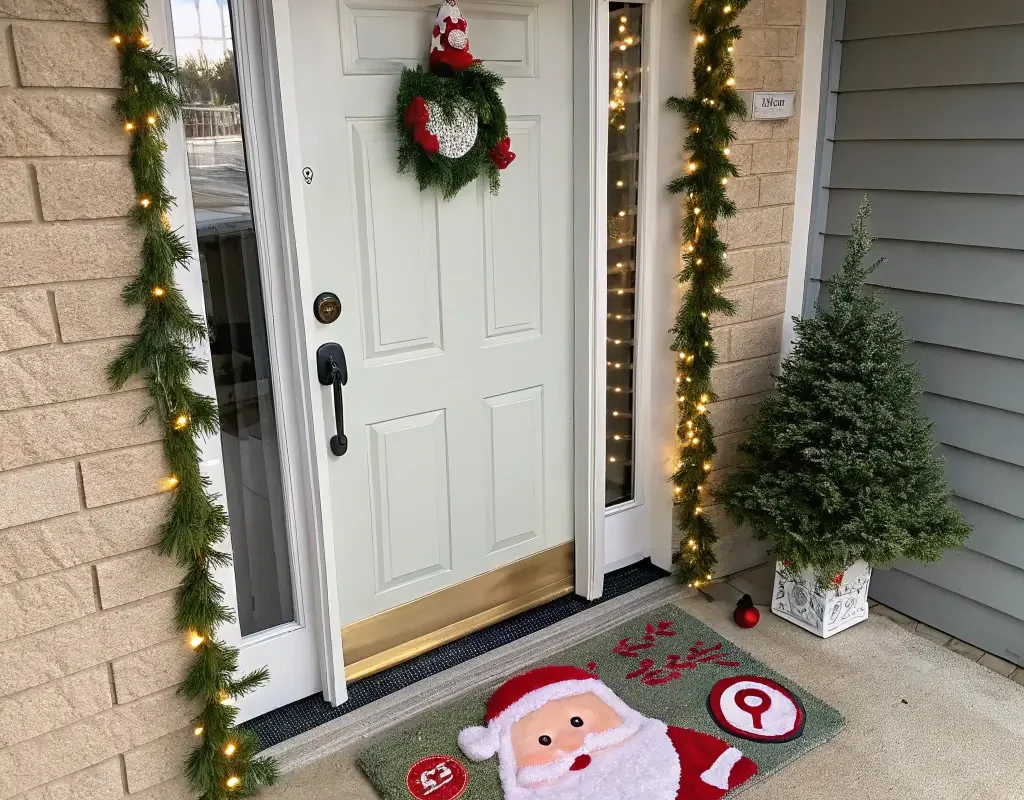
Your doormat sets the tone before anyone even rings the bell. A festive Santa-themed welcome mat paired with coordinating accents creates that perfect first impression.
Confession time: I own seven Christmas doormats. Each has its own personality, from cheeky “Santa, Stop Here!” to elegant “Merry and Bright” scripts. Switching them throughout December keeps things fresh and gives me ridiculous amounts of joy.
Mat Selection Criteria
Not all doormats survive the holiday hustle:
• Coir mats – Excellent for scraping off snow and dirt
• Rubber mats – Easy to clean, perfect for wet climates
• Fabric mats – Soft and decorative but require covered porches
Size matters more than you’d expect. Standard 18×30 inch mats look tiny on larger porches. Go for 24×36 inches minimum if you have the space. Double doors? Consider an extended mat or two coordinating ones.
Coordinating Accent Pieces
The mat shouldn’t work alone:
Santa-themed additions:
• Boot scrapers shaped like reindeer
• “Santa’s Workshop” signs pointing to your door
• Milk and cookies decoration props
• Miniature sleigh with presents near the entrance
Last year, I created a “Santa pit stop” complete with a tiny mailbox for letters to the North Pole. The neighborhood kids went absolutely nuts for it, and honestly? Making magic for others makes the whole season worthwhile.
Glittery Starburst Door Hanging
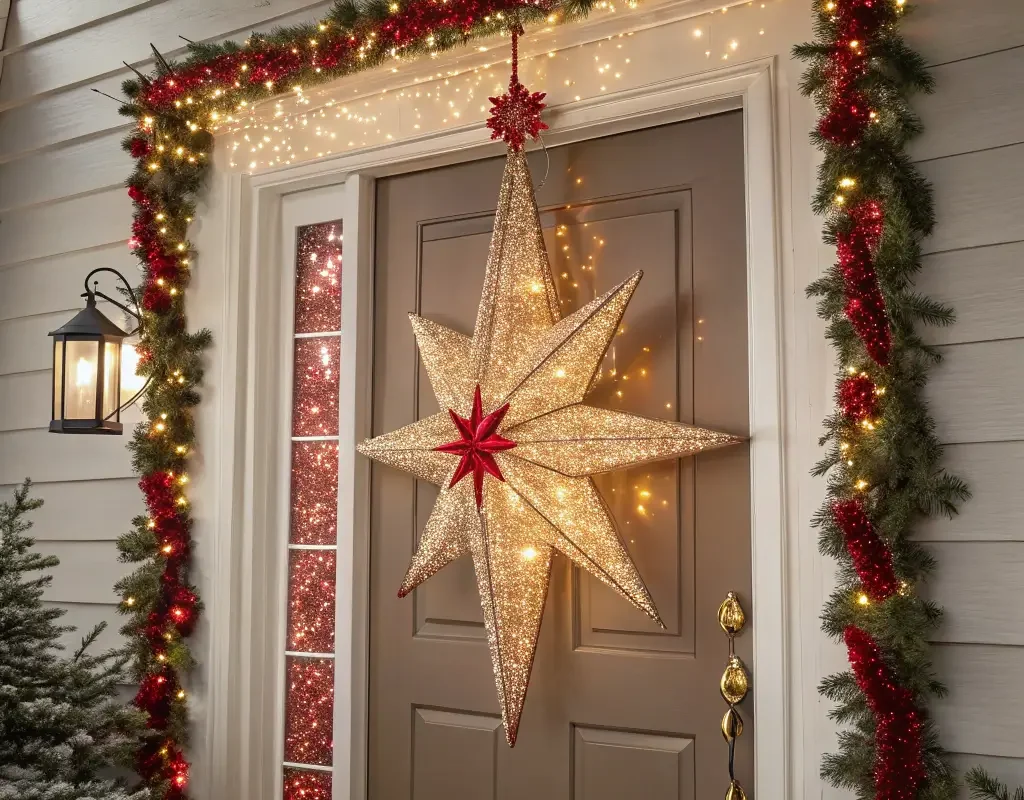
Want to make your entrance literally sparkle? Starburst decorations catch and reflect light in the most mesmerizing way, creating focal points that demand attention.
I discovered starburst decorations during a post-Christmas sale (best shopping day ever, BTW). What started as one impulse buy turned into a full-blown obsession with these geometric beauties.
Choosing Your Starburst Style
Options range from subtle to “visible from space”:
• Metallic finishes – Gold, silver, copper, or mixed metals
• Glitter-coated versions – Maximum sparkle factor
• LED-integrated designs – Built-in lighting for night impact
• Natural materials – Wood or rattan for rustic appeal
Size creates drama – go for at least 20 inches diameter for door hanging. Anything smaller gets lost unless you cluster multiple pieces together.
Installation and Arrangement
Hanging these beauties requires strategy:
Single statement piece: Center at eye level or slightly above for maximum impact. Use sturdy hanging hardware – these decorations catch wind like sails.
Cluster arrangement: Vary sizes from 8-24 inches, overlapping slightly for depth. Start with the largest piece and build around it. I use fishing line at different lengths to create a 3D effect.
Mixed media approach: Combine starbursts with other geometric shapes like orbs or diamonds. This creates visual complexity that keeps eyes moving across your display.
Weather-proofing tip: Spray with clear acrylic sealant before hanging outdoors. Glitter has this annoying habit of migrating everywhere without proper sealing.
Also Read: 15 Creative Traditional Christmas Decor Ideas for Holiday Magic
Holiday-Themed Door Signboard
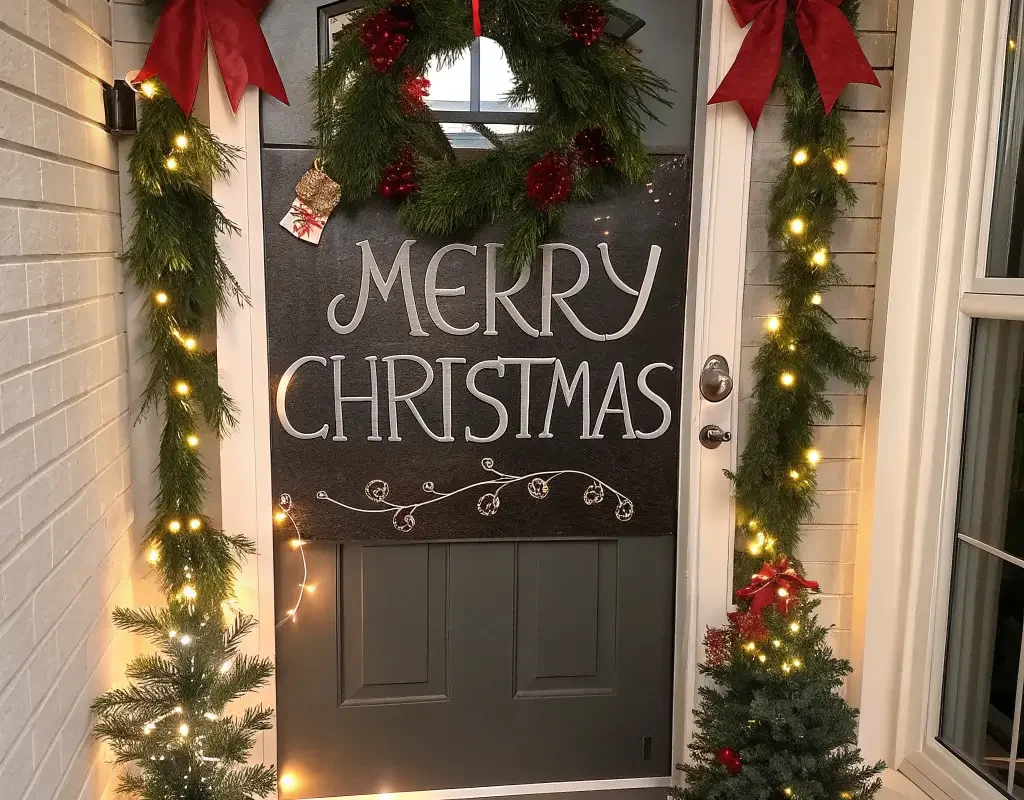
Sometimes words speak louder than decorations. A well-designed holiday signboard makes your message clear while adding personality to your entrance.
My first attempt at door signage involved a printer, laminator, and way too much confidence. Let’s just say paper doesn’t love winter weather. Now I know better, and you can learn from my soggy mistakes.
Sign Material Options
Choose based on your climate and commitment level:
• Wood signs – Classic, durable, reusable yearly
• Chalkboard signs – Changeable messages throughout season
• Metal signs – Weather-resistant and modern
• Canvas banners – Soft, safe for storm doors
DIY or buy? Both work! I’ve made signs using reclaimed wood and stencils (therapeutic and budget-friendly) and bought gorgeous ones from local artists. The key is choosing messages that reflect your family’s personality.
Message Ideas That Connect
Skip generic “Season’s Greetings” unless that truly speaks to you:
Playful options:
• “Santa, I can explain…”
• “Jingle all the way (inside for cookies)”
• “Elves welcome, Grinches tolerated”
Heartfelt choices:
• “Peace, Love, and Joy live here”
• “Grateful, Thankful, Blessed”
• “Home for the Holidays”
Interactive messages:
• “Ring twice for Christmas cheer”
• “Deliveries welcome, carolers encouraged”
Position signs where they’re easily readable but won’t block your peephole or doorbell. I hang mine slightly off-center at eye level – creates visual interest without sacrificing function.
Complementary Styling
Your signboard shouldn’t float alone in decoration space:
Frame with greenery – Small swags or garland pieces around sign edges
Add spotlight – Solar stake light aimed at sign for evening visibility
Coordinate colors – Match sign colors to other door decorations
Layer textures – Combine smooth signs with rough natural elements
Bringing It All Together
Creating magical front door Christmas decorations isn’t about perfection – it’s about expressing your holiday spirit in ways that make you smile every time you come home. Whether you go all-out with every idea or pick your favorites to focus on, the key is making it authentically yours.
Start with one or two elements and build from there. Maybe this year it’s just a gorgeous wreath and some lanterns. Next year, add the mini trees. Before you know it, you’ll have that house – the one everyone slows down to admire.
Remember, the best decorations create moments. They make delivery drivers smile, give neighbors conversation starters, and most importantly, welcome everyone who approaches with warmth and joy. That’s the real magic of holiday decorating.
Don’t stress about achieving Pinterest perfection. Some of my favorite decoration memories involve complete disasters that became family jokes. The crooked bow that wouldn’t stay put, the lights that only worked when you kicked the door just right, the snowflake that looked more like a spider – these imperfections become part of your holiday story.
Take time to enjoy the process. Pour some cocoa (or wine, no judgment), crank up the Christmas tunes, and have fun with it. After all, the holidays come once a year – might as well make your entrance absolutely unforgettable!
What matters most? Creating an entrance that makes you happy every single time you see it. Because at the end of the day, that joy radiates outward, touching everyone who passes by your magical, merry, perfectly imperfect Christmas door.