Ready to turn your kitchen into a Christmas wonderland without breaking the bank or losing your mind? Let me tell you, after years of trying every Pinterest-worthy decoration known to humanity, I’ve finally cracked the code on making your kitchen look festive without it looking like Santa’s workshop exploded in there.
Your kitchen deserves some holiday love too, and I’m about to show you exactly how to make it happen.
The kitchen remains the heart of every home during the holidays – it’s where the magic happens, from baking cookies to hosting impromptu gatherings.
So why not give it the festive treatment it deserves? Trust me, these ideas will have your guests asking for your decorator’s number (spoiler alert: it’s you!).
Table of Contents
- 1 Mini Christmas Tree on Counter
- 2 Festive Garland on Cabinets
- 3 Holiday-Themed Mason Jar Centerpieces
- 4 Christmas Cookie Display Stand
- 5 Hanging Ornament Mobile Above Island
- 6 Red and Green Dish Towels
- 7 Pinecone and Cinnamon Bowl Decor
- 8 LED String Lights Around Windows
- 9 Christmas Chalkboard Menu Sign
- 10 Candy Cane Utensil Holder
- 11 Snowflake Window Clings
- 12 Seasonal Wreath on Pantry Door
- 13 Bringing It All Together
Mini Christmas Tree on Counter
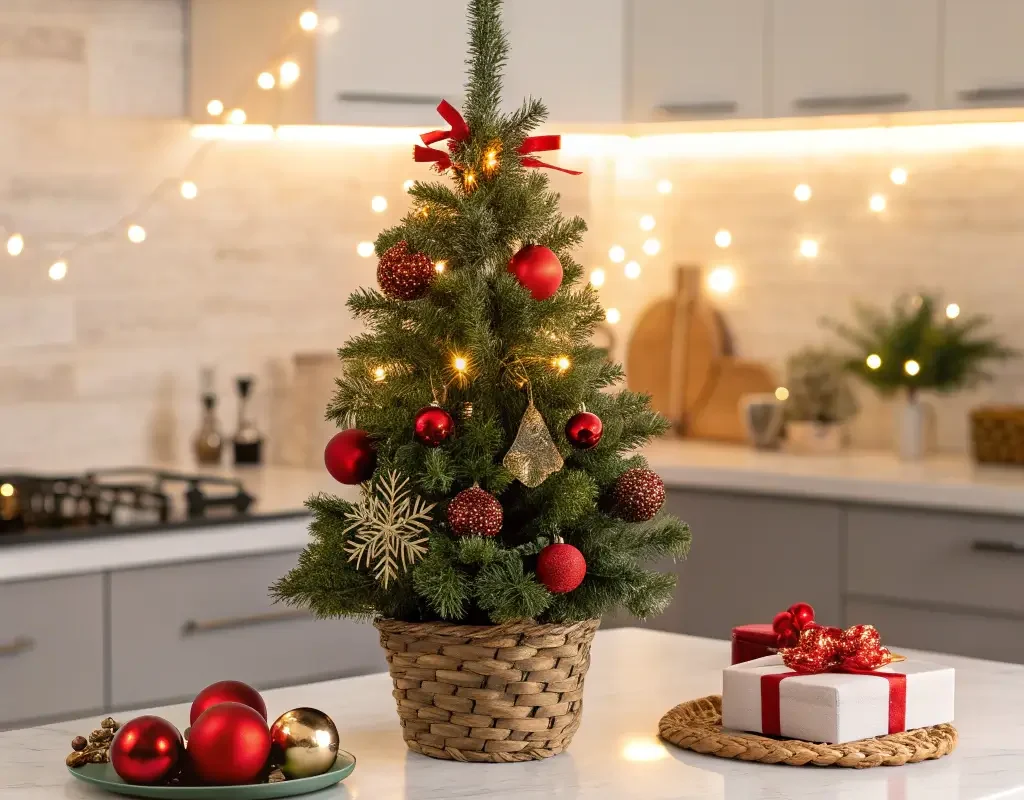
Nothing says “I’ve got my life together” quite like a perfectly placed mini Christmas tree on your kitchen counter. I discovered this trick three years ago when I couldn’t fit a full-sized tree in my tiny apartment, and now I can’t imagine December without my little kitchen companion.
You want to pick a tree that’s between 12-24 inches tall – anything bigger and you’ll be knocking it over every time you reach for the coffee maker. Have you ever tried making morning coffee while dodging pine needles? Not fun. Place it on a corner of your counter where it won’t interfere with your prep space but still catches the eye when someone walks in.
Here’s what makes a mini kitchen tree special:
- Battery-operated LED lights (because who needs another cord to trip over?)
- Miniature kitchen-themed ornaments like tiny spatulas, mixing bowls, or gingerbread cookies
- A simple burlap base or festive kitchen towel wrapped around the pot
- Edible decorations like popcorn garland or candy canes for that extra kitchen vibe
The best part? You can customize it to match your kitchen’s color scheme. Got a farmhouse kitchen? Go for rustic ornaments and twine. Modern minimalist? Silver and white decorations will do the trick. IMO, the key is keeping it proportional – don’t go overboard with massive ornaments on a tiny tree.
Placement Tips That Actually Work
I’ve learned the hard way that placement matters more than you think. Keep your mini tree away from the stove (obvious, but you’d be surprised), and position it where it won’t block your most-used appliances. The corner near your coffee station works brilliantly – it adds cheer to your morning routine without getting in the way.
Consider adding a timer to your lights so they automatically turn on during dinner prep. There’s something magical about cooking with a twinkling tree beside you. Just make sure you secure it properly if you have cats – learned that lesson the hard way when Mr. Whiskers decided to recreate his own version of Christmas Vacation.
Festive Garland on Cabinets
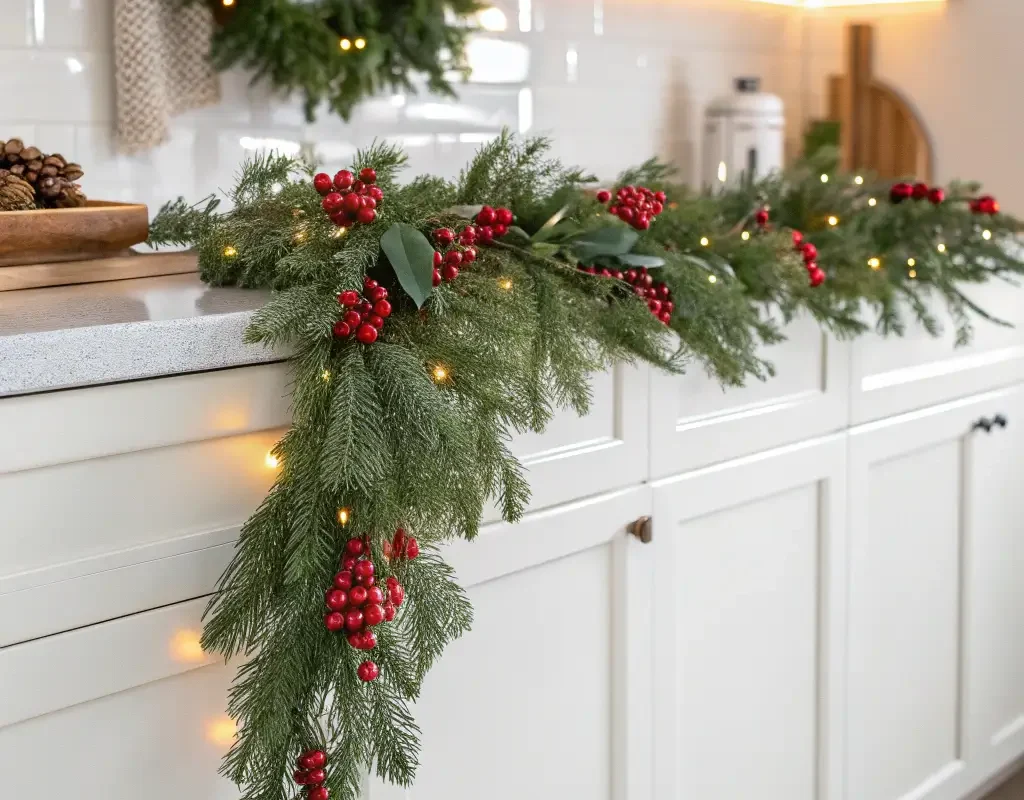
Let’s talk about the easiest transformation you can make to your kitchen – draping garland across your cabinet tops or along the edges. This single decoration changes the entire vibe of your space faster than you can say “jingle bells.”
I started doing this five years ago when I realized my kitchen looked sad compared to the rest of my decorated house. Now, people always comment on how cohesive and inviting my kitchen feels during the holidays. The trick is choosing the right type of garland for your space.
For upper cabinets with space between them and the ceiling, try this approach:
- Measure twice, buy once – seriously, measure your cabinet spans before shopping
- Choose garland with built-in lights for maximum impact with minimum effort
- Secure with removable adhesive hooks to avoid damage
- Add ribbon bows at each corner for that professional decorator look
Want to know what really makes garland pop? Layer it with additional elements. I weave in some battery-operated fairy lights (the warm white ones, not the harsh blue-white that makes your kitchen look like an operating room), and tuck in a few sparkly picks or small ornaments every 12 inches or so.
Making It Look Professional, Not Messy
The difference between Pinterest-perfect garland and “what happened here?” comes down to technique. Never let your garland sag in the middle – use clear Command strips every 18-24 inches to maintain that perfect swag. And please, for the love of all things festive, fluff your garland before hanging it. Nothing screams “last-minute decoration” like flat, compressed garland straight from storage.
If you’re working with open shelving, weave the garland between your dishes and glassware. Creates this gorgeous, lived-in holiday look that suggests you casually wake up this festive every day. (We both know you spent an hour arranging it, but they don’t need to know that.)
Holiday-Themed Mason Jar Centerpieces
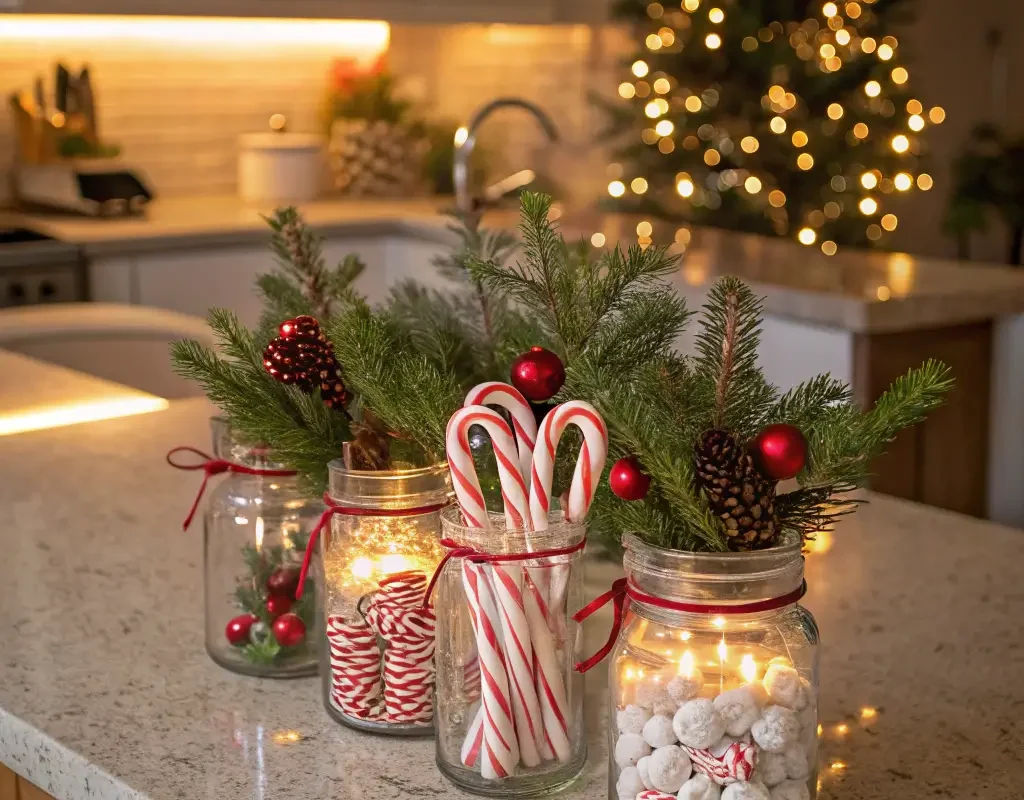
Mason jars have become the Swiss Army knife of decorating, and Christmas is their time to shine. I’ve probably created dozens of different versions over the years, and they never fail to impress – plus, they cost practically nothing to make.
The beauty of mason jar centerpieces lies in their versatility. You can create an entire collection using stuff you probably already have lying around. Ever noticed how everything looks more expensive in a mason jar? It’s like magic 🙂
Here are my go-to mason jar fills that actually look good:
- Cranberries and floating candles with water and a sprig of rosemary
- Epsom salt “snow” with battery tea lights for a snowy lantern effect
- Candy canes arranged in a pattern with ribbon tied around the rim
- Pine branches and red berries with twine and a jingle bell accent
Creating Different Heights for Visual Interest
Don’t make the rookie mistake of using jars that are all the same size. Mix it up with varying heights – use everything from tiny jelly jars to those massive half-gallon ones. Arrange them in odd numbers (groups of three or five work best) and place them on a festive runner or wooden tray.
Want to really blow minds? Create a tiered display using cake stands or even just books wrapped in brown paper. Layer your mason jars at different levels, and suddenly you’ve got a centerpiece that looks like you hired a professional decorator.
Also Read: 15 Amazing Christmas Room Decor Ideas and Decorative Magic
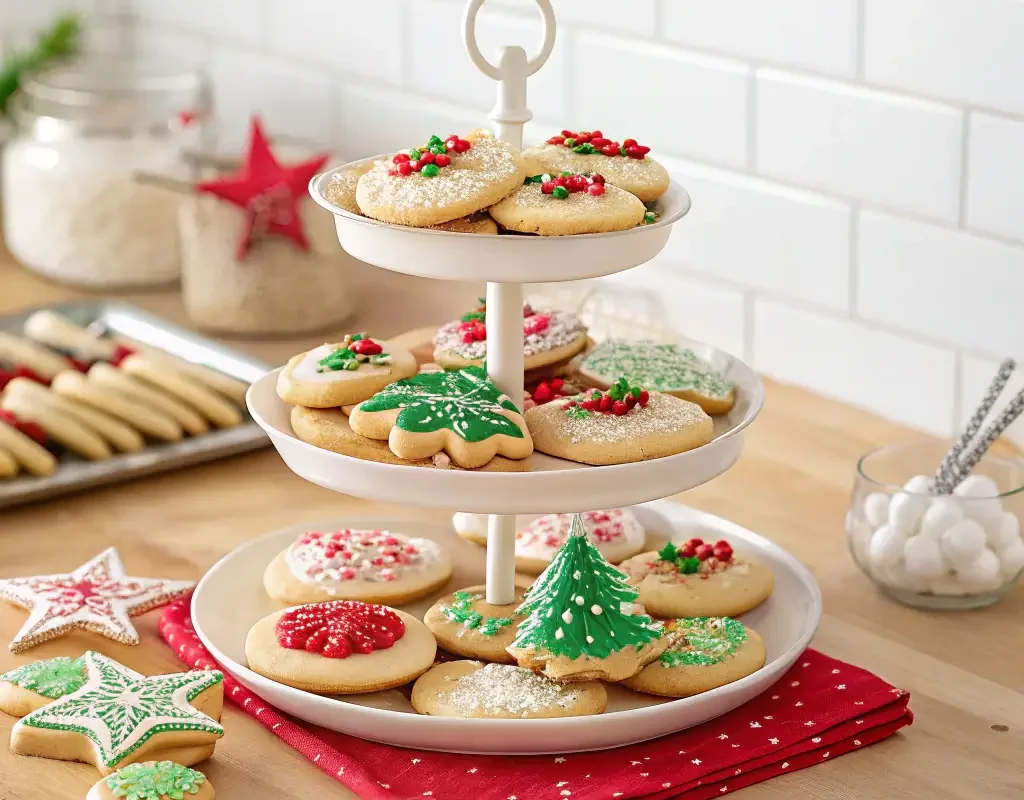
Nothing says “welcome to my festive kitchen” quite like a gorgeous display of Christmas cookies that doubles as decoration and dessert. This idea kills two birds with one stone – you get stunning décor and convenient snack access.
I discovered the power of the cookie display stand during a particularly chaotic holiday party three years ago. Guests kept asking where the desserts were, and I kept pointing to various plates scattered around. Now? Everything goes on one show-stopping display, and people literally gasp when they see it.
The key elements for a killer cookie display:
- A tiered stand (glass, wood, or metal – whatever matches your kitchen)
- Parchment paper doilies for that bakery-fresh look
- Mix of cookie types for visual variety and dietary options
- Small signs or labels identifying each type (especially important for allergies)
- Strategic height variation using cake pedestals or even sturdy boxes
Here’s the million-dollar question everyone asks: how do you keep the cookies fresh? Rotate them daily if you’re using the display long-term. Cover the entire stand with a clear cake dome when not actively showing it off. And here’s my secret weapon – use fake cookies on the bottom tiers and real ones only on top where people actually reach.
For parties, I set up the display about an hour before guests arrive. Any earlier and you risk stale cookies or worse – family members treating it like a free-for-all buffet. Place it on your kitchen island or a side counter where it’s accessible but not in the way of food prep.
Hanging Ornament Mobile Above Island
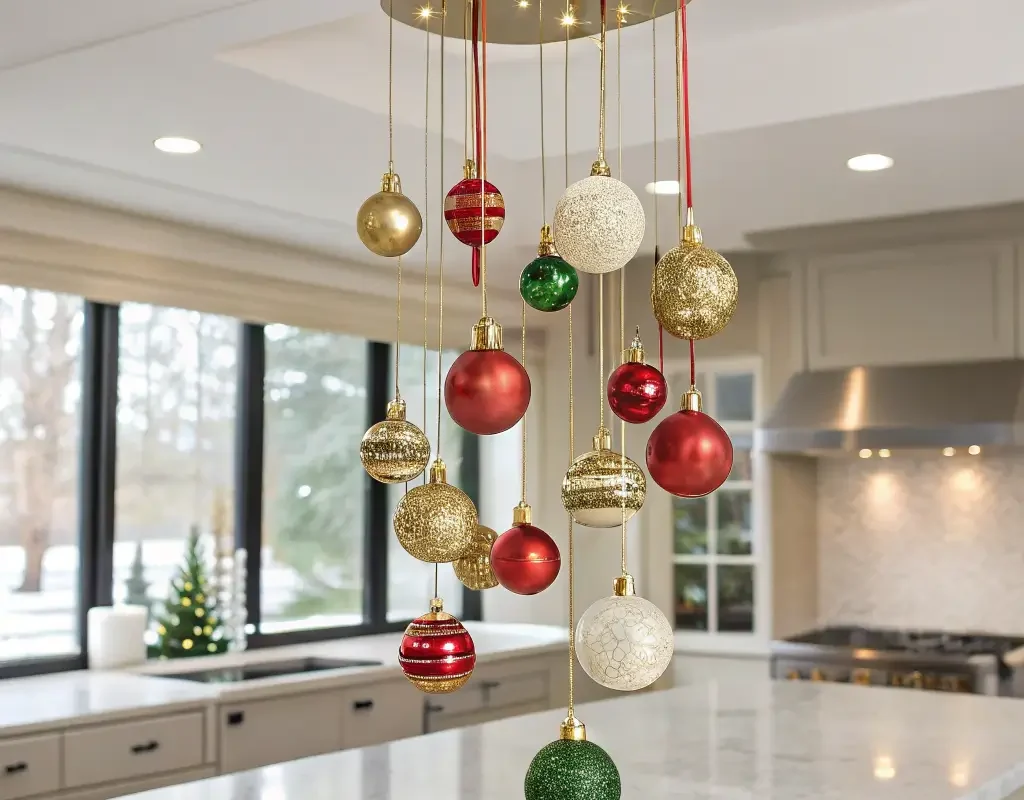
Ever looked up at that empty space above your kitchen island and thought, “What a waste of prime decorating real estate”? Me too. That’s why I started creating hanging ornament mobiles that transform that dead space into a festive focal point.
This decoration works especially well if you already have a light fixture or pot rack above your island. You can work around existing fixtures or, if you’re lucky enough to have open space, create your own hanging system using removable ceiling hooks.
Here’s what you need for a stunning mobile:
- Fishing line or clear thread (invisible support is key)
- Varied ornament sizes from 2-6 inches diameter
- Different hanging lengths for dynamic movement
- Lightweight materials (no vintage glass heirlooms please!)
- A sturdy base like an embroidery hoop or wire wreath form
I learned the hard way that weight distribution matters. My first attempt looked beautiful for exactly three minutes before tilting dramatically to one side. Now I always test the balance before committing to the final arrangement.
Making It Kitchen-Appropriate
Remember, this is hanging over a food prep area, so choose ornaments wisely. Shatterproof is non-negotiable – trust someone who’s fished ornament shards out of cookie dough. Stick with materials that can be easily cleaned if needed, and avoid anything with loose glitter that might snow down onto your meals.
The height is crucial too. Hang it high enough that tall people won’t bonk their heads, but low enough to actually see and enjoy. Generally, 8-10 feet from the floor to the lowest ornament works perfectly. Any lower and it becomes a hazard; any higher and it might as well not exist.
Red and Green Dish Towels

Sometimes the simplest decorations make the biggest impact, and festive dish towels prove this point perfectly. You’re going to use dish towels anyway, so why not make them work double-duty as decoration?
I used to think holiday dish towels were pointless – until I realized they tie the whole kitchen together like nothing else can. They’re functional art that actually serves a purpose beyond looking pretty. Plus, unlike that garland you’ll take down in January, you can use festive towels all winter long.
The strategic placement guide:
- Oven handle – the most visible spot, choose your best design here
- Sink area – layer 2-3 coordinating patterns for depth
- Island bar stools – drape one over each seat back
- Open shelving displays – fold and stack with regular towels for color pops
Beyond Basic Red and Green
While red and green are classic, don’t limit yourself. Metallic accents, winter whites, or even playful patterns with reindeer and snowmen can work beautifully. The key is consistency – pick a theme and stick with it throughout your kitchen.
FYI, quality matters here more than you might think. Cheap holiday towels that don’t actually dry anything defeat the purpose. Invest in good quality cotton or linen that happens to have festive patterns. They’ll last for years and actually work when you need them to.
I’ve found that having two sets in rotation keeps things fresh and clean throughout the season. Nobody wants to cook Christmas dinner with towels that look like they’ve been through a food fight.
Also Read: 15 Creative Traditional Christmas Decor Ideas for Holiday Magic
Pinecone and Cinnamon Bowl Decor
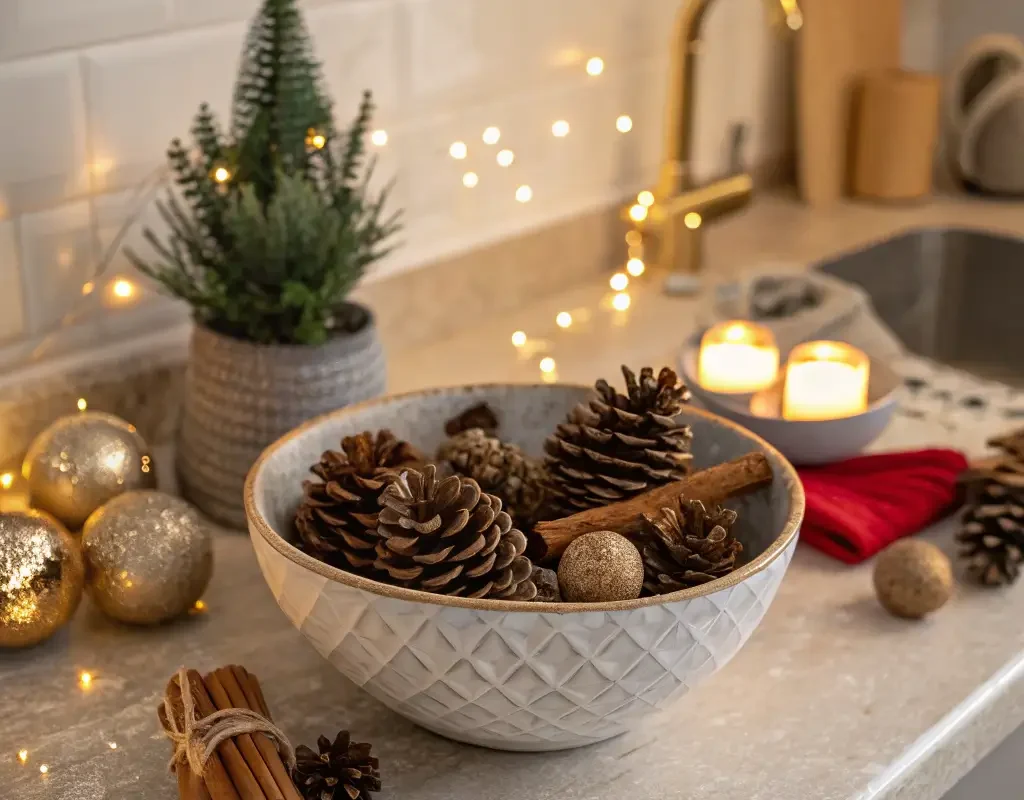
Want your kitchen to smell like Christmas while looking absolutely gorgeous? Enter the pinecone and cinnamon bowl – the decoration that engages multiple senses and costs almost nothing to create.
I stumbled upon this idea during a walk when I found myself collecting pinecones like some sort of festive squirrel. Combined with cinnamon sticks from the spice aisle, you’ve got instant holiday ambiance that actually makes your kitchen smell like you’ve been baking all day (even when you’ve been ordering takeout).
Creating the perfect aromatic display:
- Large wooden or ceramic bowl as your base
- Various sized pinecones for texture
- Whole cinnamon sticks bundled with twine
- Dried orange slices for color and additional scent
- Star anise for visual interest and spice
- A few drops of essential oil (pine or cinnamon) to refresh the scent
Keeping It Fresh and Pest-Free
Before you bring those pinecones inside, bake them at 200°F for 30 minutes. This kills any bugs and opens them up beautifully. Nobody wants surprise visitors crawling out of their festive display – learned that nightmare the hard way.
Position your bowl somewhere with good air circulation to spread the scent. The kitchen island or open shelving works perfectly. Just keep it away from heat sources that might make the essential oils evaporate too quickly.
Pro tip: refresh the scent weekly with a few drops of essential oil or by gently crushing one of the cinnamon sticks to release more fragrance. Your kitchen will smell like the holidays without the work of actually baking.
LED String Lights Around Windows
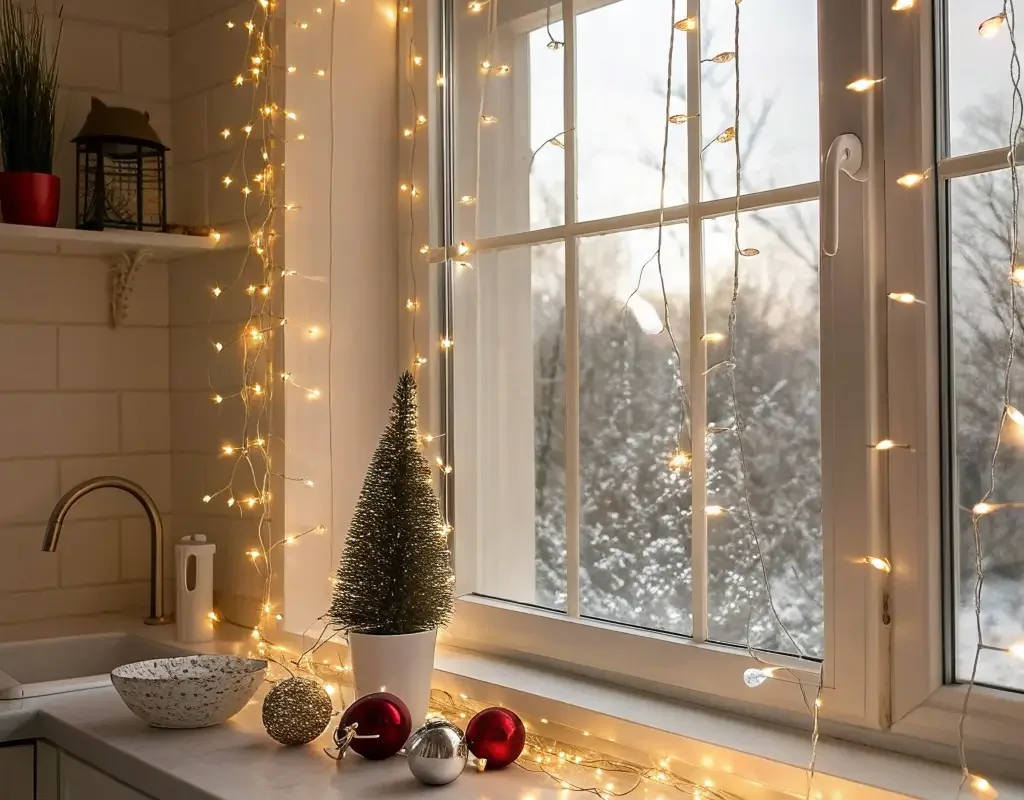
Kitchen windows often get forgotten in the decoration department, but they’re prime real estate for creating ambiance. LED string lights around windows create this warm, welcoming glow that makes your kitchen feel like a cozy winter hideaway.
I started doing this when I realized my kitchen felt dark and gloomy during those short winter days. Now, those twinkling lights make even doing dishes feel festive. Is that weird? Maybe. Do I care? Absolutely not.
The best lighting strategies:
- Warm white LEDs over cool white (unless you want your kitchen to look like a hospital)
- Battery-operated options for windows far from outlets
- Timer functions so they turn on automatically at dusk
- Waterproof varieties for windows near the sink
- Dimmable options for versatility
Installation Without Damage
The trick to professional-looking window lights is invisible installation. Use clear removable clips designed for outdoor lights – they work perfectly indoors and won’t damage your window frames or paint. Space them evenly, about 6-8 inches apart, for that perfect drape.
Create different patterns for visual interest. Try swagging the lights for a classic look, or go geometric with straight lines for a modern vibe. You can even create shapes like stars or trees if you’re feeling ambitious.
Don’t forget about under-cabinet lighting while you’re at it. Adding LED strips under your cabinets during the holidays creates this amazing layered lighting effect that makes your whole kitchen glow.
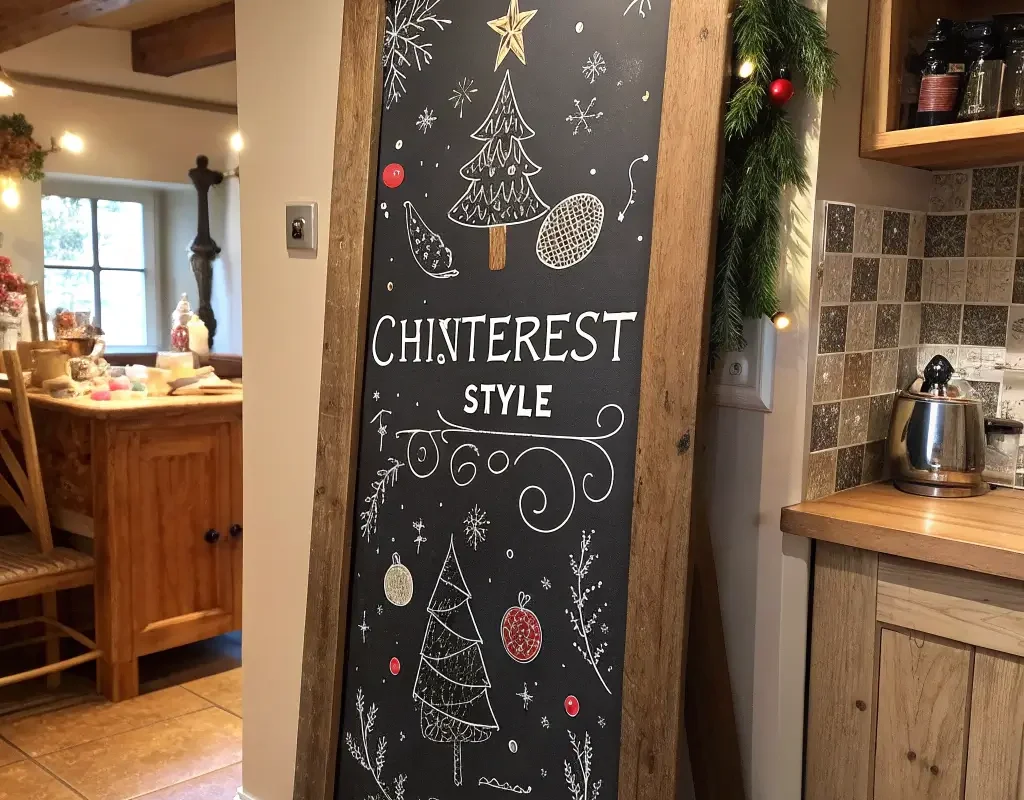
A festive chalkboard menu adds personality and function to your holiday kitchen. Whether you’re planning Christmas dinner or just want to add some whimsy to your daily meals, this decoration pulls serious double duty.
I got into chalkboard signs after attending a party where the host had the entire evening’s menu beautifully written out. Guests knew what to expect, dietary restrictions were clearly marked, and it looked absolutely stunning. Now I can’t imagine entertaining without one.
Making your chalkboard shine:
- Choose the right size – big enough to read but not overwhelming
- Practice your lettering on paper first (trust me on this)
- Use chalk markers for cleaner lines and vibrant colors
- Create borders with holiday doodles like holly or snowflakes
- Include fun headers like “Santa’s Kitchen” or “Christmas Countdown”
Don’t limit yourself to just dinner menus. Use your chalkboard for cookie decorating schedules, hot chocolate bar ingredients, or even a countdown to Christmas. Change it weekly to keep things fresh and give yourself a reason to practice those hand-lettering skills.
Position it where people naturally look – near the coffee station for morning inspiration, or by the entrance to welcome guests. Make sure it’s at eye level and well-lit so people actually read it.
Also Read: 10 Charming Christmas Kitchen Ideas to Delight Everyone
Candy Cane Utensil Holder

Transform your everyday utensil holder into a festive conversation piece with some strategic candy cane action. This idea is so simple it almost feels like cheating, but the impact is surprisingly significant.
Here’s the thing – you need your cooking utensils accessible, but who says functional can’t be festive? I discovered this trick when I accidentally dropped a candy cane in my utensil crock and thought, “Hey, that actually looks pretty good.”
Creating the perfect candy cane display:
- Use a wide-mouth container (mason jars, ceramic crocks, or even tin cans work)
- Layer candy canes around the inside edge facing outward
- Secure with a ribbon around the outside for stability
- Mix in some greenery like small spruce sprigs for texture
- Add battery tea lights in the center for evening glow
Making It Last the Season
Real candy canes can get sticky and gross, especially near the stove. Consider using plastic candy canes for longevity, or wrap real ones in cellophane to protect them from kitchen humidity. Nobody wants peppermint-flavored pasta because your candy canes melted onto your wooden spoons :/
You can also create multiple holders for different purposes – one for cooking utensils, another for bar tools if you’re hosting parties. Coordinate the ribbon colors with your other kitchen decorations for that pulled-together look.
Snowflake Window Clings
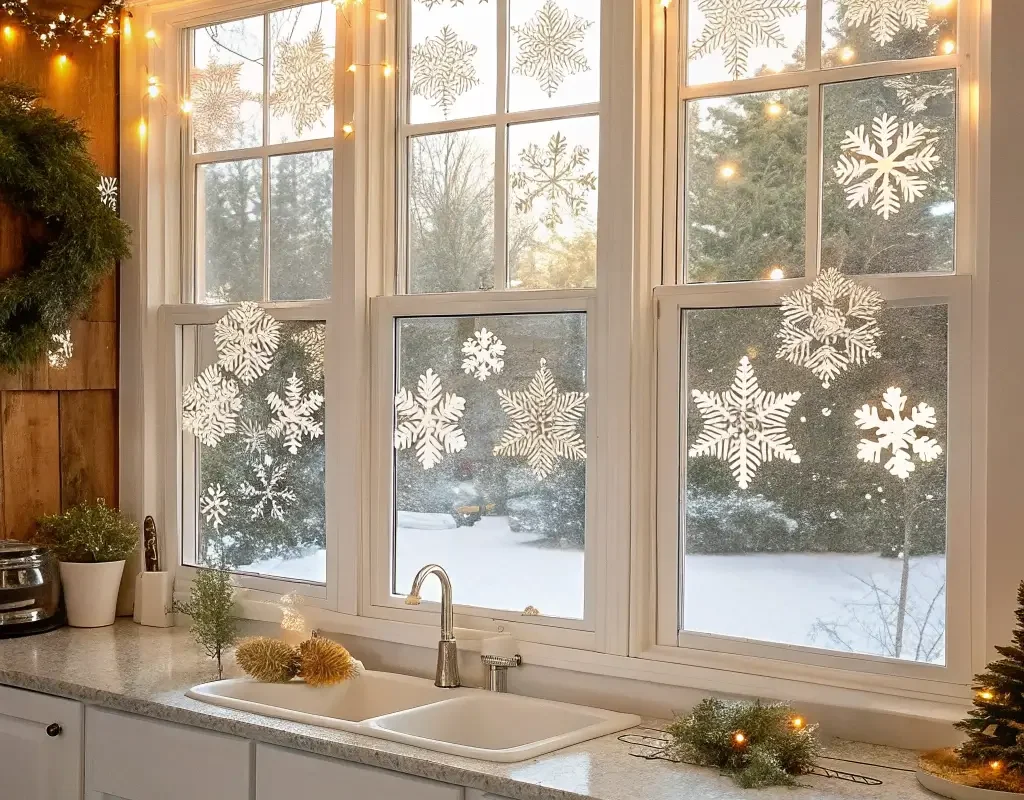
Window clings might remind you of elementary school classrooms, but modern versions have seriously upped their sophistication game. The right snowflake clings can make your kitchen windows look like frozen works of art.
I was skeptical about window clings until I found some elegant, detailed designs that looked more like etched glass than stickers. Now they’re my go-to for adding festive flair without any commitment or damage. Plus, they’re perfect for renters who can’t make permanent changes.
Selecting and arranging clings effectively:
- Vary the sizes from tiny 1-inch accents to statement 8-inch pieces
- Create patterns that flow naturally, like snow drifting across the glass
- Mix styles – combine geometric modern snowflakes with traditional designs
- Consider placement carefully – eye level for maximum impact
- Clean windows first (obvious but crucial for proper adhesion)
Design Strategies That Work
Avoid the kindergarten look by clustering clings asymmetrically rather than spacing them evenly. Nature doesn’t do perfect patterns, and neither should your snowflake arrangement. Start with larger pieces as anchors, then fill in with smaller ones for movement.
Think about what you see from outside too. Your kitchen window decorations are visible from your yard or street, making them part of your home’s overall holiday curb appeal. Light them from inside at night for a magical effect that neighbors will love.
Seasonal Wreath on Pantry Door
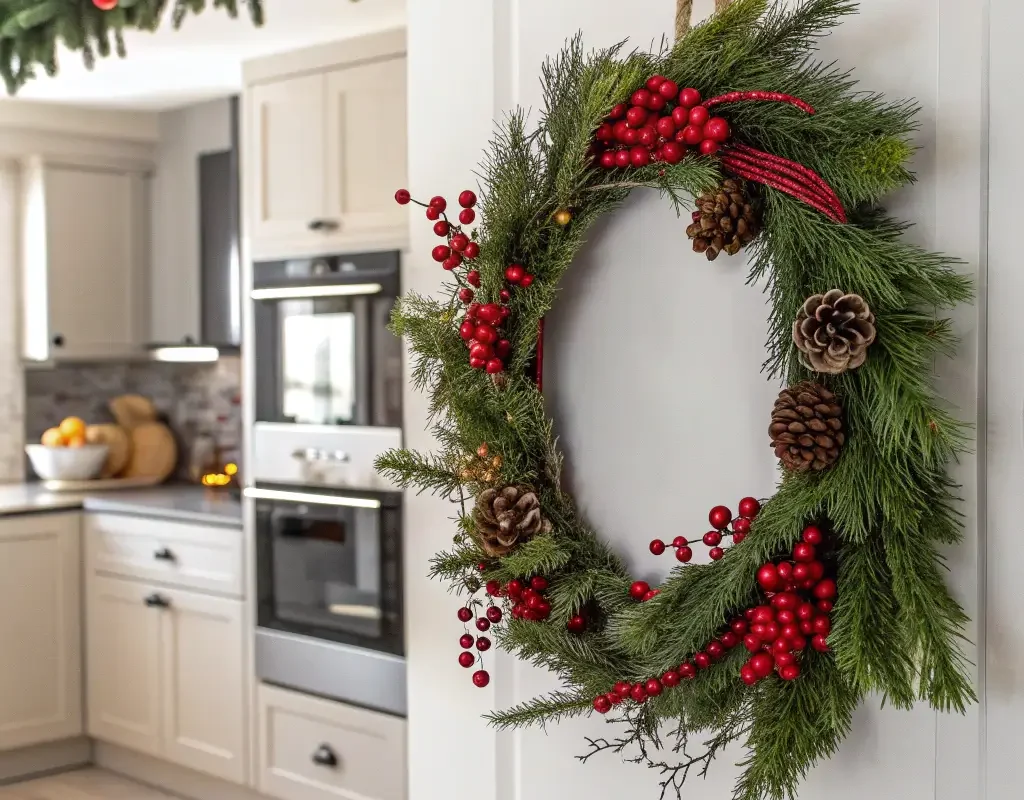
That pantry door you walk past twenty times a day? It’s begging for a festive wreath to mark the season. This often-overlooked spot is perfect for adding holiday cheer without cluttering your counters or work spaces.
A kitchen-appropriate wreath differs from your front door version. It needs to be flatter, lighter, and more subtle since you’re opening that door constantly. I learned this after my first pantry wreath got squished beyond recognition within a week.
Creating the perfect pantry wreath:
- Choose a 12-16 inch diameter for standard doors
- Opt for artificial materials that won’t shed or wilt
- Include kitchen-themed elements like mini rolling pins, cookie cutters, or dried oranges
- Keep it relatively flat – no more than 3 inches deep
- Use an over-door hanger to avoid holes in your door
Making It Special
Personalize your pantry wreath to reflect your kitchen’s personality. Love baking? Incorporate mini whisks and measuring spoons. Wine enthusiast? Add some cork accents and artificial grapes. The goal is creating something that feels intentional, not just slapped up for the sake of decoration.
Consider making it interactive – attach a small chalkboard sign that you can update with messages like “Cookie Central” or “Santa’s Snack Stash.” Kids especially love these little touches that make the kitchen feel magical.
Bringing It All Together
After years of decorating (and redecorating) my kitchen for the holidays, I’ve learned that the best decorated kitchen is one that still functions. Every single one of these ideas can be adjusted to fit your space, style, and sanity level.
You don’t need to implement all twelve ideas – even just three or four will transform your kitchen into a festive wonderland. Start with the ones that excite you most, and build from there. Remember, the goal is creating a space that makes you smile every time you walk in, not winning a decorating competition.
The magic of kitchen Christmas decorations lies in their ability to make ordinary moments feel special. That morning coffee tastes better under twinkling lights. Washing dishes becomes less of a chore when you’re looking at snowflakes on the window. Even reheating leftovers feels festive when your kitchen looks this good.
So go ahead, pick your favorites from this list and give your kitchen the holiday treatment it deserves. Your family will thank you, your guests will be impressed, and most importantly, you’ll have created a warm, welcoming space that embodies everything the season is about.
Who knows? You might even find yourself volunteering to host Christmas dinner this year. (Okay, let’s not get too crazy.)
Happy decorating, and may your kitchen be merry and bright!