Okay, let’s be real for a second – who says Christmas has to be all red and green? If you’re scrolling through Pinterest right now (guilty as charged!), you’ve probably noticed that blue Christmas decor is having a major moment. And honestly? I’m here for it.
Last year, I completely ditched my traditional decorations and went full-on blue theme. My mother-in-law raised an eyebrow, but when she saw the final result, even she admitted it looked like something straight out of a magazine spread.
The cool, serene vibes of blue Christmas decorations transform your space into this elegant winter wonderland that feels both festive and fresh.
So if you’re ready to break free from the holiday color rulebook and create something that’ll make your Instagram followers stop mid-scroll, you’ve come to the right place.
Let’s talk about 10 stunning blue Christmas decor ideas that’ll have everyone asking where you hired your decorator (spoiler alert: you won’t need one).
Table of Contents
- 1 Frosty Blue Winter Wonderland Tree
- 2 Midnight Blue & Silver Mantel Magic
- 3 Icy Blue Outdoor Holiday Display
- 4 Blue Ombre Christmas Wreath
- 5 Coastal Blue Nautical Holiday Decor
- 6 Sparkling Blue Glass Ornament DIY
- 7 Blue Velvet Ribbon Gift Wrapping
- 8 Frozen Blue Table Setting Elegance
- 9 Blue Pinecone Garland Charm
- 10 Soft Blue Fairy Light Corners
- 11 Wrapping It All Up
Frosty Blue Winter Wonderland Tree
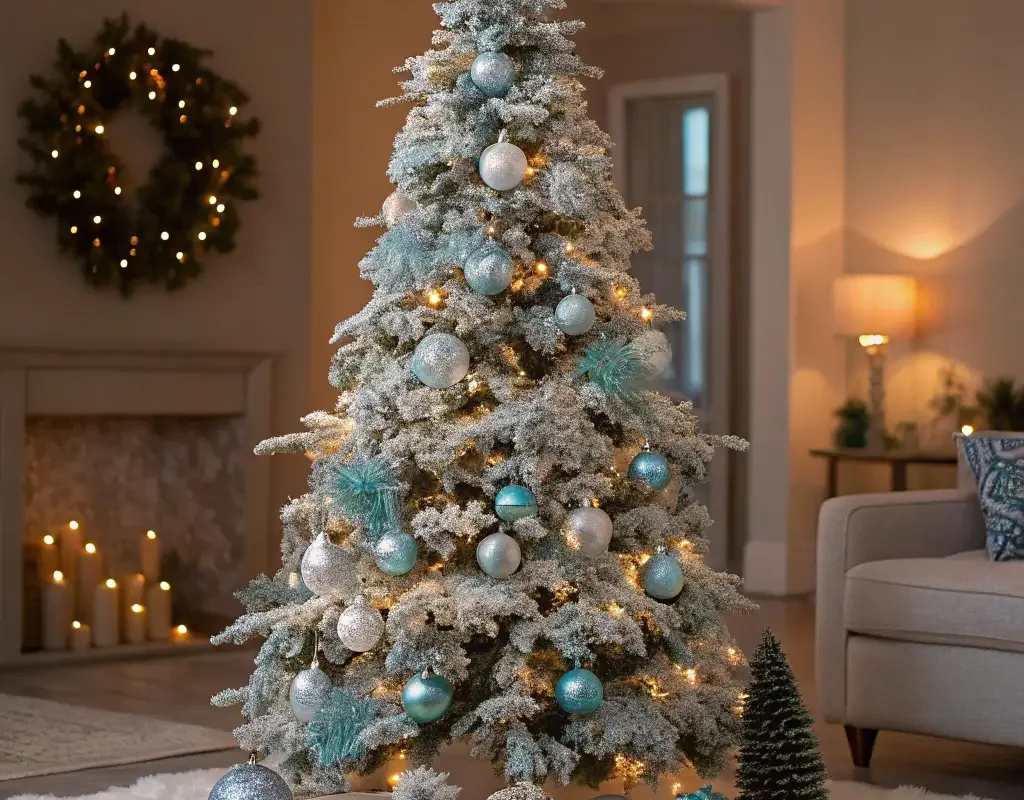
You know that feeling when you walk into a room and the Christmas tree just takes your breath away? That’s exactly what a frosty blue winter wonderland tree does. I’m talking about creating a showstopper that looks like Jack Frost himself decorated it.
Start with your tree choice – and here’s where I get a bit controversial. Skip the traditional green tree and go for a white or silver artificial tree as your base. Trust me on this one. The white backdrop makes those blue ornaments pop like crazy, creating this ethereal, magical effect that green trees just can’t match.
Choosing Your Blue Palette
When I decorated my first blue tree, I made the rookie mistake of using every shade of blue I could find. Big mistake. The key here is sticking to 2-3 shades maximum:
- Light icy blue for that frozen effect
- Medium powder blue for depth
- Deep navy for contrast and sophistication
Mix in some silver and white ornaments to break things up. Think snowflakes, icicles, and those gorgeous mercury glass baubles that catch the light just right.
Layering Techniques That Work
Here’s my secret formula for tree decorating that nobody talks about:
- Start with lights – go for cool white or blue-tinted LED lights
- Add ribbon or garland – a sheer blue organza ribbon woven through the branches creates amazing depth
- Place your largest ornaments first – these anchor your design
- Fill in with medium ornaments – vary the depths, don’t just hang everything on the tips
- Finish with small accents – tiny snowflakes, mini bells, whatever adds that final sparkle
Remember to step back every few minutes and check your progress. Is one area looking too heavy? Move things around! There’s no tree decorating police here 🙂
Midnight Blue & Silver Mantel Magic
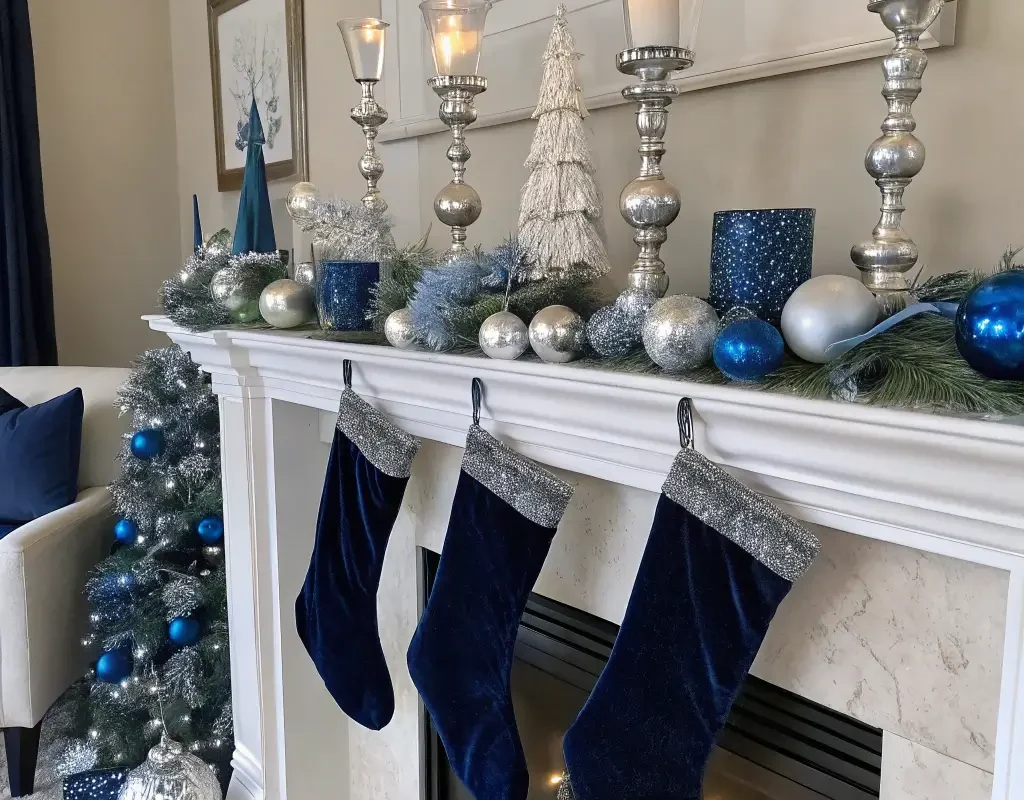
Your mantel is basically the stage for your holiday performance, and midnight blue paired with silver creates drama that would make Broadway jealous. This combination screams sophistication while still feeling festive.
I learned this the hard way, but your mantel decoration needs to complement your room, not compete with it. If you’ve got busy wallpaper or lots of patterns already, keep the mantel simpler. But if your walls are neutral? Girl, go wild!
Building Your Base Layer
Start with a lush garland as your foundation. Here’s what works beautifully:
- Silver-dusted pine garland with blue berries
- Eucalyptus garland spray-painted with light blue accents
- Mixed metallic garland combining silver tinsel with blue ribbon
Drape it naturally – none of that stiff, perfectly symmetrical nonsense. Real elegance has movement and flow. Let some pieces hang lower than others. Create visual interest by clustering decorations in odd numbers (designer trick alert!).
Adding the Wow Factor
Now for the fun part – the accessories that make people stop and stare:
- Midnight blue pillar candles in varying heights
- Silver mercury glass votives for that vintage glamour
- Blue glass ornaments scattered throughout
- Miniature silver trees for height variation
- Battery-operated fairy lights woven through everything
Pro tip: Add a large statement piece off-center – maybe a silver starburst or an oversized blue glass ornament. This creates a focal point that draws the eye and prevents that “everything’s the same size” boredom.
Icy Blue Outdoor Holiday Display

Why should the inside of your house have all the fun? Your outdoor holiday display sets the tone before anyone even rings the doorbell. And blue outdoor decorations? They’re absolutely magical against snow (or even without it, let’s be honest).
The trick with outdoor decorating is weatherproofing without sacrificing style. Nobody wants to see your beautiful display looking sad and droopy after the first winter storm.
Front Door Drama
Your front door is prime real estate for making a statement. Here’s how I tackle mine:
Double up on wreaths – hang a large blue and silver wreath on the door, then add a smaller coordinating one on each side window. This creates a cohesive look that feels intentional, not random.
Frame your entrance with blue LED rope lights. They’re weather-resistant and create this cool, otherworldly glow that regular white lights just can’t match. Wrap them around columns, door frames, or porch railings.
Yard Display Elements
Want to know what really makes neighbors slow down when they drive by?
- Light-up blue topiaries flanking your entrance
- Silver and blue ornament balls in outdoor planters
- Blue-tinted spotlight aimed at your house numbers or a feature tree
- Oversized blue bow on your mailbox (waterproof ribbon, FYI!)
- Pathway markers with blue LED stakes
Don’t forget about your existing landscaping! Wrap blue net lights over shrubs for instant impact. It’s way easier than individual string lights and looks super professional.
Also Read: 15 Elegant Christmas Bathroom Decor Ideas for Sparkling Style
Blue Ombre Christmas Wreath
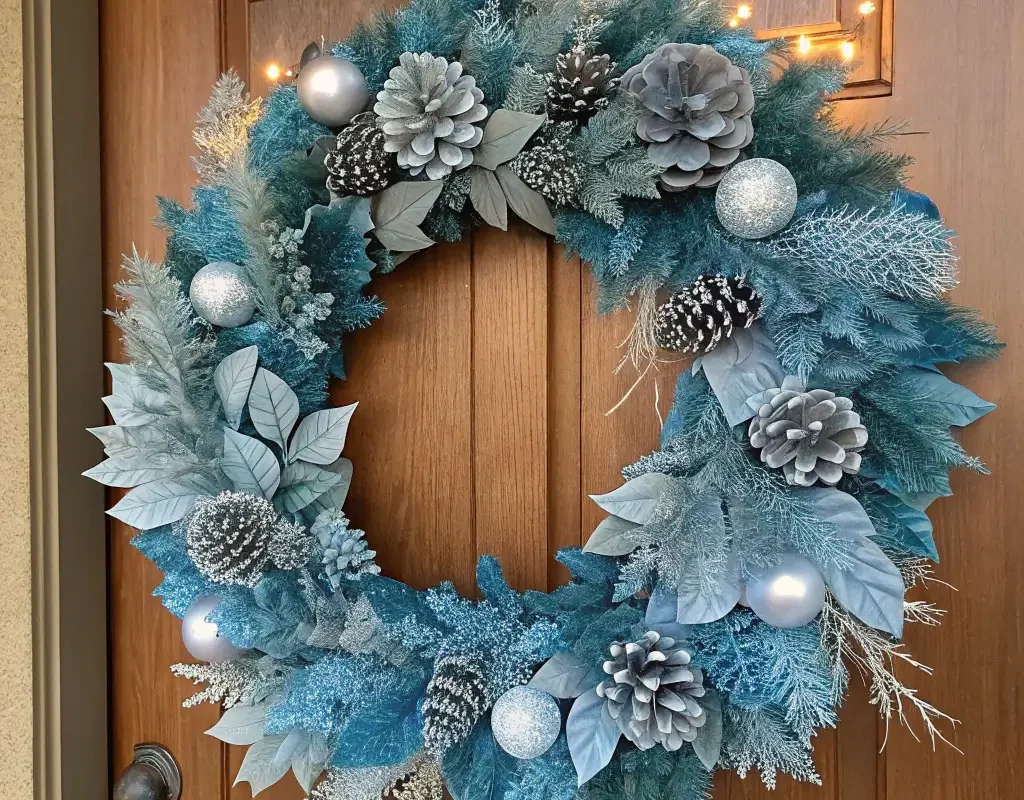
Okay, can we talk about how ombre everything took over Pinterest? But here’s the thing – when it comes to Christmas wreaths, the ombre effect actually works brilliantly. A blue ombre wreath looks like an expensive custom piece, but I’m about to show you how ridiculously easy it is to make.
Last year, I made three of these beauties – one for myself and two as gifts. Everyone thought I’d spent a fortune at some fancy boutique. Nope! Total cost? Under $30 each.
Choosing Your Blues
The secret to a stunning ombre effect is having at least 4-5 shades of blue. Here’s my go-to gradient:
- White or barely-there blue at the top
- Pale sky blue
- Classic powder blue
- Rich royal blue
- Deep navy at the bottom
You can achieve this with ornaments, ribbons, flowers, or even painted pinecones. Mix textures for extra interest – combine matte and shiny finishes for that professional look.
Assembly Tips That Actually Matter
Start with a foam or grapevine wreath form. Foam is easier for beginners because you can just stick things in, but grapevine gives that rustic charm if that’s your vibe.
Work in sections, not randomly all over. This keeps your gradient clean and intentional. Start at the top with your lightest shade and gradually work your way down. Overlap sections slightly so there’s no harsh line between colors.
Here’s the game-changer: add metallic accents throughout. Silver picks, glittered branches, or crystal sprays tie the whole thing together and make it sparkle. Because what’s Christmas without a little sparkle, right?
Coastal Blue Nautical Holiday Decor

Who says beach vibes can’t be Christmassy? Coastal blue nautical holiday decor brings that relaxed, beachy feel to the festive season. It’s perfect if you live near the coast, obviously, but also if you just want something different from the typical winter woodland theme.
I discovered this style when visiting my sister in Florida. Seeing Christmas decorations mixed with seashells and starfish felt weird at first, but then it just… worked. Now I incorporate coastal elements even in my landlocked home.
Key Coastal Elements
The beauty of nautical Christmas decor lies in combining traditional holiday elements with beach-inspired pieces:
- Starfish ornaments painted in metallic blue
- Glass fishing floats in various shades of blue
- Rope-wrapped candleholders
- Driftwood garland with blue ribbon
- Sand dollar ornaments with silver glitter edges
- Miniature sailboats with tiny blue sails
Don’t go overboard though (pun totally intended). You want “elegant coastal Christmas,” not “beach gift shop exploded in my living room.”
Color Coordination Magic
Stick to a crisp color palette:
- Navy blue (your anchor color – see what I did there?)
- Seafoam or aqua accents
- Crisp white for contrast
- Natural rope and wood tones
- Touches of silver for sparkle
This combination feels fresh and sophisticated. Add some white coral pieces or bleached shells for texture. The contrast between rough natural elements and smooth glass ornaments creates visual interest that keeps people looking.
Sparkling Blue Glass Ornament DIY

Ready for a project that’ll make you feel like a crafting genius? DIY blue glass ornaments are surprisingly simple and look absolutely stunning. Plus, you can customize them exactly to your color scheme.
I started making these after seeing similar ones in a high-end store for $15 EACH. Um, no thanks. Mine cost about $2 per ornament and honestly look better because I made them exactly how I wanted.
Materials You Actually Need
Skip the complicated craft store lists. Here’s what really matters:
- Clear glass ball ornaments (buy in bulk online)
- Blue alcohol ink or acrylic paint thinned with water
- Fine glitter in blue and silver
- Floor polish (trust me on this one – creates that mercury glass effect)
- Metallic paint pens for details
The Technique That Works Every Time
Pour a small amount of paint or ink inside the ornament and swirl it around. The key is not covering everything – leave some clear spots for depth. While it’s still wet, add a pinch of fine glitter and swirl again.
For that expensive mercury glass look, spray the inside with water, add a tiny bit of floor polish, swirl, then immediately add silver paint. The reaction creates that mottled, vintage effect that people pay big bucks for.
Let them dry completely (overnight is best), then use metallic paint pens to add details on the outside – dots, swirls, snowflakes, whatever speaks to you. These personal touches make them feel special and intentional.
Also Read: 15 Trendy Outdoor Christmas Decorations Yard Ideas for 2025
Blue Velvet Ribbon Gift Wrapping
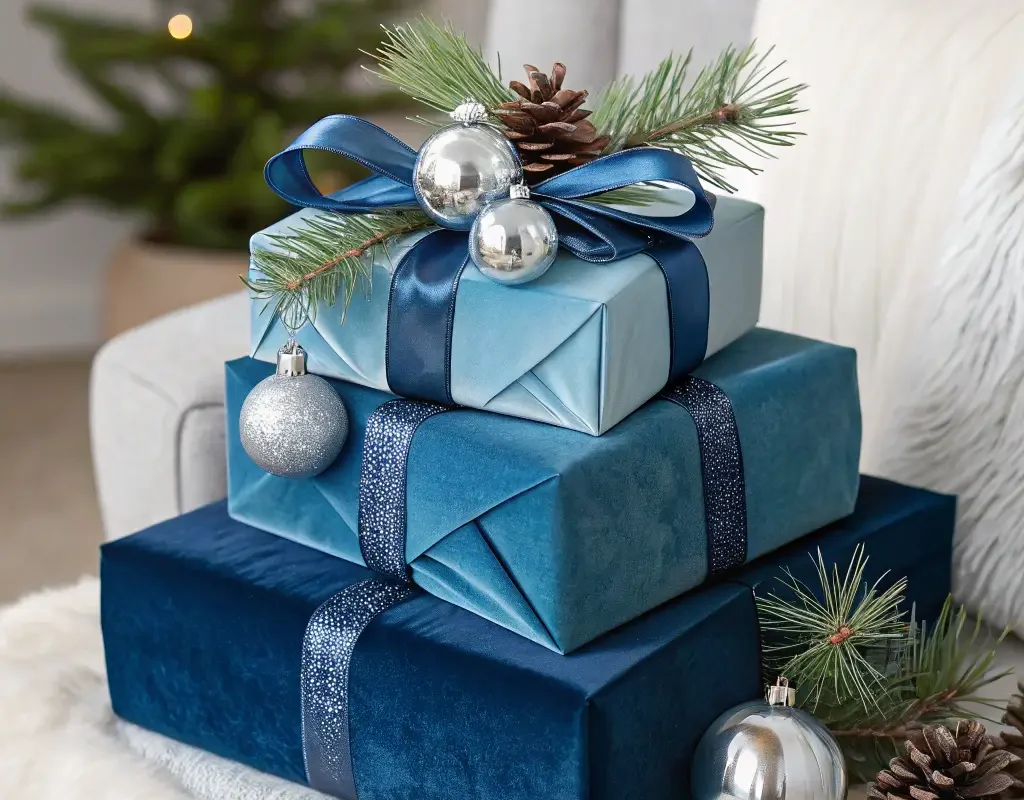
Let’s talk about something that makes me irrationally happy – perfectly wrapped presents. And nothing, I mean nothing, elevates gift wrapping like luxurious blue velvet ribbon. It’s that little detail that makes people not want to open their gifts (mission accomplished, IMO).
The first time I used velvet ribbon, I thought I was being extra. Then I saw how people literally gasped when they saw the presents under the tree. Now it’s my signature move.
Choosing Your Wrapping Foundation
Your ribbon is the star, so keep the wrapping paper simple:
- Kraft paper for that rustic elegance
- White or silver paper for classic sophistication
- Navy paper with blue velvet ribbon in a lighter shade for monochromatic chic
Skip the busy patterns. You want the ribbon to be the focal point, not compete with candy canes and reindeer.
Ribbon Techniques That Impress
Forget basic bows. Here’s what actually looks professional:
The Classic Crisscross: Wrap ribbon around the box both ways, crossing underneath. Tie a simple bow on top, but let the tails cascade naturally. Cut the ends at an angle for that polished look.
The Diagonal Wrap: Start at one corner, wrap diagonally across to the opposite corner. This creates movement and looks super modern.
The Layered Look: Use two different widths of blue ribbon – a wider velvet base with a thinner satin or metallic ribbon on top. This adds dimension without effort.
Add small embellishments to the bow center:
- Silver jingle bells
- Mini blue ornaments
- Sprigs of silver-painted eucalyptus
- Vintage brooches (thrift stores are goldmines for these)
Frozen Blue Table Setting Elegance
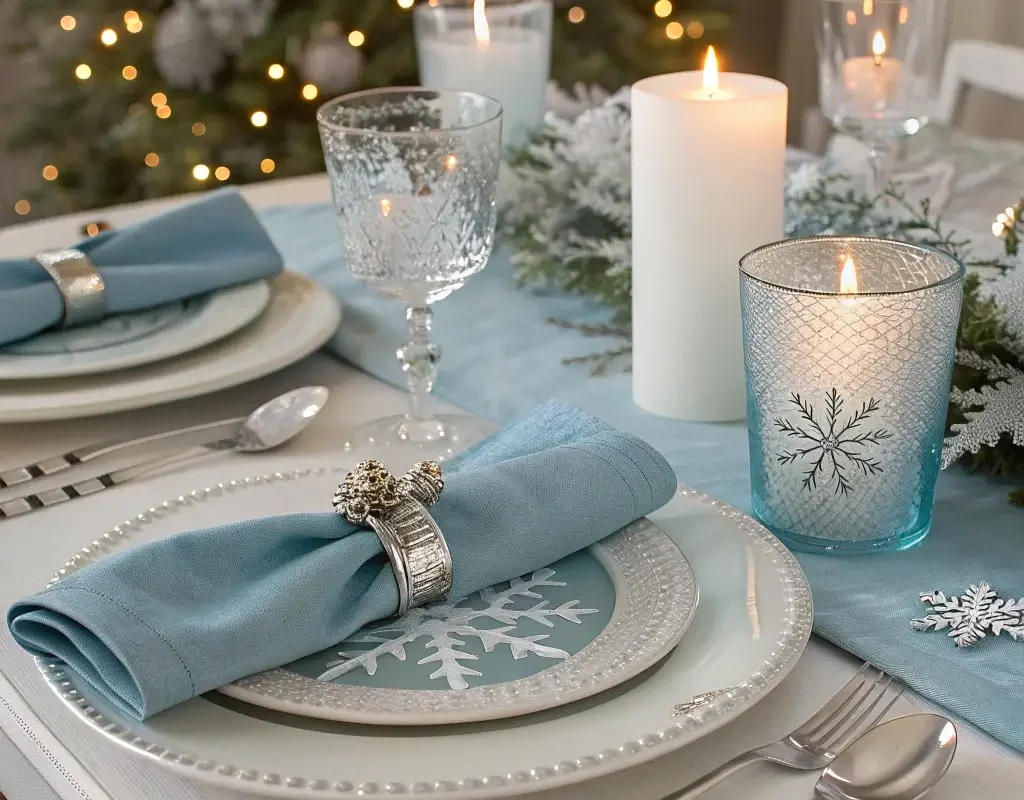
Creating a frozen blue table setting makes every meal feel like a special occasion. Whether you’re hosting Christmas dinner or just want your Tuesday night pasta to feel fancy, the right table setting changes everything.
My most complimented holiday dinner ever featured an all-blue tablescape. People literally took photos before sitting down. Did it take hours to set up? Nope – maybe 30 minutes once I knew what I was doing.
Foundation Elements
Start with your base layers and build up:
- Tablecloth or runner – go for icy blue linen or silver with blue undertones
- Charger plates – silver or navy blue creates instant elegance
- Dinnerware – white plates let the blue accents shine
- Glassware – blue-tinted glasses or crystal with blue stems
- Napkins – navy blue cloth napkins feel so much fancier than paper
Centerpiece Magic
Your centerpiece pulls everything together. Here are three options that always work:
Option 1: The Linear Look
Create a runner down the table center using:
- Blue glass votives at varying heights
- Silver pinecones
- Blue ornaments scattered between
- Battery-operated fairy lights woven throughout
Option 2: The Statement Piece
One large focal point:
- Tall blue glass vases with silver branches
- Surrounded by smaller coordinating elements
- Less cluttered, more dramatic
Option 3: The Individual Touch
Mini arrangements at each place setting:
- Small blue bud vases with single silver stems
- Personal and Instagram-worthy
- Guests can take them home as favors
Don’t forget the details that matter:
- Blue ribbon tied around napkins
- Silver and blue confetti scattered on the table
- Place cards with blue calligraphy
- Blue rim on the wine glasses (sugar rim tinted with food coloring)
Blue Pinecone Garland Charm
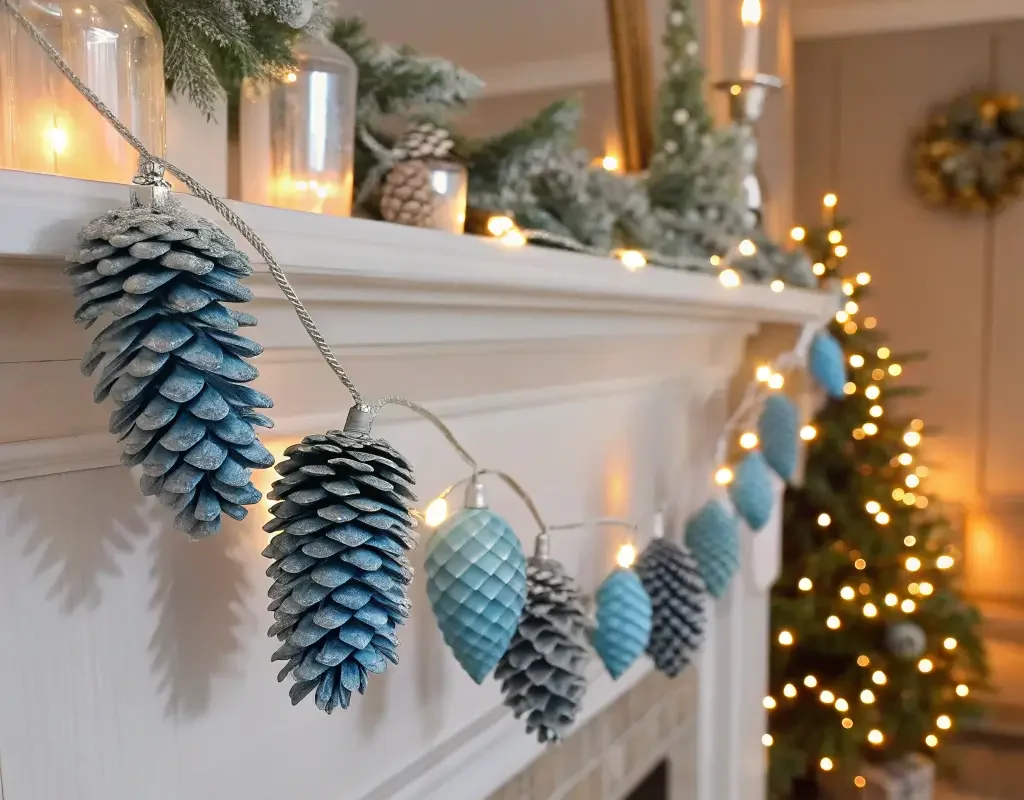
Want something that looks expensive but costs basically nothing? Enter the blue pinecone garland. I stumbled upon this idea when I had a bag of pinecones and leftover blue spray paint. Best accident ever.
This garland works anywhere – mantel, staircase, doorway, even wrapped around a mirror. It brings nature indoors but with that magical twist that makes it special.
Pinecone Prep Work
First, you need to prepare your pinecones properly (learned this the hard way when bugs crawled out of mine mid-party):
- Bake them at 200°F for 30 minutes to kill bugs and open them up
- Let them cool completely
- Brush off debris with an old toothbrush
Now for the fun part – painting them:
- Spray paint in various shades of blue
- Paint just the tips for an ombre effect
- Add glitter while paint is wet
- Mix in some silver and white cones for variety
Assembly Secrets
Creating the actual garland is easier than you’d think:
Materials needed:
- Painted pinecones (obviously)
- Heavy-duty twine or ribbon
- Hot glue gun
- Optional: fairy lights, blue berries, silver leaves
The process:
Attach pinecones to your base (twine or ribbon) using hot glue. Space them evenly but not identically – nature isn’t perfect. Alternate colors and sizes for visual interest.
Weave in battery-operated fairy lights for evening ambiance. Add artificial blue berries or silver leaves between pinecones for fullness. The key is making it look effortless and organic, not forced or symmetrical.
Also Read: 15 Simple Apartment Christmas Decor ideas and Easy DIY Touches
Soft Blue Fairy Light Corners
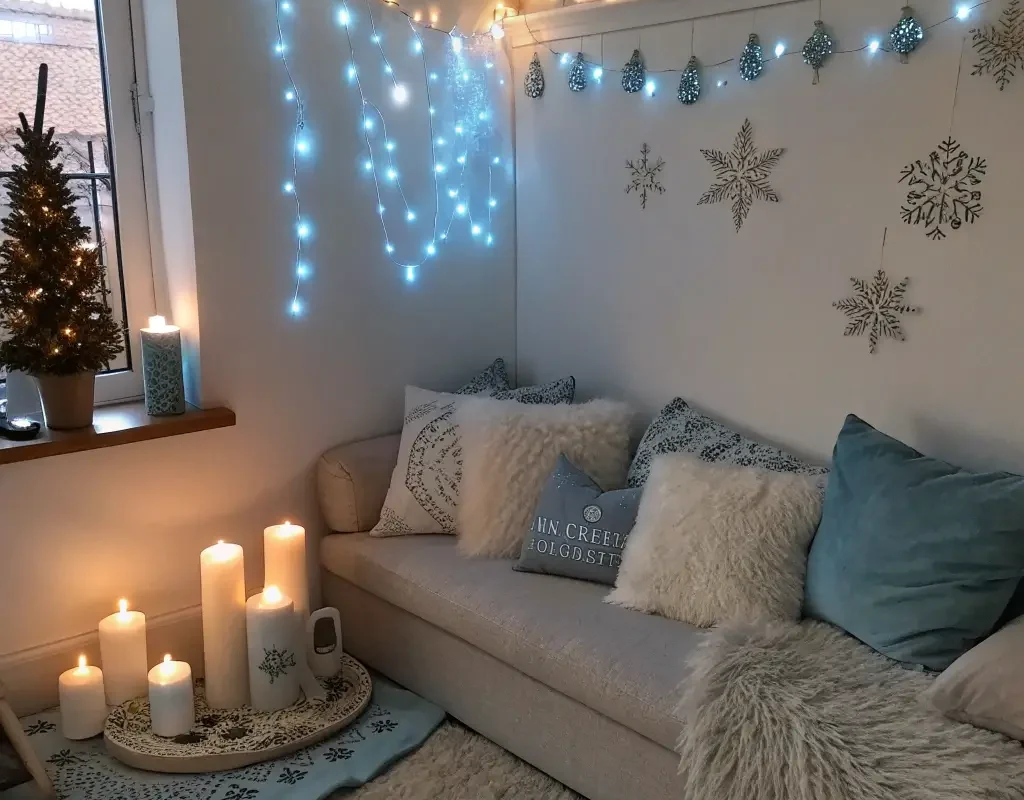
Let’s end with something magical – soft blue fairy light corners. These transform forgotten spaces into cozy holiday nooks that make your whole home feel enchanted.
Every room has that awkward corner that you don’t know what to do with. Mine was behind a chair in the living room. Now? It’s everyone’s favorite spot for holiday selfies.
Creating Ambient Magic
The secret to amazing fairy light displays is layering different types of lights:
- String lights for the base glow
- Curtain lights for dramatic backdrop
- Battery-operated branches for structure
- Projection lights for moving effects
Start with your main light source – usually string lights. Don’t just hang them in straight lines (boring!). Create swoops, clusters, and varying heights. Mix warm white with blue lights for depth.
Styling Your Corner
Here’s my formula for the perfect lit corner:
Base: Place a small table, stool, or even stack of vintage suitcases
Lights: Drape from ceiling to floor in waterfall effect
Accents: Add blue glass bottles, silver branches, or mini trees
Comfort: Include a blue throw pillow or blanket
Final touch: A mirror to double the light effect
Want to know the best part? These corners photograph beautifully. Your Instagram game will thank you. Plus, they create the perfect reading nook when you need a break from holiday chaos.
Power Solutions
Nobody wants to see ugly cords everywhere. Here’s how I handle it:
- Battery-operated everything when possible
- Command strips to guide cords along baseboards
- Cord covers painted to match your walls
- Power strips hidden behind furniture
- Timer outlets so lights turn on automatically at dusk
Wrapping It All Up
So there you have it – 10 blue Christmas decor ideas that’ll transform your home into that Pinterest-perfect wonderland you’ve been dreaming about. The best part? You don’t need to break the bank or hire a professional decorator to achieve these looks.
Remember, decorating should be fun, not stressful. Start with one or two ideas that really speak to you. Maybe it’s the ombre wreath that catches your eye, or perhaps you’re dying to try those DIY glass ornaments. Whatever you choose, make it your own.
The beauty of blue Christmas decor is its versatility. It works with modern minimalist homes, traditional spaces, coastal cottages, and everything in between. Plus, unlike some trendy color schemes that look dated by next year, blue is timeless. Those decorations you create this year? You’ll still love them five years from now.
Don’t be afraid to mix different shades and textures. Combine that midnight blue velvet with icy blue glass. Mix matte and metallic finishes. Add natural elements like pinecones and branches to keep things grounded. The contrast creates visual interest that makes people want to look closer.
And hey, if your mother-in-law gives you the side-eye about abandoning traditional red and green, just smile and hand her a glass of wine. Once she sees how stunning your blue winter wonderland looks, she’ll be asking for decorating tips. Trust me on this one.
Happy decorating, and may your holidays be merry, bright, and beautifully blue! ✨